Friday, April 29, 2011

Step by Step: How to Re-create Princess, Dutchess Kate Middleton's Wedding Makeup!

Photo Credit: http://celebrity-gossip.net
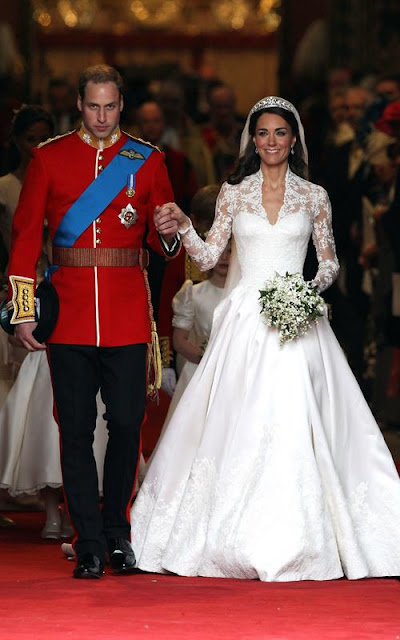
Kate Middleton looked absolutely beautiful on her wedding. From her simple, and elegant dress - to her brunette locks and her glowing complexion.

Keep Reading to re-create Kate Middleton's Bridal look yourself!

Like many of you may of already read on various social media sites, Kate decided on doing her very own makeup for her wedding, after she had taken a few makeup lessons from renowned makeup artist Arabella Preston.

She kept her makeup simple and sophisticated. She went for a subtle smokey eye, pinked coral cheeks and a nude lip.

To Get Kate Middleton's Look:

You can tell by photos that Kate takes wonderful care of her skin. Her overall complexion is very even and radiant, and she doesn't seem to have any visible blemishes. Because her skin doesn't need very much coverage, she can get away with a light foundation. Because it's a long day for Kate and she was being photographed and filmed, a foundation with a little bit more coverage than usual is most suitable for her. Nothing too heavy, but a foundation that won't budge much or get oily throughout the ceremony and one that photographs well.

A good foundation with medium coverage and a satin finish will look best. Matte foundations can sometimes make the skin appear dull, and foundations with a dewy finish can make your skin appear oily soon after it has been applied. Also, a foundation with very little to no SPF will suit you well, because foundations with higher SPF's can make your face appear pale in photos. You want to make sure your neck and face match.

Prep: To avoid looking dull, make sure your skin is well exfoliated. It's best to exfoliate 1-2x a week with a mild scrub, or with facial brush, exfoliation glove, etc. Exfoliating will buff away your uppermost dead skin cells, and your skin will appear more even and radiant. Make sure you skin is well moisturized before applying the foundation. You don't want anything too oily or heavy. I like using DDF Ultra-Lite Oil-Free Moisturizing Dew. Another alternative is Evian Mineral Water Spray, essentially, water in a can that sprays out in an ultra-light mist to "refresh" your skin - before and/or after makeup. To appear more radiant, you can apply a moisturizer that contains iridescent particles, such as MAC Strobe Cream. If you feel it is necessary, you can prime your skin. Primers generally help your foundation glide across your face easier, as it evens out your skin texture, thus giving your foundation a more even look. For this, I like using Hard Candy Sheer Envy Primer.

Concealer: Once your skin is prepped, you want to apply concealer to areas that need concealing. My favorite heavy duty concealer is Hard Candy Glamoflauge. With your fingertip, apply a tiny dot of concealer to any red marks/blemishes that need concealing. To blend, lightly tap the area with your finger or use a blending brush such as the MAC 224 Tapered Blending Brush or Sigma E40 Tapered Blending Brush for the softest finish. The next area that needs concealing is your under-eyes. Make sure your under eyes are well moisturized so your concealer goes on effortlessly. For severe dark circles, apply a corrector first such as the Bobbi Brown Corrector with your fingertips. Focus on applying it to the hollows of your eyes, rather than the area directly under your lash line, as too much can actually draw attention to your fine lines. Then, apply your concealer by putting a tiny dab on the tip of your ring finger and lightly pat it until it is blended. If you need more, apply a very light, second layer. Don't apply too much at once, as it can look cakey. To further blend your concealer, you can again, use a Tapered Blending Brush.

Foundation: Now, it's time for your foundation. MAKE UP FOREVER HD Foundation is an excellent choice for a foundation because it doesn't contain any SPF, and it photographs beautifully. There is also a wide variety of colors, so you should be able to find your correct color match. Shake the bottle very well and apply a pump in your clean palm, or a clean surface. Take your fingertip and dot the foundation on all areas of your face (cheeks, chin, forehead, nose). Then, take a foundation brush such as the MAC 187 Duo-Fibre Brush, MAC 130 Short Duo Fibre Brush or Sigma F80 Flat Top Synthetic Kabuki Brush and gently blend the foundation all over your face in small, circular motions. For a more precise application, and to get to small areas (around your brows, nose, hairline, etc) you can use a standard foundation brush such as the top rated Bobbi Brown Foundation Brush. Avoid applying too much foundation in areas that do not need coverage. Such as around your eyes, upper lip, between brows, etc. These are areas that tend to create dark shadows when too much foundation is applied. Focus on the areas that you need the most coverage, such as your cheeks & chin. If you need to go back to apply more foundation, you can lightly dip the tip of your brush in the foundation stipple it over the areas that need it, and again, blend. Once everything is blended, I personally like to go back with a clean,dry foundation brush and blend/buff it further for about a minute to ensure everything is well blended and to give my face a flawless finish. A brush that isn't very dense, such as a Duo-Fiber works great.

Setting Powder: Then, take a large powder brush, such as the Sigma F30 Large Powder BrushMAC Blot Powder and MAKE UP FOREVER HD Powder. Use the powder very sparingly to avoid removing any radiance from your skin. Guerlain Meteorites is also a beautiful powder that will make your skin glow without looking powdery.

Bronzer/Contour Powder: Kate's skin has a very subtle bronze glow. To achieve this, take a natural, matte bronzer and with a small blush or contour brush, such as the Sigma F40 Large Angled Contour Brush and apply a very light dusting of bronzer, starting at the highest point of the hollows of your cheeks and bringing the color through your hollows, stopping at the apples of your cheeks. Then, bring the bronzer up your temples and forehead, blending it into your hairline. This will make your face appear slimmer and more sculpted. A good matte bronzer to use is NYC Sunny Bronzer or Benefit Hoola. The reason to use a matte bronzer opposed to a bronzer that contains shimmer is because any shimmer will highlight (draw light to) a certain area. We are trying to "contour" by creating shadows (removing light from areas).

Blush: Kate wore a beautiful pinked coral blush with a warm undertone to her cheeks for a healthy, pink glow. With a small blush brush, such as the ELF Studio Blush Brush, lightly swirl it through a pinked coral blush such as MAC Dainty Mineralize Blush or Benefit Bella Bamba and apply it to the apples of your cheeks. Then, dust off your brush with a napkin to remove any excess color and blend it upwards, so your bronzer and blush are merged into each other. If you made the mistake of applying too much, take your powder brush and lightly go over your cheeks.

Brows: Kate has strong, dark brows. They aren't at all overpowering or harsh outlined. To achieve her natural look, use a brow powder that matches your hair color. MAC Brun Eyeshadow (muted black brown) works great for deep, dark brunettes, MAC Espresso Eyeshadow (medium golden brown) works great for medium brunettes and MAC Cork Eyeshadow (light golden brown) works great for light brunettes and blondes. Use an angled brow brush, such as the MAC 266 Small Angle Brush and follow the natural shape of your brows. To soften the edges of your brows, clean off the brush and run it across the edges of your brows.

To check out two of my brow tutorials, go here or here.

Eyes: To recreate Kate's natural, smokey eye, first apply a very thin layer of an eyeshadow base with your fingers all over your lid to avoid any creasing of your eyeshadow. Urban Decay Primer Potion, MAC Paint Bare Canvas Paint or MAC Bare Study Paint Pot all work great. Then, take a champagne colored eyeshadow, such as MAC Shroom or MAC Naked Lunch and apply it lightly over your lid, stopping above your crease. Then, take a soft brown, such as MAC Cork and apply it lightly through and above your crease to create a light shadow. Extend it slightly outward past your eyes. Then, apply a glistening taupe, such as MAC Satin Taupe lightly through your crease. Apply a warm vanilla shade as a brow highlight, such as MAC Rice paper. Blend everything together with a soft blending brush so they aren't any harsh lines. My favorite blending brush is the Sigma E70 Medium Angled Shading Brush. It appears Kate lined her eyes with a deep shadow. It doesn't look quite black, it looks rather a matte charcoal. It also looks very precise, it doesn't look like she used a smudge brush - rather an angled brush (like the MAC #266 mentioned above for the brows). A great matte, charcoal shadow to use for lining the eyes is MAC Typographic. She lined her upper a bit thick, and applied it much thinner to her lower lash line. It also looks like she may of deepened the line with a black gel liner or black shadow.. such as Bobbi Brown Long Wearing Gel Liner in Black Ink or MAC Carbon Eyeshadow. You can tell the black line is extremely thin, and isn't too black. The emphasis is mainly on the thicker, softer charcoal shade she lined her top lash line with. You can take the same angled brush and lightly tap it across your lash line as close as possible to your natural lashes with the darker product. A light coat of waterproof mascara will do, as she doesn't have much emphasis on her lashes. My favorite is Covergirl Lash Blast Mascara, as it is smudge proof.

Lips: Kate's lips look very natural and are lined with a warm, natural spiced pink lip liner, such as MAC Spice Lip Pencil and a glossy, natural pink lip gloss such as MAC Florabundance or Nymphette Lip glass.

Photo Credit: http://celebrity-gossip.net


Wednesday, April 27, 2011

Golden Glitter Nails with Love & Beauty Clear/Silver Nail Polish!


Swatches
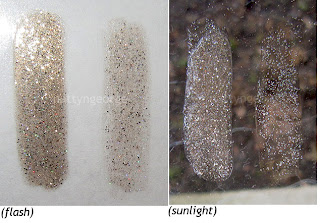
Clear/Silver (Unique name, right?) is a clear based polish with a very fine golden bronze & multi-colored (holographic) glitter and a larger silver glitter. The polish is very sheer with one coat, and the silver glitter stands out more than anything. With a few coats, the color deepens to a glittery golden bronze filled with silver flecks. It's a color that really stands out in the sunlight. 

The color looks a lot like MAC Reflects Antique Gold Pigment mixed with 3D Silver Pigment. 

I tested the polish out on my nails in a couple of different ways. Alone, over a taupe colored polish and over a black polish.

 Left to Right: Three coats of Clear/Silver, One coat of taupe/nude polish (Love & Beauty Camel) with one coat of Clear/Silver on top & One coat of black nail polish (Wet n Wild) with one coat of Clear/Silver on top.

The color is definitely too sheer to be worn with one coat, but I really like the way it looks when it is built with several. I also think it looks very pretty over the taupe and black.

I have terrible nails at the moment because one broke (the middle) all the way at the end, so I had no choice but to cut them all short. I will be doing an actual NOTD with this color soon - hopefully, i'll be able to capture the glitter better because the photos don't do this shade justice. It's much more of an eye-catcher in person.

Love & Beauty Nail Polishes can be purchased online and in-store at Forever 21.

Tuesday, April 26, 2011

Benefit Erase Paste Review, Photos and Swatches!

Benefit Erase Paste 

Benefit Erase Paste ($26) is a concentrated, creamy, blendable concealer that instantly brightens and camouflages all-in-one. It has an innovative formula which makes sure signs of stress and fatigue are a thing of the past.

The consistency of Benefit Erase Paste is quite different than any other concealer I've tried. You would think it would be similar in texture to your average pot concealer (MAC Studio Finish, NYX Concealer in a jar, etc). But, actually, it's what the name implies.. "paste". When you touch the concealer with your finger, instead of leaving a dent in the product, a small amount of product will stick to your finger. It's very thick and tacky, but very creamy.


I find that it requires a little work to blend into the skin, and a little does not go a long way. Because the product is very dense and thick, it doesn't smooth across my under eyes as well as I thought it would. I found this product works the best when it is dotted under my eyes and then blending it with light tapping motions of the tip of my finger. The "window washer" sweeping technique isn't as effective, and I found myself having to go back for more product. The finish is a bit dewy and can settle in your fine lines if you don't set it with powder.

Because of the products milky pink color, it works extremely well at brightening the under eyes. I found that my eye area looks much more illuminated when wearing this. I do have to mention that I was a little disappointed with the coverage. When I swatched the product on my hand when I was at UTLA, I thought that it was going to provide full coverage because of the product density. Once this concealer is blended under the eyes, it sheers out quite a bit. The coverage is definitely buildable to a heavy medium, but because of it's texture, when it's built some may experience a problem with it settling or caking. I didn't notice caking under my eyes, but I did notice it doesn't stay put/set well. I have to apply my foundation very carefully under my eyes after I've applied the Erase Paste or it will get swept away with the brush, and I'll end up having to apply more. I personally love using it in conjunction with another concealer. I've tried it under (as well as on top) of Hard Candy Glamoflauge and the end result is 100% coverage with a brightening effect.

Monday, April 25, 2011

Winner of my Shabby Apple Dress Giveaway!!

I would like to thank my readers for entering my giveaway! I loved reading all of the things you're excited about this upcoming summer! I apologize that this giveaway was for US residents only, but I should be having another giveaway very soon that is available worldwide. As always, I'd like to thank you all for reading my blog, commenting and supporting me! I always read your comments, even if I don't get a chance to respond.. I really appreciate them! So, thank you, thank you!!

I'd also like to thank Shabby Apple for sponsoring this giveaway! Shabby Apple is an awesome site, and if you're interested in purchasing anything, my discount code is still in effect. 


Now, onto the winner of the giveaway...

I used Random.org to randomize all of the entries through their "List Randomizer" and picked the winner out through the "True Random Number Generator". The winner was #21 on the list, and that is.. PALOMAORTIZ! Congratulations, I'll be e-mailing you shortly!

Here is the list for reference:

Thanks again, everyone!

Sunday, April 24, 2011

Shopping Haul! ALDO Handbag, Forever 21 Shoes & More!

Hey Everyone!
I did a little shopping Friday with my bestie and thought I'd post a haul to share what I got! I didn't buy any clothes though, with the exception of a couple items. I am happy though, I now have a spring/summer bag and a pair of heels to wear.

ALDO Tellis Handbag (in the color bone) $40
(click here to view on the website)
I always know that Aldo has cute handbags that aren't very pricey. I typically get my bags from Marshall's/TJ Maxx or retail stores such as Macy's and Lord & Taylor, but I didn't have enough to splurge on anything too expensive. I thought this bag was adorable. I love the color- at first sight, I thought it was pink, but at a closer look it's a light, blushed tan. I'm also a sucker for tassels. I think they are totally chic. Also, you can wear this bag on your shoulder with the longer, detachable strap, or on your arm like a satchel.
This is my BFF modeling my bag last night.. haha. Her shoes, pants, and sweater were all purchased from Forever 21 yesterday. I love the pants.. I was going to buy them as well.. but she said she'd share hers with me whenever I want to wear them. (Sure! Let me lose 20 pounds first.. haha)

Forever 21 Distressed Leatherette Cutout Heels $28.80
(view here on the website)
I loved these sandals at first sight. The laced up front automatically made me think of the gorgeous Christian Louboutin "Miss Fortune" Sandals that are often seen on the Kardashian sisters. I also love the "distressed" brown faux leather and the platform heel. Faux leather shoes never usually work out for me, but I have pretty good luck with Forever 21 shoes. 

Forever 21 Accessories
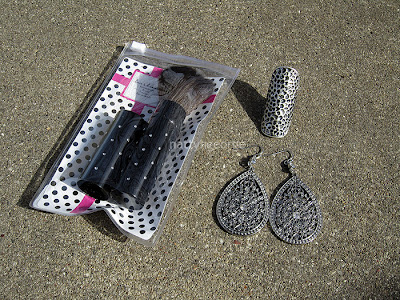
Jeweled Retractable Makeup Brush $3.80 (here), Dimpled Knuckle Ring $3.80 (here) & Filigree and Rhinestone Teardrop Earrings $2.80 (here).

I thought the brush would be useful for tossing in my handbag without worrying about staining the lining. The bristles are actually very soft (not very dense) and it works well for powder or blush/bronzer.

It's actually surprisingly comfortable and doesn't bother me at all after wearing it all day.

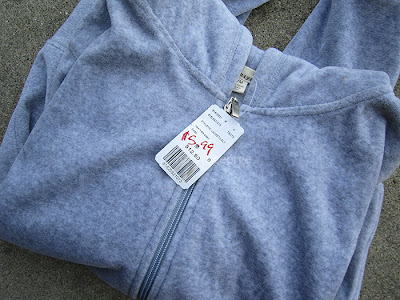
 Clearance zip hoodie $5.99.
I can always use a plain hoodie for lounging.

H&M Accessories
Polka Dot Umbrella w/ Ruffles $9.95, Necklace $3.95
It was raining terribly, so I decided to purchase an umbrella. I thought the ruffles were totally cute and girly.

Cami $5.95, Cotton Stretch Mini Skirt $5.95

The cami is my favorite color.. it's like a pale tan-pink. It looks very pretty with the black trim, and I can probably get a lot of use from it. The skirt was a great deal, and I figured it's a good thing to have. I will have to exchange the skirt though, because I (and my friend) found that it runs large. I purchased a med, and I need a small - and my friend purchased a small and needs an x-small.

That's it for my haul! Have you purchased any goodies lately that you're excited to wear?

Saturday, April 23, 2011

NOTD: Color Club Revvvolution (OPI My Private Jet's Fraternal Twin) + Comparison!

Two (2) coats of Color Club Revvvolution & One (1) coat of Sally Hansen Insta Dri Top Coat.
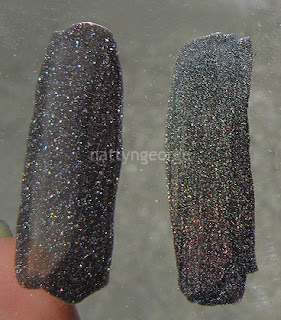
Color Club Revvvolution is a glossy gunmetal with a fine holographic shimmer. Indoors (in dim lighting) the color appears as a gunmetal-black with fine silver shimmer. The holo is definitely noticeable, but it's when your nails hit the sunlight, the rainbow holo shines in all it's glory. What I love about this polish is that it's not your mediocre black that contains holographic glitter. When this color is painted on you nails, it paints a sheet of holo on your nails. Your whole nail has the holo effect, not only just the glitter. (Hard to explain, but do you know what I mean? Basically, the glitter isn't the star of the polish. The polish is the star.) Also, the formula is great. It's a little thick though, but dries fairly quick and is opaque with one coat.

Some compare this to the very difficult-to-find OPI My Private Jet, the ORIGINAL version. The original "MPJ" was a beautiful black/gunmetal filled with holographic shimmer. Then, the formula changed to the one I have. Many reviewers hated the new formulation of MPJ, but it's actually one of my favorite polishes. Of course the original was amazing, and I've hoped for over a year to score a bottle at some point, but Color Club Revvvolution comes as a close dupe.

Comparison
Left: OPI My Private Jet, Right: Color Club Revvvolution
Top: Color Club Revvvolution, Bottom: OPI My Private Jet
Swatched on clear tape, Left: OPI My Private Jet, Right: Color Club Revvvolution
What's obvious about Revvvoluion in comparison to MPJ is it has a true holo effect, while MPJ falls short. MPJ has less shimmer, and has a combination of micro-fine glitter and chunkier glitter. Revvvolution has purely micro-fine glitter. Revvvolution also appears a bit lighter in color - more pewter, whereas MPJ appears more black. Also, MPJ has that funky reddish purple pearl to it in the sunlight. 

I purchased my bottle of Color Club Revvvolution on eBay for around $6.

Thursday, April 21, 2011

Final Thoughts: Ardell Brow & Lash Growth Accelerator Treatment Gel! + Photos!

This past Monday marked my fourth week of using the Ardell Brow & Lash Growth Accelerator Treatment Gel. Each week, I've posted photos of my progress and wrote about the changes I've noticed in my lashes.

I was pretty consistent throughout the weeks of applying the treatment generously to my lashes before bed. It never seemed to irritate my eyes until I reached my final week. By that time, the product had turned gray from any mascara residue that may of been on my lashes and there was barely any left in the tube. My eyes started to water as soon as I applied the product and as soon as I would wash my eyes in the morning. This didn't happen till the final week, therefore in my final week I wasn't consistent with applying it. I applied it maybe 3-4 days out of the week. The previous weeks I was applying it 5-7 days, sometimes twice a day. Possibly because I wasn't as consistent, I saw little changes. But, I'm still very happy with the product overall.

Week 4 Photos:
COMPARISON

Week 1 Photos: 

Let me briefly go over the changes I've noticed week to week.
Week 1: At the end of week one, I noticed a definite change in the length of my lashes. It wasn't anything dramatic, but I could tell when I applied my mascara that my lashes looked longer. 
Week 2: At the end of week two, I am noticing more and more that my lashes did indeed grow in length. I couldn't tell if they were any longer than they were at the end of week 1, but I could tell they were indeed longer than when I started using the treatment. I also am noticing that I have a lot of new growth - and areas where I had lashes missing, are filling in nicely.
Week 3: At the end of week three, I didn't notice any further lengthening than the previous weeks. I do notice that both my top and bottom lashes are thicker from the new growth. I also noticed that my bottom lashes are more sparse.
Week 4: At the end of week 4, I didn't notice any further lengthening than the previous weeks. I can't tell if I have any new growth of lashes, but I think there are little changes since week three. Any new growth has grown out now, and I'm very happy!

Overall, using the Ardell Brow & Lash Growth Accelerator Treatment Gel helped bring my lashes to the condition they are supposed to be in. They have a little "give" now when I touch them with my finger tips, so I'm convinced it helped strengthen my lashes. I was hoping my lashes would be a bit stronger, but perhaps they will with continued use. I would be able to push another week or two out of the tube, but like I mentioned, because it was near the end, it started irritating my eyes. My lashes are slightly longer and I have many more lashes than I had prior to using this product. I do believe this product is a great lash conditioner to keep your lashes in good shape. I would recommend this product if you use harsh makeup removers on your eyes, if you use waterproof mascara, if you wear lash extensions or wear false lashes often - anything that can damage or cause your lashes to fall out, and you need a product that will help grow your lashes back & keep them conditioned. This product isn't anything like Latisse, as my lashes haven't grown much in length, but my results with mascara are SO much better than they were before. I literally use to apply my mascara for 5 minutes to build my lashes to the desired length/volume. Now, I can apply my mascara in about a minute, with better results. This is a fantastic product for the low price!

Now that I'm finished with this product, I'm going to try something new. I'm thinking of picking up the L'Oreal Lash Boosting Serum. Thoughts??

Wednesday, April 20, 2011

MAC Coppertone Blush Review, Photos and Swatches!

mac coppertone blush review

MAC Coppertone Blush

MAC Coppertone Blush is described as a peach-brown with a matte finish. It's a blush that you really don't hear much about, and I'm not sure why, because it's such a gem! 

Coppertone and Me go way back - in fact, it's the first MAC Blush I ever purchased. I remember walking into Macy's and swinging by the MAC counter when I was around 17 or 18 years old. I was pretty obsessed with self-tanning at the time, and was looking for a shade that would compliment my faux bronzed skin. Coppertone immediately caught my eye and I knew it'd be a perfect match for me. I wore it daily for quite some time (it's probably my most used MAC blush) and years later, I'm still loving it.

On my cheeks, it's such a natural slightly rosy, deep peach. It gives my face such a natural sunkissed color.

mac coppertone blush

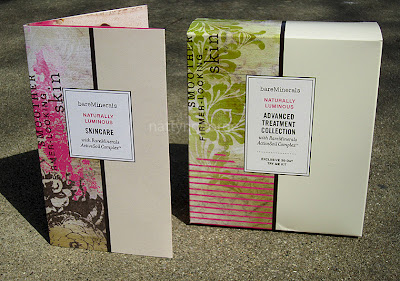
Bare Minerals Naturally Luminous Advanced Treatment Collection with RareMinerals ActiveSoil Complex

Introducing a more youthful-looking you! The bareMinerals Skincare Advanced Treatment collection is a perfect way to introduce the Naturally Luminous Skincare line. This collection provides three advanced, targeted treatments for youthful, healthy-looking skin. All of the formulas are powered by 100% pureRareMinerals Active Soil Complex for extraordinary skin-renewing benefits, including cell renewal and antioxidant protection. From Bare Escentuals.

The Advanced Treatment Collection includes:
2 fl oz Purifying Facial Cleanser
0.5 fl oz Wrinkle Concentrate
1 fl oz Extra-Firming Neck Cream

This kit retails for $36 on QVC.com. (To be redirected, click here)

Bare Minerals Naturally Luminous Purifying Facial Cleanser
 
"This gentle cleanser transforms into a light, creamy texture to remove makeup, dissolve impurities, and rebalance skin for a soft, smooth complexion. The 100 percent pure RareMinerals ActiveSoil Complex powers this product, leaving skin feeling perfectly clean, hydrated, and with a naturally luminous glow. Plus, it's gentle enough for eye makeup removal."
  
Bare Minerals Naturally Luminous Wrinkle Concentrate
"Virtually diminish lines and wrinkles with this instantly hydrating treatment powered by a combination of 100% pure RareMinerals ActiveSoil Complex and skin-revitalizing peptides. This intensive concentrate smoothes skin texture immediately, while our proprietary complex revitalizes cells, revealing renewed, more luminous skin."

Bare Minerals Naturally Extra Firming Neck Cream
"Firm, tighten and improve skin texture and smoothness with this naturally luminous, extra-firming neck cream that targets the special needs of the delicate skin around the neck and decollete. Powered by our proprietary, 100% pure RareMinerals ActiveSoil Complex, this clinically proven, all-in-one cream locks in moisture to restore a youthful, lifted look and helps defend against daily environmental stressors."

Thoughts: Considering I'm 22, I don't really need a neck cream or wrinkle concentrate - So, I'm letting my mom use the neck cream daily and having her report back to me her thoughts about it. I've been using the cleanser every day though for about a week and I really like it. It lives up up its claims, as it's very gentle and takes off every trace of my makeup and eye makeup, without irritating my eyes. Afterward, it leaves my skin feeling very fresh. It reminds me a lot of Cetaphil's Gentle Cleanser, as the consistency is similar and it doesn't lather like a soap. I actually prefer using the Bare Minerals Cleanser, as it does a more efficient job of removing my makeup, and it's just as gentle. As for the wrinkle concentrate, it's lightweight, absorbs very quickly without feeling or looking greasy. You can easily apply it as you walk out the door with no worries of shine - I love that it doesn't "sit" on top of the skin. The texture of the concentrate feels very creamy and buttery in between my fingers and leaves my fingertips as soft as can be. (I love when creams do that for some reason) It's also the case for the neck cream. It's slightly thicker than the wrinkle concentrate, but it's not even close to being heavy. Again, this absorbs quickly and doesn't feel thick, sticky or greasy. In comparison to the wrinkle concentrate, it feels a bit more moisturizing. All of the products have a faint, spicy, lemony scent. Kind of like the scent of a antibacterial towelette. It's light, so nothing I find offensive. 

I will update you with my thoughts by the end the month. Overall, I think this kit is a very good value for all three products. The kit should last a full month, so that's around $12 per product. This kit also has rave reviews on QVC and is quickly becoming a best seller.

If you have tried any of these products, share your thoughts in the comments below!

Disclaimer: The products mentioned in this post were provided to me by QVC for consideration. I am in no way affiliated with the brand mentioned.

You can find this necklace at Aldo...

Hey Everyone!

Back in February, I posted a photo of myself wearing this long beaded necklace, and I received several messages where I purchased it. I own two of them, one is green and one is light blue. I purchased both of them from a trendy, wholesale store in Chicago (not sure of the name, but it's on Clark & Wilson) and the selection of items always change. I searched online, as well as ebay for similar styles and couldn't find any. 

So, today when I was browsing aldoshoes.com, I found the exact necklace!
 Yes, it's silver and not gold - but it's the exact same necklace. So if you were interested in purchasing it, you'll be able to find it at Aldo. Click here.


Monday, April 18, 2011

SHABBY APPLE DRESS GIVEAWAY!!!!!!

Shabby Apple is an awesome site that specializes in Women's dresses. They have a large selection of dresses, all of which are simple, yet elegant and classy. Shabby Apple has a variety of "The Little Black Dress", Vintage Inspired, Sophisticated dresses - suitable for the workplace as well as various fun summer/spring styles. What's also great about Shabby Apple is that they offer Plus size options as well as Maternity and Little Girl Dresses.

Not only does Shabby Apple carry dresses, but they also have a selection of fashion jewelery, shoes, swimsuits, aprons and more!

**GIVEAWAY**
Shabby Apple was kind enough to sponsor a giveaway for my readers for the chance to win the beautiful vintage inspired, MOON RIVER dress. *This giveaway is eligible for US Residents only!
Moon River, retail price $92
Details about the dress:
"Bring back nostalgia for the beautiful jazz age in Moon River, a sultry silver frock with stunning details.  Carefully constructed from stretch sateen, the Moon River boasts a high, wide boat neck, fitted bodice,and cap sleeves.  The slightly tapered skirt descends from a bouquet off our flouncy ruffles at the low waist, and falls to the knee. Belted,bedecked with a long strand of pearls or left as a stand-alone statement, Moon River has potential to inspire romantic flashbacks wherever you wear it." - shabbyapple.com 

If you would like to see more photos & information about this dress, view the product page by clicking here.

Rules to Enter:
1) You must be a follower of my blog
2) As with any giveaway, you must be 18 or older - If you are under 18, you must have permission by a parent or guardian to enter.
3) You must be a resident of the US to enter, as Shabby Apple only ships to the US. (I apologize to international users)

How to Enter:
1) It's pretty simple! If you are interested in winning this dress, post in the comments below what you are looking forward to the most about summer! 
  2) Include your e-mail address in your comment so I can contact you once you've won.
That's it!

This contest starts now and ends Sunday April 24th at 11:59 EST. One winner will be announced Monday, April 25th. I hope you all will enter! Good Luck!

Also, for a limited time, my readers can save 10% off all orders made! 


Monday's FOTD!


 I'm wearing Laura Mercier Silk Creme Foundation again (I keep skipping between different foundations) because I'd like to post my review for it soon. This would be my fourth time wearing it. The past three times, I haven't used a setting powder - So I know how well it wears without one. Today, I wore setting powder all over my face so I can test out how well it wears throughout the day with powder. I'll probably wear it again once more tomorrow and let you know what I think of it.
 
Face:
DDF Advanced Moisture Defense spf 15 applied to my face for moisture & sunscreen
Hard Candy Glamoflauge Concealer in Medium applied in light, tapping motions to my under eyes, around nose, under brows and blemish marks on my cheeks with a small, standard foundation brush
Maybelline Fit Me Concealer in #20 applied under my eyes to match my skin better, blended in with my MAC 224 brush
Laura Mercier Silk Creme Foundation in Bamboo Beige applied by dotting the foundation all over my face with my finger, and then blending it in with my MAC 131 brush. Then, I further buffed my face in circular motions with my Sigma Duo Fibre F50 brush.
Ben Nye Neutral Set/Ben Nye Banana Visage Powder (a 50/50 mix) applied to my under eyes to set my concealer and applied lightly all over my face with my Sigma Large Powder F30 brush
Guerlain Meteorites in Beige Chic applied lightly all over my face, again with my Sigma Large Powder F30 brush
MAC Golden Bronzing Powder applied to the hollows of my cheeks and extended up my cheekbones
Bobbi Brown Pale Pink Powder Blush applied to my cheekbones & apples of my cheeks
MAC Fix Spray a light spritz all over my face, so it wouldn't look too "dull" and powdery

Brows:
ELF Brow Kit in Medium
MAC Brow Set in Girl/Boy

Eyes:
Mark. Metro Eyeshadow all over my lid (From the Urban Neutrals Flip For It Palette) A basic frosty champagne shade - similar to MAC Grand Entrance
MAC Sorcery Eyeshadow applied to my upper and lower lashline with an angled brush, as well as the outer V of my crease
MAC Pink Venus Eyeshadow applied on my lower lashline near my tearducts, making Sorcery appear as a pinked lilac
Covergirl Lash Blast Mascara in Very Black
Ardell Long Flare Individual Lashes I applied 2 clusters to the outer edge of my top lashline to make my lashes extend further out

Lips:
MAC Pale Lip Erase
Revlon Colorstay Lipliner in Natural
Revlon Colorstay Mineral Lipglaze in Perennial Pink #538 

Bobbi Brown Pale Pink Powder Blush & Guerlain Beige Chic Meteorites are both products I received in the mail this morning from swaps. I have really been interested in trying Meteorites, so I'm excited to finally own some. I'm not sure what I think of them yet, as they are extremely subtle.. I'll have to see throughout the week.


Also, someone asked me on formspring if I can post where I purchased/what brand is the clothing I am wearing when I post FOTD's. Today, I'm wearing small pink rose earrings from Forever 21, A pale pink tank top with a satin black bow from Forever 21, a black hooded "flyaway" jacket from Express & light, distressed skinny jeans from Express (not visible in photos).

I don't mean to take so many photos, but again, it was asked if I can post more photos when I'm posting FOTD's. :)

Hope you all have a wonderful day! It's a little chilly here in Chicago today.. it has been so nice all week, as you can tell, I've been taking my photos outside lately. I've been loving it!!