Showing posts with label fotd. Show all posts

Wednesday, October 23, 2013

Face of the Day Walk-through | Full Coverage Face & Soft Eyes


You can call me a ride-or-die medium coverage kind of chick. I've tried countless foundations - many of which I loved and some.. not so much. The ones I love all share a common factor - they all have a solid medium coverage. That basically means that the coverage is somewhere in-between light and full - A medium coverage will even out skin discolorations, cover blemishes, yet the foundation only looks like a silky veil on the skin rather a mask, and sometimes, my freckles, sunspots and sometimes even a little redness will slightly shine through. I actually kind of like that - it gives the illusion of clear skin, while not erasing every single spot.

But of course, I love switching it up and sometimes I really like an airbrushed, blemish-free face. Recently, I've been enjoying wearing a full coverage face, especially on nights out when I really want my makeup to hold up for several hours. Light and medium coverage foundations can break down a bit with sweat, etc, but when I bust out my heavy duty full coverage makeup, I know that my makeup isn't going anywhere all night. I'm going to take you through a quick run through of what I've been wearing lately.


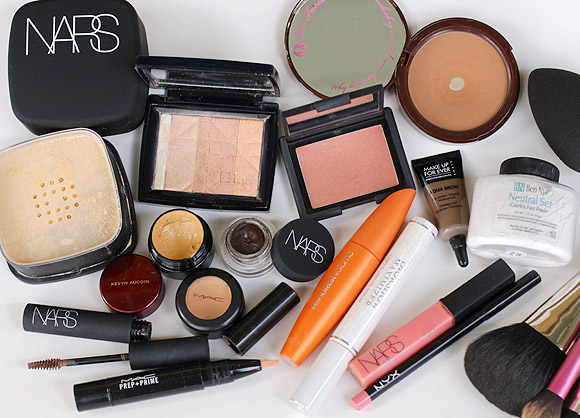
I like to start out with applying a water based moisturizer to my entire face as it will allow my makeup to spread and blend effortlessly without looking dry or cakey. I always apply a moisturizer liberally to my under-eyes so the skin under my eyes will look rejuvenated, giving the illusion of well rested eyes. My favorite full coverage concealer is MAC Studio Finish Concealer. I like applying it with my middle or ring finger and tapping/patting the product (not wiping) to blend.

Kevyn Aucoin Sensual Skin Enhancer has been my go-to full coverage foundation. It's an incredibly dense, tacky cream and you only need the tiniest bit for the whole face. I like to dot it on each area of my face, and then with a damp Beauty Blender sponge, spread and pat the foundation into my face until it's completely blended. If I want my face to look really perfect, I'll add a second thin layer.

Now, with full coverage foundations, you need to pop some dimension back in your face as an opaque coverage can flatten the face and make the natural contours less apparent. I love using MAC Prep + Prime Highlighter and applying it under my eyes and down the bridge of my nose and blending it out with a beauty blender. It really brightens up the face and gives more of a structured look.

I always set my under-eyes with Ben Nye Neutral Set Powder, which has been my favorite under-eye setting powder for years. I love that once I apply it, it really locks my concealer in and makes it budge-proof until I remove my makeup. Creasing and setting is never an issue. If I want a seriously opaque, Kim K kind of under-eye, I'll take a sponge and pat some MAC Studio Fix Powder under my eyes. For the rest of my face, I've been really enjoying NARS Loose Powder. It adds a hint of additional coverage, while softening the look of the skin, making the face look virtually perfect.


The skin is now a blank canvas, so I like adding some warmth into my skin and at the same time exaggerating the natural contours of my face. I've been loving Too Faced Chocolate Soleil Bronzer because it's a med-dark brown matte bronzer and mimics shadows really well. If you have very pronounced features, it's not really necessary, but for those with a fuller face, it can work wonders. With a small contouring brush I like to apply the bronzer below my cheekbones and blend upward, as well as up my temples and forehead, and all around the outer edges of my face. I like going back with my powder brush to further blend any areas that look too harsh.

Then, I like popping a little color on my cheeks. I chose NARS Lovejoy Blush - a lovely shade of rosy-bronze that is a very flattering every-day shade for warm skin tones. After I've applied my blush, I'm going to apply a highlighter with my fingertips across the highest points of my cheekbones. I used Dior Amber Diamond, a subtle ultra fine powder highlight that makes the skin look like it's glowing from within.

For my eyebrows, I've used a combination of NARS Eye Paint and MAKE UP FOREVER Aqua Brow. I have quite a bit of filling in to do, but I'm going to try making them look as natural as I can by not applying too much product at once. Since my natural brows are very dark, I always like to finish with a tinted brow gel to lighten them up slightly. It softens my brows so they don't look as harsh/tattooed. I'm using NARS Brow Gel.

The eyes I'm keeping rather plain today and I'm going to apply MAC All That Glitters Eyeshadow all over my lid and smudge NARS Eye Paint on my upper and lower lash line. Then I'm going to line my eyes with the eye paint as well.

Lastly, I'm going to curl my lashes, add a coat of Diorshow Maximizer Lash Plumping Serum and two coats of Covergirl Lash Blast Mascara. For a little extra intensity, I added some Red Cherry False Lashes.

Friday, March 8, 2013

My Face of the Day.


Haven't posted one of these in ages! This is pretty much my usual makeup look using all products that I use on a regular basis. I don't wear false lashes often, but I recently ordered some Red Cherry Lashes and I've been wearing them almost every day because I love them so much! Strangely, my eyelashes are almost non existent as of lately and I'm not sure why. I think since I've begun using Covergirl Clump Crusher Mascara, I've lost all of my lashes. (This happened to me when I was using Covergirl Lash Perfection too - good mascaras, but for whatever reason, they pull my lashes out) So I've been resorting to falsies for the time being and I purchased the Ardell Brow & Lash Growth Accelerator treatment I used in the past to grow my lashes back.

I've had a few questions regarding my eyebrows because they are lighter than they were before. I bleach them every three weeks using Sally Hansen Creme Hair Bleach and I've switched to a lighter shade in my Make Up Forever Aqua Brow. I really like the way they look now.

Products Used-

Face
Le Metier de Beaute Peau Vierge (tinted luminizer, skin treatment and spf - used as a base)
MAC Pro Longwear Concealer NW25 (applied under my eyes)
Guerlain Parure Extreme Foundation #3
NARS Laguna Bronzer (applied all over the face)
NARS Oasis Blush (applied to the cheeks)
MAC Superb Extra Dimension Highlighter (applied to the highest points of my cheeks for shine)
Ben Nye Neutral Set Powder (applied to my undereyes and t-zone to set foundation)

Eyebrows
MAC Spiked Eyebrows Retractable Crayon (used to shape my brows)
Make Up Forever Aqua Brow #15 (used to fill my brows in)
MAC Girl Boy Brow Set (tinted brow gel)

Eyes
Nars Lola Lola Eyeshadow
Nars Night Fever Eyeshadow
Red Cherry #82 Eyelashes (my new favorite lashes!)
Covergirl Lash Blast Fusion Mascara

Lips
MAC Soar Lip Liner
MAC Insanely It Sheen Supreme Lipstick (very lightly dabbed on my lips)
Nars Super Orgasm Lipgloss (my new favorite lipgloss!)

*Nars eyeshadows not pictured.. oops!


I'm working on a post as we speak on the Nars Eyeshadows I used in this look - it should be up in a couple of hours!

Saturday, May 19, 2012

My Everyday Face Routine.

My Everyday Face Routine


This post isn't really supposed to be hugely informative, but I thought it would be a fun post to quickly go through my typical day makeup. My routine is never really "solid" as I change up products from day to day, otherwise I'd never get through any of my products.

On a daily basis I keep my eyes very simple. The colors always change, but what stays the same is that I always apply MAC Brule all over my lids as a base and smudge color across my top and bottom lashline, followed with lots of mascara.

Products Used (in order used)
MAC Pro Longwear Concealer in NC20
Hard Candy Glamoflauge Concealer in Medium
Estee Lauder Double Wear Foundation in Tawny (applied with Real Techniques Stippling Brush)
MAC Eyebrows Retractable Pencil in Spiked
Spoolie Tool
Guerlain Meteorites Powder (applied with a Sigma F30 Large Powder Brush)
Becca Flamenco Bronzing Powder (applied with Coastal Scents Destiny Kabuki on a Stick Brush)
MAC Honey Rose Magically Cool Liquid Powder (applied with Kirkland Stippling Brush)
Nars Dolce Vita Blush (applied with Kirkland Stippling Brush)
MAC Brule, Club and Nehru Eyeshadows
Shu Uemura Eyelash Curler
Shiseido Nourishing Mascara Base
Covergirl Lash Blast Fusion Mascara
MAC Viva Glam Nicki Lipstick
NYX Nude Peach Mega Shine Lipgloss

I'll be doing individual posts on application technique (how to apply concealer, blush, bronzer, etc) because I'd like to explain in detail, rather than briefly in a quick tutorial.

Monday, January 30, 2012

Guest Post: A Sulty Smokey Night Look!


Guest Post Written by Marla
Today the incredibly talented Marla of Makeup By Marla shares her Face of the Day (FOTD) from this past weekend. She also goes through the list of products she used to create the look!


On Saturday night I went out with a few friends to “The Marketplace”. The Marketplace is a tiny plaza that has restaurants, boutiques, and a movie theatre. I didn't want to look too made up but I wanted to wear a dark smokey eye to make my eyes pop.

Going out at night is really the ultimate test for your makeup. The staying power and durability needs to be good because you don’t want to have to be reapplying all night! I used a variety of drugstore and high end products that I both rely on and trust to stay put all night.

I will add small anecdotes about products that I recommend wearing when going out at night.


READ MORE!

Wednesday, January 25, 2012

Revlon ColorSilk Hair Color in Dark Brown + A Few New Hair Products for Shiny Hair.

I know, probably doesn't look like much of a change, but my hair lately has been looking dull and lifeless. I figured it was time for a dye and picked up one that I've been using off and on for years - Revlon ColorSilk Hair Color in #30 Dark Brown.

The instructions are to leave it in your hair for 25 minutes, and I always make sure to leave it in for the exact time, and not a minute over, or I'll end up with almost black hair.

Revlon ColorSilk Hair Color is actually the least expensive hair dye you can find at the drugstore. It's only around $3 a box, and delivers just as well - if not better than the higher priced boxed dyes.

READ MORE!

Saturday, October 1, 2011

My new hair color + a couple photos of Rocky :)

I ended up dying my hair last night with the hair dye I posted about yesterday. It was the Clairol Nice n' Easy Colorblend Foam in the shade #4 Dark Brown. Prior to dying my hair, my hair color was an ashy, medium brown with a bunch of golden brown-auburn tones towards the bottom. This dye changed my color to a very dark, rich brown. I really like it, and I'm hoping it's not going to fade considerably once I wash my hair. 

READ MORE..

Saturday, September 10, 2011

Quick FOTD.

I posted a new picture on my Twitter a couple of days ago, and had a few requests for a FOTD, so here's a quick breakdown of what I was wearing!


Face:
DDF Ultra-Lite Oil-Free Moisturizing Dew (base)
Hard Candy Glamouflage Concealer in Light mixed with MAC Prolongwear Concealer in NW25 (under my eyes)
Guerlain Parure Extreme Foundation #3 (around a 1/2 pump to even out my complexion)
Chanel Double Perfection Compact (to set my foundation and add a little extra coverage, applied using my Sigma F30 Brush)
Benefit Hoola Bronzer (contour)
Nars Dolce Vita Blush (across cheeks)

Brows:
MAC Espresso Eyeshadow
ELF Brow Treat & Tame in Dark

Eyes:
MAC Rubenesque Paint Pot (base)
Sigma Bare Palette (Command all over the lid, Snoop through the crease)
MAC Brown Down Eyeshadow (outer-V)
Physician's Formula Eye Booster Eyeliner in Ultra-Black
Maybelline The Falsie's Mascara

Lips:
MAC Stripdown Lipliner
NYX Fig Round Lipstick


I'll be posting reviews soon for Maybelline The Falsie's Macara and the Physician's Formula Eye Booster Eyeliner. I'm really loving both products - especially the eyeliner.. it has become a new favorite of mine!

Hope you all have a wonderful weekend!

Sunday, July 24, 2011

Love this bright lip combo!

Wet n Wild 511B Nouveau Pink (First mentioned in my haul post here)
NYX Round Lipgloss in Doll Pink (Mentioned in my '09 NYX post here)

I love bright lipsticks, but the truth is... they make me nervous. For whatever the reason may be, bright lipsticks are out of my comfort zone. I do admire a good bright lipstick when I see one, maybe even purchase it, but it will just end up collecting dust in my lipstick drawer.

There are some days where I'll feel like being a little more adventurous with my lip color, and I'll toss on MAC Vegas Volt, MAC Morange, NYX Louisiana or OCC Divine Lip Tar without much thought. In the past month or so, Wet n Wild Nouveau Pink has pretty much replaced all of those other brights I like to wear - who woulda thought at 99 cents? It's such a flattering shade that really brightens up my face (and I'm pretty sure it makes my teeth appear whiter). It's really pretty on it's own, but I like pairing it with NYX Round Lipgloss in Doll Pink. It takes it up a notch. 

If you're terrified of brights (or red) like me, I recommend experimenting with the inexpensive brands before investing in a high end lipstick you may only wear once a year. Wet n Wild has great options for a low price. If you like the color, force yourself to wear it! Don't look in the mirror every 15 minutes while you're out, forget that you're wearing it. If you can get through a full day of wearing it before putting on something else neutral, you've passed the test! I bet you'll get some compliments too while you're out. Try it more often!


What is your favorite bright lipstick?

Tuesday, July 12, 2011

Testing out Chanel Vitalumiere Aqua Foundation!


I got a hold of a couple sample packets of Chanel Vitalumiere Aqua a couple of weeks ago and finally decided to try it out today. When I asked for a sample, I expected they were going to pour some product directly from their counter tester bottle, but they actually had sample packets of each shade. I was a little disappointed because the packets are so small, I figured I'd need both to cover my face. With the little bottles they fill up from the testers, they can typically last me a week - sometimes more if I'm lucky.

Anyway, the Sales Associate matched me to B30 Beige Sable. My shade in the regular Vitalumiere is 40 Beige. Right away, I noticed that B30 looked a little light, but when it was applied to an area of my face, it was undetectable. I'd say it's a good MAC NC30 color match.
I've read several reviews for Chanel Vitalumiere Aqua, and the majority of the reviews stated that this particular foundation looks best when applied with the fingers. I tend to use more product when I use my fingers, and considering I only had a couple of small packets, I wasn't about to waste any product. I first moisturized my face with a little DDF Oil-Free Moisturizing Dew and then I applied the foundation like I normally would any foundation. I squeezed out a small amount and placed a dot on each cheek, nose, chin and forehead. Then, with my Sigma F80 brush, I lightly buffed it in my skin with small circular motions. I then placed a tiny bit more product on my cheeks to build the coverage and again, buffed it in with my brush.

The consistency is a bit different than any foundation I think I've tried. I figured because it's water based, it would be really thin and watery. It's incredibly light and has an airy, whipped texture. Once applied to the face, you can really tell it water based because it has that slight cooling sensation of water. The color seemed to oxidize slightly after a few minutes, but it didn't oxidize too dark, orange, etc. The color is perfect. I was a little surprised by the coverage. It evened out my skintone beautifully and even covered my blemishes pretty good. It's a light coverage and can be layered easily to medium coverage. The finish is a lovely illuminating satin. I'm wearing it right now and it still looks great after almost 7 hours, with the exception that my chin and nose has become a little shiny.

Really loving it so far - and I'm pretty confident that I'll be purchasing it for my summer foundation! I'll have a FULL review to come later!

FACE: DDF Ultra-lite Oil Free Moisturizing Dew
Hard Candy Glamoflauge Concealer in Light & Medium (mixed 50/50) applied under my eyes
Chanel Vitalumiere Aqua in B30 applied with my Sigma F80 Brush
Chanel Bronze Universel/Soleil Tan De Chanel Bronzer applied with my Coastal Scents Tapered Duo Fiber Brush

BROWS:
MAC Espresso Eyeshadow
ELF Eyebrow Treat and Tame in Medium

EYES:
Urban Decay Naked Palette ("Naked" and "Buck" blended in my crease and smoked outward, darkened my outer V with "Smog") 
Nars Coconut Grove Eyeshadow lined my upper and lower lashline
Wet n Wild Silent Treatment Trio applied the pink browbone shade to my lid
Urban Decay Midnight Cowboy Eyeshadow applied on my lid over the Wet n Wild shadow, and my inner corners
MAC Blackline Pearlglide Eyeliner on my waterline 
Covergirl Lash Perfection Mascara
Revlon Beyond Natural #91169 False Eyelashes snipped in half

LIPS:
MAKE UP FOREVER Aqua Lipliner in #4C
OCC Lip Tars - Divine and Hush mixed 50/50
Sally Hansen Lip Inflation Extreme Lipgloss (clear)


Hope you all have a wonderful night! And, if you haven't already, please check out my giveaway HERE!

Friday, June 17, 2011

MAC Honey Rose Magically Cool Liquid Powder Review, Photos, Swatches and FOTD!

MAC Honey Rose Magically Cool Liquid Powder review

MAC Honey Rose Magically Cool Liquid Powder

Product Description: A silky, feather-light powder, formulated with 70% water, dusts on to the skin as a cooling mist to set and enhance the look of any foundation. Beyond sheer: light-reflecting and translucent. A virtually invisible way to add luminosity and a soft radiant glow to the skin.

MAC Magically Cool Liquid Powders are available in three (3) shades: Truth & Light (Sheer shimmer that reflects silver and pink), Honey Rose (Sheer rosy beige with multi-dimensional shimmer) and Cajun (Sheer bronze shimmer that reflects gold).

While I was at MAC, I swatched all three shades, but the most appealing shade to me was Honey Rose. Truth & Light appeared very sheer - almost invisible, with a slight white cast and slight shimmer. Cajun appeared to be a very pretty golden brown - somewhat similar to my Chanel Bronze Universel, but I wasn't sure of how well it would blend as an all over bronzer. Once it hits the skin, it dries almost instantly. I'm not sure if it was the bright fluorescent lighting, but Honey Rose looked gorgeous. It's a champagne pink with a frosty - almost golden sheen. It reminds me a little bit of Urban Decay Sin Eyeshadow. I thought it would a perfect highlight for my skin tone. 

MAC Magically Cool Liquid Powder in Honey Rose

Monday, June 13, 2011

Review: Clairol Nice & Easy Perfect 10 Permanent Hair Color in Medium Brown!

Clairol Nice & Easy Perfect 10 Permanent Hair Color
(#5 Medium Brown)
The kits contents.
Makeupalley rating of 3.3/5 based on 287 reviews, with a 56% re-purchase rate. (view here)

As you may already know, I dye my hair every month (sometimes I skip a month or two) with Clairol's Natural Instincts Brass Free Brunettes Semi-Permanent Hair Color in Medium Brown. Prior to that, I was using whatever was on sale and from the looks of the box, wouldn't turn my hair orange or black. It was usually a hit or miss - the majority of the time was a miss. I would use Dark Brown dyes, with the anxiety of possibly leaving it in too long or not leaving it in long enough. (I've ended up with jet black hair twice by leaving it in too long.) Other dyes would leave my hair color a brassy brown that would fade to a medium auburn after a couple of months. Medium brown is all I ask for!! Anyway, I loved that Clairol Natural Instincts Brass Free Brunettes didn't cause my hair to go too dark or have any terrible orange tones. Even though the color was spot on, it didn't do a good job covering my white hairs. My hair would be an awesome, rich medium brown and I'd have my platinum white hairs shining though my bangs like nobody's business. So, I thought I'd look elsewhere in the world of drugstore hair dye.

Clairol Perfect 10 sounded like what I needed - 10 minutes to develop, with 100% gray coverage. 

It's your standard box dye - it comes with the application tube that contains the color activator & the color creme, an instruction booklet with plastic gloves and a deep conditioner. It also has a snazzy comb applicator that you can screw on the tube. I like that you don't have to use the comb if you don't want to. You can just toss it and use the squeeze tip like a standard hair dye. I actually like the comb, but for precision root application, I think the traditional way works best - Run the product down your roots and blend with your fingertips or a fine tooth comb.

Since I don't have that many white hairs (yes, they are white. snow white. they aren't gray) just a small family of them in one area, I used the comb applicator and ran the dye through the top of my head and worked it with my fingers down the strands to blend the color in with my hair, then placed my hair in a bun.


I waited 10-12 minutes and washed and conditioned my hair. I then used my NuMe flat iron the following morning to curl my hair.

My hair color didn't change all that much from before, but it does appear a bit warmer. It appears to have a slight mahogany tone in the light. My hair looks shiny and healthy and doesn't feel dried out.

100% gray coverage? No. 96% to be exact, as I still can see about 4-5 hairs that aren't white anymore, but are a light golden. I was a little upset about that, because they are the most visible ones as they are at top of my bangs. Maybe they are what you call "stubborn grays" and need around 20 minutes. Oh well. I do like the outcome anyway, and I probably will purchase this dye again because of the ease of use.

After I dyed my hair using #5 Medium Brown.

**Before tossing the box, rip the top of the box off to remember the brand and shade in case you like the final outcome!

Monday, April 18, 2011

Monday's FOTD!


 I'm wearing Laura Mercier Silk Creme Foundation again (I keep skipping between different foundations) because I'd like to post my review for it soon. This would be my fourth time wearing it. The past three times, I haven't used a setting powder - So I know how well it wears without one. Today, I wore setting powder all over my face so I can test out how well it wears throughout the day with powder. I'll probably wear it again once more tomorrow and let you know what I think of it.
 
Face:
DDF Advanced Moisture Defense spf 15 applied to my face for moisture & sunscreen
Hard Candy Glamoflauge Concealer in Medium applied in light, tapping motions to my under eyes, around nose, under brows and blemish marks on my cheeks with a small, standard foundation brush
Maybelline Fit Me Concealer in #20 applied under my eyes to match my skin better, blended in with my MAC 224 brush
Laura Mercier Silk Creme Foundation in Bamboo Beige applied by dotting the foundation all over my face with my finger, and then blending it in with my MAC 131 brush. Then, I further buffed my face in circular motions with my Sigma Duo Fibre F50 brush.
Ben Nye Neutral Set/Ben Nye Banana Visage Powder (a 50/50 mix) applied to my under eyes to set my concealer and applied lightly all over my face with my Sigma Large Powder F30 brush
Guerlain Meteorites in Beige Chic applied lightly all over my face, again with my Sigma Large Powder F30 brush
MAC Golden Bronzing Powder applied to the hollows of my cheeks and extended up my cheekbones
Bobbi Brown Pale Pink Powder Blush applied to my cheekbones & apples of my cheeks
MAC Fix Spray a light spritz all over my face, so it wouldn't look too "dull" and powdery

Brows:
ELF Brow Kit in Medium
MAC Brow Set in Girl/Boy

Eyes:
Mark. Metro Eyeshadow all over my lid (From the Urban Neutrals Flip For It Palette) A basic frosty champagne shade - similar to MAC Grand Entrance
MAC Sorcery Eyeshadow applied to my upper and lower lashline with an angled brush, as well as the outer V of my crease
MAC Pink Venus Eyeshadow applied on my lower lashline near my tearducts, making Sorcery appear as a pinked lilac
Covergirl Lash Blast Mascara in Very Black
Ardell Long Flare Individual Lashes I applied 2 clusters to the outer edge of my top lashline to make my lashes extend further out

Lips:
MAC Pale Lip Erase
Revlon Colorstay Lipliner in Natural
Revlon Colorstay Mineral Lipglaze in Perennial Pink #538 

Bobbi Brown Pale Pink Powder Blush & Guerlain Beige Chic Meteorites are both products I received in the mail this morning from swaps. I have really been interested in trying Meteorites, so I'm excited to finally own some. I'm not sure what I think of them yet, as they are extremely subtle.. I'll have to see throughout the week.


Also, someone asked me on formspring if I can post where I purchased/what brand is the clothing I am wearing when I post FOTD's. Today, I'm wearing small pink rose earrings from Forever 21, A pale pink tank top with a satin black bow from Forever 21, a black hooded "flyaway" jacket from Express & light, distressed skinny jeans from Express (not visible in photos).

I don't mean to take so many photos, but again, it was asked if I can post more photos when I'm posting FOTD's. :)

Hope you all have a wonderful day! It's a little chilly here in Chicago today.. it has been so nice all week, as you can tell, I've been taking my photos outside lately. I've been loving it!!

Sunday, April 17, 2011

FOTD Wearing Guerlain Parure Extreme Foundation #3!


I thought I'd do a quick update how my Guerlain Parure Extreme Foundation is working for me. (I apologize for all of my foundation posts and if you can't keep up with them all!) So you might remember, I purchased Guerlain Parure Extreme #4 back in December, and although I loved the foundation, it was a terrible color choice for me. To make it work, I would use a foundation in the lightest shade (Neutrogena Healthy Skin in Classic Ivory) to lighten it up and then I would a drop of Coastal Scents yellow corrector to give it a more yellow/golden tone. That was working great for me, but I really wanted to find my correct color match, so I wouldn't have to go through the hassle of mixing foundations all of the time.

Earlier this month, I decided to place an order for Guerlain Parure Extreme in the shade #3. I had no idea until that point what Guerlain's numbering meant for the foundation, until Lisasz09 on youtube let me know that even numbers are actually pink toned, and odd numbers are yellow toned. So, I was please to know that it isn't the whole line that is pink toned. I'm happy to say that #3 matches me beautifully, and is a good NC30-35 match. It doesn't have a strong yellow tone, per say, but it matches me very good.

Swatched Top: Guerlain Parure Foundation #3, Bottom: Guerlain Parure Extreme #4
I've been wearing this foundation almost every day, with the exception of the days where I've tested out Chanel Vitalumiere, Laura Mercier Silk Creme & a couple days of Neutrogena Healthy Skin. I love that it looks so natural & with setting powder, lasts all day. It has climbed up my list of favorite foundations, and made it to my top 5.

I didn't set my foundation with powder, because I wanted to show the santiny finish. It was a bit cloudy today, so my skin looks a little beige? I assure you though, the color match is excellent, and this is just not the best lighting. I'll be wearing this in FOTD's to come. My FOTD today is nothing spectacular, because I was about to go grocery shopping for a BBQ and didn't want to go too heavy on my eyes in the day time.


Face:
Hard Candy Glamoflauge Concealer in Medium under my eyes, around the corners of my nose and under my brows
Maybelline Fit Me Concealer in #20 under my eyes over the Hard Candy Concealer for a better color match
Guerlain Parure Extreme Foundation #3 applied a sheer layer with my fingers, and built a thin second layer with my MAC 131 duo fibre brush
Guerlain Brunettes 02 Terracotta Bronzing Powder applied to the hollows of my cheeks & extended up my cheekbones
MAC Optimistic Orange Cremeblend Blush applied to my cheekbones
Hard Candy Honeymoon Blush applied over Optimistic Orange for a soft, shimmery peach sheen

Brows:

Eyes: 
Dior Crush Glow 5-Colour Iridescent Eyeshadow (golden shade all over my lid, brown in the outer V)
Bobbi Brown Long Wearing Gel Ink in Black Ink (lined my top and bottom lash line)
Covergirl Lash Blast Mascara in Very Black
Revlon Fantasy Lengths Professional Self Adhesive Eyelashes #99500

Lips:
MAC Pale Lip Erase applied as a light base to my lips
MAC Subculture Lip Liner
YSL #26 Tender Peach Rouge Volupte Lipstick (this shade looks much different.. lighter and more pink - with lip erase as a base.. I love it! But we all know RV lipsticks have the worst staying power and it was practically gone in these photos despite I had just applied it.)

Friday, April 8, 2011

My Face Today: Testing out Laura Mercier Silk Creme Foundation!

I received a message on formspring a few days ago asking if I've tried Laura Mercier's Silk Creme Foundation & what my thoughts were about it. Well, I actually haven't tried any Laura Mercier products, but decided to give myself an excuse to go to Sephora and pick up a sample of the foundation. I didn't do any prior research of what my shade would be, but with a little swatching, I decided on Bamboo Beige, which seems to be a pretty good NC30 match. The Sales Associate gave me a pretty nice sample that should last me a full week, possibly more. Today is my first day wearing it, and so far I think it's great. It actually seems like a spinning image of MAC Studio Sculpt Foundation. I'll give you a full review on it soon!
Sample of Laura Mercier Silk Creme Foundation - Bamboo Beige
I used my Dior Crush Glow palette (I posted about here) for today's look, and I've actually been using it just about every day as my "go-to" product. It's just so convenient that all of the shades go so well together and the palette is fairly small and lightweight. I actually think I'm going to start investing more in Dior quints rather than any other brand of shadows. Although I love MAC, I'm over the obsession of owning so many eye shadows. I just don't use them enough, with the exception of a small handful.

Face:  
Cetaphil Moisturizing Cream as a base (2nd day trying this out)
Hard Candy Glamoflauge Conealer in medium under my eyes
Laura Mercier Silk Creme Foundation in Bamboo Beige applied with my Sigma F50 Duo Fibre Brush
Ben Nye Neutral Set Powder to set my foundation
Bare Escentuals Well Rested applied lightly under my eyes
MAC Dainty Mineralized Blush
MAC Golden Bronzer

Brows:
MAKE UP FOREVER Brow Corrector in Medium
MAC Brow Set in Girl/Boy

Eyes:
Dior Crush Glow Quint (Taupe in crease, copper brown in crease and outer v, gold on lid, frosted pink by the tearducts and blended into the beginning of lower lashline, copper brown all the way across lower lashline)
Nars Coconut Grove Eyeshadow (deepened my lower and upper lashline)
Covergirl Lash Blast Mascara in Very Black
Dollar Tree False Lashes (cut in half - seen in this post)

Lips:
MAC Subculture Lipliner
MAC Shygirl Lipstick
Nars Chihuahua Lipgloss

Oh! Also you may notice I'm sporting a little colour, which I've been lacking lately. I purchased Clarins Intense Bronze Self Tanning Tint to use daily on my face. Day two, and no breakouts.. so I'm being very hopeful! A review for it coming up soon...

Sunday, March 6, 2011

FOTD: Thinking Guerlain Parure Extreme may be HG material.. + Updates & Upcoming Posts!

Hey Everyone! (Long post.. sorry)

I hope you are all enjoying your weekends.. I've had quite a bit of things going on in the past few days so I'm a little backed up on posts that I've wanted to do - as well as e-mail responses & formspring responses. So I truly apologize if any of you have been waiting around for responses - I'll get to them after I finish this post.

After posting my false eyelash tutorial, I was contacted by Revlon to try out some of their eyelashes and let my readers know what I think about them. I received a few different styles in the mail this afternoon - so I should be reviewing them shortly.

Also, I've been dying to try Vichy Dermablend Concealer after seeing and reading so many raves - but from what I've heard it's not available in the US? Does anyone know if the product differs from the "regular" Dermablend Concealer? I haven't had time to research it thoroughly. Anyway - I ended up going to ULTA and swatching all of the concealers and splurging on the "Quick Fix" concealer. I'm really liking it so far. I should have a review on this soon as well.

Some other upcoming posts will be:
Foxy Locks Extensions Review
ELF Natural & Dramatic Eyelashes Review
Neutrogena Healthy Skin Foundation Review (I own the lightest shade for when I have no tan - but I'd like to purchase a shade equivalent to my "usual" skintone so I can give a better review)
Dermablend Quick Fix Concealer Review
Hard Candy Sheer Envy Primer Review
Updated Skincare Routine
Updated Foundation Routine
NOTD (Not sure what color yet..)

They are in no particular order, but when I have a to-do list, I typically start with the reviews because they are a little less time consuming. 

Oh! If you follow me on Twitter, you may of seen my tweet where I mentioned I've been thinking lately about dying my hair red. I've had every shade of brown, jet black, strawberry blonde and platinum blonde - but I've never been a redhead. I may try it.. Any opinions?? I'm getting so sick of my hair right now.

Okay, I think I covered most of what I was going to mention.. So here is my face of the day.

For the past few days I have been wearing my Guerlain Parure Extreme Foundation. If you read my review for it in December (click here for reference), I purchased it in a shade that was very "off". I have it in #4 and although it's said to match NC40 - I find it to be way too dark and orange/red/pink. So, I only ended up wearing it a few times & put it away - hoping to purchase a white color corrector to lighten it. So, since I purchased Neutrogena's Healthy Skin Foundation in the lightest shade - I decided to mix the two. I took one pump of Guerlain and a little dab of Neutrogena + a little dab of Coastal Scents Yellow Color Correcter (click here for reference) and ended up with a shade that works. 

This foundation works extremely well when applied with the fingers. I apply it to my face the same way I'd apply a moisturizer and it blends seamlessly - REALLY.. I'm not trying to sound fancy. It is literally seamless. I'm not going to lie, every time I read a review for Guerlain Parure Extreme and someone called it a "full coverage" foundation, I wanted to call them crazy. I didn't understand why anyone thought it could be full coverage. I was proved wrong this morning. 

Guerlain Parure Extreme is a different kind of "full coverage" foundation. When you think of full coverage you think Dermablend, Estee Lauder Double Wear, MAC Full Coverage - You know, that really thick foundation that applied opaque. This foundation is so incredibly thin and lightweight and when it's applied with the fingers- it gives a very radiant medium coverage. Well, today when I applied it with my fingers - my foundation looked flawless BUT, it did not cover up my blemishes from my recent breakout. The red still showed through and some blemishes looked like gray spots under my foundation. But my overall skin texture & skintone looked amazing. I had a little foundation left over from what I had mixed, so I decided to take my Sonia Kashuk flat top brush and apply the rest to my face. And WOW. My skin looked perfect. As a matter of fact, too perfect. I looked like a porcelain doll. But the wonderful thing about the foundation is, I still looked radiant and it didn't look heavy or cakey. I have to admit, I was sort of embarrassed to go run errands because I was afraid I looked too fake, but my mom called me "nuts" and we went about our errands.

I didn't powder my face and surprisingly, my makeup stayed put perfectly from early afternoon till night time. Absolutely perfect. I didn't need any touch ups and I couldn't believe that foundation didn't settle into my laugh lines or wear off in my laugh lines like most of my foundations do.

I definitely would say this is HG material and I'm going to continue wearing it mixed with Neutrogena Healthy Skin in Classic Ivory. I would like to try it in shade #3 sometime in the future to see if it's a good match.. maybe I'll pick up a sample at Bloomingdale's to see what the undertone is like in comparison to #4.

Face: 
Bobbi Brown Vitamin Enriched Face Base
Guerlain Parure Extreme Foundation #4, Neutrogena Healthy Skin Foundation #Classic Ivory (1 part Guerlain, 1/2 part Neutrogena) and a dab of Coastal Scents Yellow Corrector
Dermablend Quick Fix Concealer #Beige (Under eyes and on blemishes)
Benefit Hoola (Lightly under my cheekbones)
MAC Smooth Harmony Beauty Powder (On my cheeks and up my forehead for warmth)
Sonia Kashuk Creme Blush Duo #Brighten my day (received as an "extra" in a swap - and it's beautiful! I think it's d/c though :( )
Urban Decay Sin Eyeshadow (Highlight my cheekbones & bridge of my nose)
Rimmel Stay Matte Transparent Powder (blotted under my eyes)

Brows:
Make Up Forever Eyebrow Corrector #3
MAC Girl/Boy Brow Set 
Anastasia Highlighting Brow Kit (used the shimmery champagne color as a highlight for my brow bone)

Eyes:
MAC Sorcery Eyeshadow, LE (Applied in the corner crease & smudged on lower lashline for a pop of color & to make my eye color stand out)
MAC Feline Eye Kohl (at the very end of my top lashline extended out)
Covergirl Lash Blast Mascara

Lips:
MAC Hover Lip Liner
Illamasqua Obey Lipstick (all over lips)
OCC Hush Liptar (added a tiny bit for a pink hue)
MAC Smile Dazzleglass (for shine)

Tuesday, March 1, 2011

FOTD: Wearing MAC Morange Lipstick

My hair was originally up in a bun, but I decided to take it down afterward.
 I only took a few photos.. I was in a bit of a rush.. :)

Face: 
Estee Lauder TimeZone (moisturized my face with this prior to application of foundation)
Estee Lauder Double Wear Foundation #Tawny (applied with Sonia Kashuk synthetic flat top brush)
Maybelline FIT ME Concealer #20 (applied under my eyes)
(no setting powder)
NYX Sand Powder Blush (used as a bronzer on my cheeks, around hairline and forehead)
NYX Desert Rose Powder Blush (used on the apples of my cheeks)

Brows:
ELF Studio Brow Kit #Medium
ELF Studio Brow Treat & Tame #Dark

Eyes:
NARS Bali Eyeshadow (lightly applied all over the lid - stopping below the crease, blended with a brush; free of any eyeshadow)
NARS Coconut Groove Eyeshadow (applied to my top and bottom lash line with a smudge brush)
ELF Natural Lash Kit (applied with DUO dark tone adhesive)
Covergirl Lash Blast Mascara (one coat to top and bottom lashes)

Lips:
MAC Chicory Lip Pencil
MAC Morange Lipstick (blotted)
Clear lipgloss (generic)

Friday, February 18, 2011

My Face of Today + Foxy Lashes!

I dyed my hair last night with my usual Clairol Natural Instincts Brass Free Brunettes in 5C Med. Brown.. So it may look slightly darker. And my hair was soo flat today because I loaded my hair with conditioner. Also, testing out my new Foxy Locks Extensions. I'll have a review on them soon for you!

Since I was wearing my military jacket, I thought it was only necessary to take a photo with my new aviators. haha! Got them at Forever 21 for $5.80.

Today was one of those days where you love your makeup and can't get a decent photograph. *sigh*

Face: MAKE UP FOREVER (MUFE) HD Foundation #128
MAC Moisturecover Concealer #NW25
NARS Irresistiblement Bronzer
Illamasqua Lover Blush
MAC Vanilla Pigment (highlight)

Eyes:
MAC Bare Canvas Paint (all over lid as a base)
MAC Vanilla Pigment (brow bone - highlight)
MAC Espresso Eyeshadow (in crease and slightly above & smudged on lower lash line)
MAC Tempting Eyeshadow (applied over espresso)
MAC Grand Entrance Eyeshadow (applied all over lid)
MAC Typographic Eyeshadow (darkened crease near the end)
Bobbi Brown Blank Ink Gel Liner (top lashline)
Foxy Lashes - Flirty Flare 02
Covergirl Lash Blast Mascara

Brows: MAKE UP FOREVER (MUFE) Eyebrow Corrector #3 Dark Ash Brown
MAC Brow Set #Girl/Boy

Lips: MAC Lure Lip Pencil
Obsessive Compulsive Lip Tar #Hush
NYX Round Lipgloss #Pinky Natural

Here is a closer look at the lashes I am wearing. They are one of the two styles that foxylocksextensions.com has to offer. I really love them and think they look natural, yet glamorous! You can click here to view more product info on these.