Monday, February 28, 2011

NOTD: Love & Beauty (Forever 21) Nail Polish in Coral!

Two (2) Coats of Love & Beauty Coral Nail Polish (No Top Coat)

Coral is a beautiful, vibrant coral-red. When I first purchased this polish, I thought it was going to be "salsa" red - basically an orange/yellow red, but this coral is absent of any yellow tones. It's almost like a vibrant, salmon-coral. I think it's a pretty close dupe to the Essie Escapades Nail Polish from Essie's Summer of '08 Collection. As for the nail polish itself, it is quite sheer with one coat and is very opaque with two. Some may prefer three coats - as when I look at my nail in the light, I can see my nail line. The formula is creamy and dries quickly. I was able to apply a second coat within a minute or two. The finish is actually very shiny, but a top coat is necessary so you won't "nick" your nails.

This Nail Polish can be found at Forever 21 stores.

Sunday, February 27, 2011

TAG: Products I'm using right now!

 The last time I did this particular tag was over a year ago, and it was a tag that I really liked & enjoyed reading on other blogs. Since it's been so long, I thought I'd post an updated one!

Shampoo: Paul Mitchell Color Protect Daily Shampoo or Kiss My Face Big Body Shampoo.
Conditioner: I don't use Conditioner, but periodically I use the tube of conditioner that comes with the box of hair dye I use (Clairol Natural Instincts). I mainly just work it though my ends if I feel my hair is a bit dry.
Treatments: Unrefined Coconut Oil or Caster Oil. I also just purchased Beyond the Zone Protein Cocktail; which I'm loving so far.
Styling products: Fantasia Heat Protector/Polisher, Beyond the Zone Flipped Out Hair Spray & Bedhead After Party.
Styling Tools: Remington Sleek and Curl Tourmaline Ceramic Straightener & Hot Tools Ceramic Titanium Hair Curling Iron.
Shower Gel: I use whatever is in arms reach - Lately I've been using up my Bath & Body Showel Gel in the scent Sweet Pea that I received for Christmas. I also like to use Coastal Scents Black African Soap, or my good ol' pink bar of Dove.
Body moisturizer: Unrefined Shea Butter & Jojoba Oil.
Deodorant: Secret Clinical Strength.
Fake Tan: SUN Labs Dark Spray & St Tropez Gradual Tan Everyday Body Lotion.
Cleanser: Neutrogena Cleansing Towelettes & Coastal Scents Black African Soap - I don't use any specific cleansers right now.
Exfoliator: Nothing currently for my face. I sometimes use a exfoliating face brush but it's a little too harsh. I like using an exfoliation glove in a warm shower if I feel my face needs it.
Primer: Hard Candy Sheer Envy Primer (I'll be reviewing this soon)
Foundation: I switch off foundations very often. I've mostly been wearing Cinema Secrets, though.
Foundation brush: ELF Studio Stipple Brush & my new Sonia Kasuk Synthetic Flat Top Brush.
Concealer: I'm finishing up my sample of Keromask & I've been using Maybelline Fit Me Concealer quite a bit - despite it's not the best.
Powder: Rimmel Stay Matte Transparent Powder
Blusher: I wear different ones all of the time. My most worn this past month have been NARS Madly, MAC Frankly Scarlet, MAC Improvise & Illamasqua Lover.
Bronzer: Again, I wear different ones all of the time.. but my most worn this month have been NARS Irresistiblement, NARS Luster (which is actually a blush, but it's quite golden) & Rimmel Sun Dance,
Highlighter: Urban Decay Sin Eyeshadow. I've had this eyeshadow for over a year and barely used it.. I just recently discovered that its an amazing highlighter for the face and I use it every day!
Eyeshadow base: None - But, once in a great while I'll use MAC Bare Canvas.
Eyeshadows: All of the browns in my Napoleon Perdis Smoke Signals Palette, NARS Coconut Groove, MAC Cork
Eyeliner: Haven't been wearing it much, but usually MAC Point Black Liquidlast Liner and I've been using Wet n Wild's Creme Liner more often..
Curler: Shu Uemura
Mascara: Shiseido Mascara Base, Covergirl Lash Blast (orange tube) & Covergirl Professional Super Thick Lash Mascara
Brows: I use different ones all of the time because I have so many brow products I want to use up. Ones I grab for the most lately have been MUFE Eyebrow Corrector, ELF Eyebrow Kit, Maybelline Define-a-Brow & Essence Brow Pencil. To set my brows I use ELF Tame & Treat or MAC Brow Set.
Lipstick: OCC Lip Tars all month.. It's either a combo of Hush & Divine or a combo of Divine & Trick.
Lipgloss: I actually haven't been really using any colored glosses. I mostly wear clear over my lip tars, so I've been trying to use up my Victoria's Secret Lip Plumper Extreme. I like using it with the lip tars because the brush applicator makes it easy to blend the colors together. I won't repurchase this product again though..
Nail Colour: Nothing is on my nails right now because I'll be painting them tomorrow morning. I've been alternating every week, but I have to say my favorite has been Revlon Top Speed Fast Dry Nail Polish in the shade Cupid.

I'm not going to tag anyone in particular because I know some people don't like being tagged. So, I'll leave it up to you guys! I would love to see you do this tag though - if you do, please post the link to your post in my comments! If you don't have a blog and want to share "what you're using right now", post in my comments as well! I'm excited to read them!

Saturday, February 26, 2011

E.L.F Studio Complexion Perfection Powder Review!

ELF Studio Complexion Perfection Powder

Product Description: Create a balanced and radiant complexion that is beautiful and healthy. The lightweight formula evens out the skin tone and absorbs excess oil. The sheer formula brightens, mattes and neutralizes the skin. The colors are meant to be blended together as the Blue neutralizes orange, the Green neutralizes red, the Pink neutralizes grey and the Yellow brightens and neutralizes red. (http://eyeslipsface.com)


So whats the theory behind having a powder with four different colors? Well, like mentioned in the product description above, these colors will neutralize certain tones your face may have that you'd like to correct.

Look at the color wheel for instance. Any color you'd like to neutralize, find it on the color wheel & across from it will be the color that it will cancel that certain color out.

Friday, February 25, 2011

Tutorial: How to Apply Fake Lashes! (Very Long Post)

How To Apply Fake Eyelashes

Applying eyelashes is very simple once you have a little bit of practice. In this tutorial I will explain step by step how to apply False Lashes. Last week, I posted about my favorite lashes, where you can purchase false lashes as well as other general information regarding false lashes. To be re-directed to that post, click here. Otherwise, Keep Reading!

Tools you will need: 
False Full Strip Eyelashes (I am using ELF Essentials Dramatic Lash Kit)
Lash Adhesive (I am using DUO Dark Tone Lash Adhesive)
Tweezers

Optional Tools:
Liquid Eyeliner or a Dark Eyeshadow
Small brush (eyeliner brush, angled liner brush, smudge brush, etc.)

Where to start? Applying false lashes will be the last step of your eyes. So, make sure to prime your eyes with an eyeshadow primer, apply your eyeshadow and eyeliner & you'll be ready to apply your false lashes!

Why apply them last? You apply false lashes last because you want your lashes to be very black and clean of any eyeshadow or other products. If you apply them first, you may have lashes that are full of eyeshadow. If you'd like, you can apply a thin coat of mascara beforehand. But it's not necessary. I like having a thin coat of mascara on my lashes before I apply false lashes.

Let's Begin! I've included photos of each step along with a caption. I have written out the steps, and they are more detailed than the actual captions.

Step 1: Take your false lashes out of the box. Using your tweezers (or fingers), gently peel the lashes off of the tray. You don't want to apply too much pressure, or else you may bend or damage the band.

Step 2: Using your pointer finger and thumb, you want to hold both ends of the eyelashes at the bottom band. Lightly move both of your hands up and down a centimeter or so. Doing this will stretch the band so it isn't as stiff. This will help the lashes sit better on the contour of your eyelid. (Think of it as stretching a balloon before you blow it up) In the photo of Step 2, the top lash is properly curved and the bottom lash has not been touched yet. You can tell the band on the bottom is a bit straighter.

Step 3: Now we are going to test the lashes to see if they are the correct length for your eye shape. If you have smaller eyes, you may need to cut a little bit. Pick up the according eyelash to you eye. The shortest part of the lashes should be matched up near your tear-duct. The longest part should be at end. The way you will set them on your eyelid is with the curl facing up. Set the lashes down in the middle of your lashline. Look to see where your natural lashes start (inner corner) and pull the false lashes to the same spot. Look to see if the band extends farther out (outer corner) than your natural lash line. If it extends out longer, grab the end with your thumb & pointer finger and lift them off.

Step 4: With your scissors, cut off any excess lashes. (Set it on your lash line again to see if you cut enough)

Step 5: Squeeze a little dab of lash adhesive on a clean surface. Don't apply it from the tube directly to the lashes. A lot of product comes out at once and you don't want to damage the lashes.

Step 6: Using any tool you'd like for precise application of the glue, (many like to use a toothpick or the opposite side of the tweezers. I'm using the opposite corner of the lash adhesive tube) pick up the glue up. Don't worry it's too much. You don't want it to be too little, otherwise your lashes might not stick well.

Step 7: Pick your lashes up with your fingers or your tweezers and drag the glue across the band of the lashes. Apply a little more to each end of the lashes, as they are the spots that tend to wear off.

Step 8: Pick the lashes up with a tweezer, holding them in the middle - close to the band but not touching the glue.

Step 9: It's difficult to apply lashes while looking straight forward into a mirror. The easiest way is by sitting down or standing up and tilting your head back a little - so when you look forward, your eyes are slightly squinted. This way, you'll be getting a better view of your lashline. Like you did in Step 3, set the lashes down on your eyelid as close as possible to the base of your natural lashes, but not touching them. They should be on your eyelid, not your lashes. Make sure they are lined up with the start of your natural lashes before you press them down on your skin.

Step 10: Once the lashes are lined up with your lashes, grab the beginning of the lashes with your tweezers and press it down on your lid. Again, make sure they are lined up with the start of your natural lashes. You don't want them to be any closer to your tear-duct, or it may cause your eyes to water or a pinching sensation. There should be a small space. Grab the outer end and press it down on your skin. Work Quickly before the glue sets.

Step 11: Go along the whole band, pressing it down onto your skin with the tweezers.

Step 12: To make sure it's very secure, use a brush (smudge brush, eyeliner/brow brush, etc) or sponge applicator and go across the band again pressing it down on your skin.
Step 13: Wait patiently for 1-2 minutes while the adhesive dries completely. 

Step 14: For this step, you can use eye liner (liquid/pencil or gel) or a dark eyeshadow (brown, black, etc). If you're using an eyeshadow, take a small smudge brush and smudge the shadow on your lid, close to your lashline - blending it into the band of the false lashes. This will blend in the band better as well as cover up any adhesive you may have gotten on your eyelid. If you're using a liquid liner, line your eyes as you normally would - against the band of the lashes.

Step 15: Apply a coat of mascara to your lashes, starting at the base of your natural lashes all the way up to the end of the false lashes. This will blend your natural lashes in better with the false lashes as well as make the lashes look darker. 

You're all finished! Enjoy your long, lush lashes!

To see how it's done, check out Kandee Johnson's video tutorial!

Thursday, February 24, 2011

Nars Isolde Eyeshadow Duo Review, Photos and Swatches!

nars isolde duo

Nars Isolde Eyeshadow Duo

Nars Isolde Eyeshadow Duo ($34) is the only Nars Duo I own, and it consists of a golden copper and a burnt copper shade. Both colors are intensely pigmented, and buttery soft. They also translate exactly the same on the lids. 

I would consider Nars a luxury brand (despite the less than luxurious packaging), so I only purchase a Nars product once in a while, as a "treat" to myself. 

I have to admit, there aren't too many duos that really grab my attention in the whole range, but as a lover of warm golden shades, Isolde is a great pick.

Knowing Nars eyeshadows, they are pigmented for the most part, but sometimes there's a "miss" in the bunch. They also differ in texture - some are super soft, while others are just average. Both shades in the Isolde Duo are actually the softest eyeshadows I've used from Nars.

nars isolde

nars isolde swatches

Wednesday, February 23, 2011

Tutorial: Create Natural, Defined Brows with a Creme Product! (I'm using MUFE Brow Corrector)

Today I will be showing you how I use the Make Up Forever Brow Corrector. I know many people are interested in trying the product but don't know how to use it. You can obviously improvise if you don't have the MUFE Brow Corrector and use any brow pencil or creme liner. I have read that some people use MAC Dipdown Fluidline or MAC Quite Natural Paint Pot as a brow filler. It may seem odd to you that creme liners can be used for your brows, but applied sparingly with a light hand you can end up with beautiful brows that are natural looking and won't budge all day. Pencils that work well are ones that you can sharpen to a good point that aren't too soft or retractable "crayon" liners such as MAC Brows or Maybelline's Define-a-Brow. These brow pencils work very well because they don't smudge as easily as pencils, the formula is pigmented (but not overpowering) and the consistency is dryer than regular eye pencils, which is essential for creating natural looking brows.


Products used in this tutorial:

Coastal Scents Precision Angled Liner Brush
E.L.F Studio Eyebrow Treat & Tame
MAKE UP FOREVER Brow Corrector #3


I am using a small eyeliner brush that is bent so you it's easier to apply liner and make precise lines. I prefer this particular brush for the brows because the tip is short, dense and comes to a point. I can make very precise lines with it. If you don't have a specific liner brush, an angled brow brush can work too. The thinner the tip is, the better. I am using the ELF Treat & Tame to set my brows. It is a tinted brow gel that adds a tiny bit of color to your brows so your natural brows will blend in with the parts you filled in. It also will keep your brows in place so the hairs are all going in the same direction. MAC has a similar product called Brow Set, which is a product I love as well.

  • If necessary, tweeze & trim your brows and/or stray hairs as you normally would. 
  • It's your preference if you like to apply foundation before or after your brows, but I usually do my brows last. It's much easier in my opinion. If you have oily skin or tend to get an oily t-zone. Set the area with powder so your brows won't get shiny or smear throughout the day. 

Step 1: (If you are using MUFE Brow Corrector) Dab a tiny bit of product onto a clean surface. If you are using a potted creme liner, you can dip your brush directly into the product. Make sure to dab it off on a clean surface or the inside of the lid so you don't apply too much product in an area at once.

Step 2: Line the underside of your brow. Follow the shape of your brow. This area should be the most precise as it is where your brows would normally be waxed, tweezed or threaded. The top of your brow is where it's supposed to look the most natural.

Step 3: Dip your brush in the product again. Wipe off any excess. You don't want your brush to be very coated in product. Look at your brows in the mirror and decide where you would like to begin. I typically fill my brows in starting at the beginning. With the tip of the brush, you want to create small, thin lines to give the illusion of brow hair. Whatever spots you wish you had more hair in, draw small lines in the same direction as your hair. Don't use very much pressure - you want the tip just touching/grazing your skin. You want thin lines that aren't too dark. You want it to blend in well with your actual brow hairs. You can practice on your hand first.

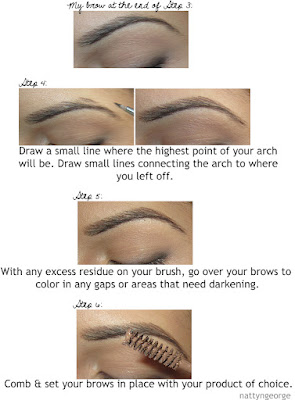
Step 4: After you've followed the top line of your natural brow, you want to accentuate your arch. Draw a small line above your natural arch in the direction of your hair growth, and connect your brows (still using the same technique) from where you left off in Step 3 to the highest point of your arch. It should look very natural.

Step 5: With any excess brown pigment from the product left over on your brush, go over your brows to darken any areas that need it. The end of your brow should be the lightest as you have the least hairs there. If it needs to be extended, do this with the residue on your brush.

Step 6: Comb your brows in place with a spoolie, clear mascara or tinted brow mascara to set your brows.
My brow looks very arched in this photo because of the angle I took the picture. Don't worry they aren't that triangular.. LOL

  • If necessary, take a small concealer brush with your favorite concealer and outline your brow and then blend it into your skin to cover up any mistakes, or if you made your brows too thick.
  • Add a shimmery highlight under your arch to make your brows look even more polished!
I hope your found this post helpful, and if you have any questions.. make sure to post them below!

Tuesday, February 22, 2011

The Sonia Kashuk Synthetic Flat Top Multipurpose Brush!

For those of you who aren't familiar with the brand.. Sonia Kashuk is a line of beauty products (created by Makeup Artist & Entrepreneur Sonia Kashuk) that are sold exclusively at Target stores. Sonia Kashuk products are supposedly of high end quality for an affordable price. One thing Sonia Kashuk is really known for is their wonderful brushes. Often times Sonia Kashuk comes out with limited edition brush sets for the whole face that range from $10-$20.. often times you can snag a great set for a great price since they go Clearance when the next new items come out. If you have, Kudos to you! I unfortunately don't have a very large selection of brushes and don't happen to own any myself.

It wasn't until lately that I was feeling a little dissatisfied with my selection of foundation brushes (I lost my MAC 131 somehow.. I gave my full size MAC 187 to my Mom and my MAC 187SE got ruined when my eyelash glue leaked into all of the bristles). Currently, I only have my ELF Studio Stipple brush.. which works wonderfully and a few basic foundation brushes (MAC 109, Ecotools Foundation Brush, ELF Studio Angled Foundation Brush) which I don't find practical for every foundation I own. I've been really wanting to try the Sigma Synthetic Face Kit, but as of the moment I can't dish out $50 on brushes. So, I finally decided to purchase the Sonia Kashuk Synthetic Flat Top Multipurpose Brush that I've see every time I'm at Target and have read raves for among Beauty Blogs.

The Sonia Kashuk Synthetic Flat Top Multipurpose Brush is a synthetic fiber brush with relatively short bristles (maybe a little under an inch long?) and is very silky soft to the touch. It is very dense and sturdy, and because of the small size - it is ideal for applying foundation and working it into small areas as well as creme and powder blush. The brush retails for $14.99.

I compared it to my other flat top brushes...
From Left to Right: Sonia Kashuk Synthetic Flat Top Multipurpose Brush, ELF Studio Powder Brush & Gotta B' Urban Finishing Brush. 
The Sonia Kashuk brush is the smallest of the three and it is the most dense. My ELF Studio Powder Brush is almost just as dense and a little bit larger. The ELF brush works well for foundation.. but I found it very difficult to clean when I used liquid foundation, so I just stick with using powder products with it. The Gotta B' Urban brush (purchased at Marshall's) is the least dense, as the fibers are very long and is ideal for setting powder.

The first time using the brush was today and I really liked the result. It smoothed on my foundation so quick and easy. I didn't have to spend extra time buffing it in like I usually do. 

Overall, I think it's a very good brush. The price seems a lot for a brush that isn't high end, but it works extremely well and is comparable to a brush you'd buy from MAC or Sephora. 

I'll keep you updated to let you know how I like this brush as I use it more and more.

Do you own this brush? How do you like it?

Sunday, February 20, 2011

NOTD: OPI Miami Beet!

 I had planned to do my nails today with Wet n Wild's "Grey Anatomy" Nail Polish that I purchased last month, but I couldn't find the bottle for the life of me. So, I just grabbed any polish from my drawer and quickly polished my nails before leaving out with my mom for the day!

Miami Beet is a cream formula polish that is a deep red purple, the true color of ripened beets. In artificial lighting (indoors) it appears to be a deep red, but in the sunlight or florescent lighting it's a deep fuchsia. Miami Beet is an older polish from OPI's South Beach Collection from the Spring/Summer of 2009.. I got a hold of this polish last summer in a swap, and this is probably only my second time wearing it. 
Two (2) coats of OPI Miami Beet & One (1) coat of Rimmel Lasting Finish Top Coat.
Lighting: Sunlight; in the shade. No flash. (The red tone is very visible)
Lighting: In Bright Sunlight. No flash. (You can see the purple tone well here)
Whats on your nails?

Saturday, February 19, 2011

False Eyelashes 101. (Where to purchase, Styles & brands I like, etc.)

It was requested to do a post on how to apply false lashes and which lashes in particular are my favorite. Once I started to write about false lashes, I realized that this post was going to be very, very long. So I decided to break it up into three different posts. This post is basic information & common questions regarding false lashes (strip lashes), my second post will be a picture tutorial of how to apply false lashes and my third post will be regarding individual lashes. If you have any questions that you think should be added to this post, comment and I will add your question along with my answer.

Check back later for my tutorial! :)

Where to Purchase False Lashes in-store:
There are several different places you can purchase false eyelashes. You can purchase them at your local drugstore (CVS Pharmacy, Walgreen's, Etc), Target, Walmart, Beauty Supply Stores (Sally Beauty Supply, ULTA, Etc.) and more.

Walgreen's & CVS Pharmacy typically carry Modlash by Andrea, Ardell Fashion Lashes, Revlon Fantasy Lengths & Maybelline Lash Expert Lashes. I've also spotted new "Kiss" brand lashes at my local Walgreen's. Most lashes range from $3.49 to $6 a pair. I usually find them cheaper at Walgreen's opposed to CVS and Walgreen's often has sales on them.

Target carries limited styles of Ardell Fashion Lashes, a couple styles of N.Y.C false eye lashes and a few styles of Sonia Kashuk Lashes. It depends on your location as well. Larger Target stores will carry a larger selection. My nearest locations sell Ardell's for around $3.69 or so a pair.

As far I recall, Walmart carries a range of Salon Perfect lashes, which I believe are Ardell/Andrea lashes with a different name sold exclusively at Walmart. I like purchasing Salon Perfect lashes because they are the same as Ardell's but cheaper! The regular price for a pair is $3 at my nearest location. They also carry Revlon Fantasy Lengths.

You will find the largest selection of lashes at your Beauty Supply stores. Sally's Beauty Supply carries all styles of Ardell and Andrea false lashes, whereas your local drugstores only carry limited styles. Depending on how large your ULTA store is, they may have a decent selection. The ULTA stores near me carry Ardell, and don't have many styles. Often times they don't have the style I am looking for.

You may be lucky enough to find decent lashes at your local Dollar Store.. I found some great Fashion Lashes at my local Dollar Tree. But, every location is different and certain items sell out quick. So, it can't be guaranteed that you'll find them. (You can view my post here about them for reference)

Where to purchase False Lashes online:
http://www.cherryculture.com. Cherryculture stocks NYX lashes & Sassi Lashes for $4.00 a pair. Although I've ordered from Cherry Culture, I've never purchased their lashes.
http://www.eyeslipsface.com. If you're on a budget, ELF has a few different styles of false lashes for $1.00 each. 
http://www.madamemadeline.com. The ultimate online store to purchase various brands of false eye lashes. They carry Ardell, Andrea, Red Cherry, Revlon, Sherani, Gypsy Lashes, Elise & more. Make sure to check out their specials as they have monthly sales.
http://www.nonpareilboutique.com. They have a large variety of their own "Nonpariel Boutique" lashes for $3 a pair as well as other brands (NYX, Red Cherry, Etc.)

You can also find eyelashes on ebay, your local drugstores website and more. If you want to share any of your favorite places to purchase eyelashes, post in the comments at the bottom of this post!

Brands of False Lashes I like:
I usually purchase Ardell and Andrea brand lashes. Since I wear false lashes often, I try and wait for a sale and I will purchase several to have on hand. I purchase Salon Perfect lashes from Walmart often, as they are less expensive. I have never tried Maybelline or Revlon lashes. I've tried N.Y.C lashes, but they only have two styles that I don't care for.. so I don't purchase them. My favorite styles are Salon Perfect #26, #23 & #28 (A longer version of #26). With all three of those styles, I always cut them in half for a less dramatic look. My favorite styles in Ardell are #105, #111 (very long & dramatic) #119, #107 & Lacies. Sometimes I purchase #103's. My favorite style in Andrea are #23, #26 (Same as Salon Perfect) & #45.


Synthetic or Human Hair? Ultimately, it's up to you to choose which you prefer. I like both, but I prefer human hair eye lashes for a few different reasons. Real human hair false lashes are made to better blend in with your lashes and give a more natural appearance. They have more "give" to them than synthetic lashes and can be bent to the shape of your eye to be worn for comfortably. They are also lightweight and should feel comfortable on your lashes. But, these are more fragile than synthetic lashes and you will typically get less uses out of them. Synthetic lashes can be made of various different fibers to best resemble real lashes. They are more stiff and you have to bend them quite a bit to fit to the shape of your eye. Depending on the brand, the band may be very stiff and it may lift off the ends, which would require frequent touch ups. Because they aren't real human hair, they hold a curl very well and are ideal if you want sky high glamour lashes. Synthetic lashes are typically shiny and can sometimes look unnatural, but once you apply a coat of mascara on them, they will blend in better with your lashes and appear less glossy. The reason many choose Synthetic lashes is because they are less expensive & they are more durable - which means that they will usually last longer.

What to look for when purchasing: It really depends on what "look" you are going for. Lashes that are very dark and thick are very noticeable and dramatic. They tend to appear less natural because of the thickness & can sometimes feel slightly heavy on your eyes. Nevertheless, they are beautiful for photo shoots or a night out. I recommend real human lashes if you want thick, because synthetic thick lashes (if they are long as well) appear very shiny, tend to curl very high and unnatural and can sometimes look "drag-ish". Steer more towards thick lashes with a natural length to add a lot of definition to your eyes.
This particular style of N.Y.C lashes are very thick and dark. You can tell that they are synthetic because they are very shiny. They are dramatic, but they aren't very long - So, they will enhance your eyes and make your eyes look darker and sultry. (Image source: www.superdrug.com)
Lashes that are natural in length and volume (refer to the "Ardell" photo above and look at #123 for example) are ideal for those with very short and fine lashes for a natural appearance. 

Lashes that are natural in volume and long in length are ideal for those with short to average lashes and average volume. (refer to Ardell #121)

Lashes that are long in length with added volume are ideal for those with average length & volume who would like added length and a darker look to their lashes. (refer to Ardell #105)

The possibilities are endless. You just want to make sure to pick lashes that are longer than your own. I've purchased lashes before that were actually shorter than my lashes - but much thicker and once I applied mascara to my lashes, they looked very unnatural. If you can't decide which to purchase, steer more towards lashes that are more natural in appearance. Then, you will get an idea of if you need more length or volume, so you'll know what to purchase next time!

Lash Adhesive/Glue: There are two basic brands of Lash Glue most that most locations carry. It is Ardell LashGrip Adhesive & DUO Eyelash Adhesive. I prefer DUO over Ardell because DUO is a stronger glue. I find that when I use Ardell lash glue, my lashes are falling off by the end of the night. That doesn't happen when I use DUO. DUO comes in two shades of glue, Dark or Clear. The dark glue is gray colored when wet, and dries to black. This is ideal if you are wearing black eyeliner or a black/dark smokey eye. The clear glue is white/off white when wet and will dry clear. Don't be alarmed by the scent of the glue if it's your first time applying false lashes. It has a offensive fishy smell, but goes away once it has dried. You may also see Ardell Lashtight Adhesive for Individual Lashes.. but don't purchase that one. It is not for strip lashes. It's for eyelash extensions. I've bought it before on accident thinking I was purchasing regular adhesive. Also, you may find the Ardell glue in a different colored box.. such as yellow, blue, black or pink. It is all the same exact product.


How to Clean False Lashes: There are several ways to clean your lashes. If you have real human hair lashes, they require a very delicate touch to clean. Apply a few drops of water to them and comb them through with a lash comb to get rid of any dust, dirt or mascara. It should also soften the glue so you can pull it off easily. Let them dry flat overnight. If they are drenched in water and you let them sit, the lashes can get clumped together and will stay that way. Synthetic lashes are easy to wash. You can run them under lukewarm water and with your fingers lightly rub the lashes so any mascara or dirt runs free. Lay them on a flat surface to dry.

How long False Lashes will last: It mainly depends on how well you take care of them. If you don't apply mascara to them or curl them with a lash curler, it will extend the life of your lashes. Make sure to always take them off at the end of the night and don't sleep with them. If you sleep with them, you may wake up to your lashes being pressed in different directions and you won't be able to wear them again. Gently peel them off at the end of the night and store them in the plastic container you purchased them in. It's important to keep them in a closed place because if you put them on your nightstand, they will collect dust and particles over night. I typically get 3 or 4 uses out of them. Sometimes I can get 5-7 uses out of them if I take extra care of them or if they are synthetic.

Friday, February 18, 2011

My Face of Today + Foxy Lashes!

I dyed my hair last night with my usual Clairol Natural Instincts Brass Free Brunettes in 5C Med. Brown.. So it may look slightly darker. And my hair was soo flat today because I loaded my hair with conditioner. Also, testing out my new Foxy Locks Extensions. I'll have a review on them soon for you!

Since I was wearing my military jacket, I thought it was only necessary to take a photo with my new aviators. haha! Got them at Forever 21 for $5.80.

Today was one of those days where you love your makeup and can't get a decent photograph. *sigh*

Face: MAKE UP FOREVER (MUFE) HD Foundation #128
MAC Moisturecover Concealer #NW25
NARS Irresistiblement Bronzer
Illamasqua Lover Blush
MAC Vanilla Pigment (highlight)

Eyes:
MAC Bare Canvas Paint (all over lid as a base)
MAC Vanilla Pigment (brow bone - highlight)
MAC Espresso Eyeshadow (in crease and slightly above & smudged on lower lash line)
MAC Tempting Eyeshadow (applied over espresso)
MAC Grand Entrance Eyeshadow (applied all over lid)
MAC Typographic Eyeshadow (darkened crease near the end)
Bobbi Brown Blank Ink Gel Liner (top lashline)
Foxy Lashes - Flirty Flare 02
Covergirl Lash Blast Mascara

Brows: MAKE UP FOREVER (MUFE) Eyebrow Corrector #3 Dark Ash Brown
MAC Brow Set #Girl/Boy

Lips: MAC Lure Lip Pencil
Obsessive Compulsive Lip Tar #Hush
NYX Round Lipgloss #Pinky Natural

Here is a closer look at the lashes I am wearing. They are one of the two styles that foxylocksextensions.com has to offer. I really love them and think they look natural, yet glamorous! You can click here to view more product info on these.

Thursday, February 17, 2011

MAC Jazzed Lipstick Review, Swatches and Comparisons!

jazzed lipstick review

Mac Jazzed Lipstick

MAC Jazzed Lipstick is a limited edition lipstick from the 2010 Summer (In the Groove) Collection. I bet a lot of you are surprised that I never owned Jazzed considering it's a lipstick that's in my favorite shade category.. haha! 

Jazzed is a medium, vibrant coral-peach with a shiny finish. Temptalia describes it as-
"a cross between Ravishing and Vegas Volt–not as peach/orange as Ravishing, but not as bright as Vegas Volt. It’s not too warm, so I think cooler skin tones can wear this well. This is not like Ever Hip–this is peach, orange, but not pink, which Ever Hip most definitely is."

MAC Jazzed Lipstick on my lips

Wednesday, February 16, 2011

Review: Keromask Concealer in the shade "Light" - A Great Full Coverage Concealer!

Keromask Concealer (Sample)

Product Description - Keromask® Masking Cream by Christy UK, is an ultra-highly pigmented and extremely concentrated camouflage cream for disguising a variety of common skin problems, large or small, such as:

Age spots • Acne marks and scars • Birthmarks • Broken capillaries • Bruises and Post-operative bruising • Burn Scars • Dark circles under the eyes • Eczema • Flushing • Moles • Permanent pigmentation problems • Port wine stains • Psoriasis • Rosacea • Scar discoloration • Tattoos • Temporary discoloration • Varicose veins • Vitiligo • And more…

Powerfully concentrated, just a small pin-drop of Keromask® is all that’s needed for many kinds of skin discoloration coverages. Generally one thin smoothed layer is sufficient coverage for most situations. However, in the case of very prominent discolorations, additional thinly applied layers of cream is more effective. Everyday make-up can be applied over a sealed area of Keromask® without disturbing it.
Keromask has an SPF12 sunscreen and is 100% waterproof when sealed with a loose finishing/setting powder. Keromask can also be worn when swimming or playing sports, and just one application can last up to eight hours, providing you with effective coverage throughout your day.

It is not animal tested.

(Source: http://keromaskmaskingcream.com)

Color Choices

You may have remembered from my latest http://www.camerareadycomsetics.com (no affiliation) haul, I purchased a sample of Keromask concealer on complete impulse because I had to spend one more dollar to qualify for free shipping.

The sample costs $3.99 and is shipped in a small plastic screw top jar. The purpose of purchasing a sample is to accurately test the color on your skin tone before purchasing a full size product. It is supposed to be enough product for a few uses. I had my fingers crossed that the sample was going to be a little more generous - but they only provided a small dab.. Luckily, with this concealer a little goes a long way - So I've been able to test the product out for days.

It was a little difficult finding swatches or many reviews for Keromask, so I chose the shade "light", which is described to fit "normal" skin tones and is most likely the most popular color. I could of probably used medium as well if I wanted to match my skin tone.. but I prefer my concealer to be a little bit lighter (not much) to give my face more dimension.

The color looked slightly dark and pink in the jar, and I didn't think it was going to work out good.. BUT, I was surprised to see that once I swatched it, it appeared much lighter and less pink.

It actually has that salmon/peachy coloring that works so well for masking under eye darkness.

I apologize that my before and after photos aren't that great. My under eye darkness is much more visible in person than it is in my before photo. I have a reddish purple under my eyes and its a darker blue purple in the corners.

You can visibly see in the after photo that it has completely covered any darkness and redness and evened out my skin tone. It has also brightened the area.

It is very visible that the finish is slightly dewy.

Review: Let me start out by saying that this concealer is amazing for full coverage. Like I said, I purchased a sample on a complete whim.. I've never heard of it and didn't research it. When I first swatched the concealer, my eyes literally lit up because I didn't expect it to be so creamy and so pigmented. I'm not going to say "typically".. but often times "full coverage" concealers tend to be dry in texture and don't "smooth" that easily on your skin. Often times it's required to moisturize your under eyes first. This concealer is so different. The texture is so buttery smooth.. The closest comparison in consistency is the Bobbi Brown Corrector.. the finish is actually like the Corrector as well.. but it covers more. The first few days wearing this I would moisturize under my eyes and then apply it with my MAC 224 brush. It provided a complete full coverage without looking heavy or thick. One day I just put a little under my eyes and on a couple of blemishes and went to run a few errands and because of the creamy consistency, it settled in my fine lines & was slightly "wet" looking? This didn't happen on days where I wore foundation & powder. With most of my concealers.. I need to "build" the coverage.. so naturally, I was applying more product than I needed. The past couple of days I've been using my finger to apply it.. and it has been working fantastic, as I'm not applying as much. I haven't noticed any creasing. It claims to be waterproof and from what I've noticed.. it lasts all day on me without fading. It brightens under my eyes and covers blemishes 100%!! I am so amazed with this concealer and I believe that this is HG material and everything I've been looking for in a concealer.

If you're looking for a moisturizing, full coverage concealer and you feel you've tried everything.. I highly recommend you to give it a try!

The only downside for me is that it's very expensive. It's $42.. but it's said to last for over a year because of the high pigmentation.

If you check out the website (http://keromaskmaskingcream.com/) you'll see on the front page that they have a video showing how it can cover up a tattoo.

Have you heard of this brand or tried this concealer? Let me know your opinion in the comments!

Tuesday, February 15, 2011

NOTD: Nude Nails with Love & Beauty (Forever 21) Nail Polish in Nude!

Two (2) coats of Love & Beauty "Nude" Nail Polish & one (1) coat of Sally Hansen Insta-Dri Top Coat. My middle fingernail is looking a little odd because the corner of it chipped pretty bad. I had to file all of my nails down so they somewhat matched in length.

I really like wearing nude colors on my nails, but I rarely ever wear them. Mainly because I don't really like the way it looks with my self tanner. But, since I've been going real light on the self tanner lately, I thought this would be a pretty neutral shade.

It's a warm pinky nude that I think is very flattering on my skin tone. Neutral colors on your nails are supposed to elongate your fingers and I actually do think this polish blends in with my hands at a glance and makes my fingers appear longer. The color is soft and milky, but it's not too light or pastel. I'm very happy to say that the formula is opaque and you only need two coats. Many nude polishes are too sheer, which require additional coats. And additional coats for me typically mean that all of my nails are going to smudge (I never wait long enough in between coats).

Anyway, great shade and I'm sure I'll be using this again and again.

My last NOTD (love & beauty forest green) actually lasted pretty long. It lasted a full week with one minor chip. Very nice for a Forever 21 polish!

Monday, February 14, 2011

Happy Valentine's Day! (My Weekend)

Hey Everyone!
Happy Valentine's Day! Hope you all had a great weekend!

I've had a few requests to "review" George's Birthday and Valentine's Day. And although I like to keep my blog beauty related, I do a personal post here and there. So here it is.. :)

I mentioned Friday that I was going away for the weekend. I had actually posted that on my way out the door, coat on and everything - so my thoughts weren't very well organized. I may go back and edit it or possibly post a full review of Cinema Secrets at a later time.

Anyway, our destination for the weekend was New Buffalo, Michigan to stay at the Four Winds Casino Resort. I've never been to Michigan, even though it's so close by. It's only around 90 miles away.. which is around a 2 hour drive.
(Photo Credit: www.newbuffalo.com)

We arrived Friday night.. maybe around 10 PM or so. While George was downstairs, I had quickly decorated the room. I made a rose petal trail from the door all the way to the bed where I had a little bunch of roses and a picture frame with a picture of us.
He loves my baking, so the night before I made peanut butter cookies with chocolate chips and chunks of Reese's peanut butter cups (his favorite) and chocolate truffles. A couple of years back a friend taught me this awesome recipe that consisted of cream cheese, Oreo's and white chocolate. All you had to do was crunch up the Oreo's into little crumbs and mix it with the cream cheese. Roll the mixture into small balls and dip them in white chocolate. Simply delicious! I did my own take on them and made two different fillings. One with cream cheese, peanut butter, graham cracker crumbs & a little sugar and the other filling was the same thing, but instead of peanut butter.. I used Nutella. They were sooo yummy!

I put the yummy treats on heart shaped plates. I also purchased lots of goodies from Rocky Mountain Chocolate in the mall which I also put on small heart shaped plates and put them around the room. (chocolate dipped strawberries, chocolate dipped rice krispy treats, chocolate dipped oreos, chocolate dipped marshmallows, etc)
The hotel room consisted of a bedroom and a sitting area with couches where you can watch tv, etc.. so in the sitting area I lined up all his gifts & cards on the tables. I also purchased a bottle of Nuvo, a "Sparkling French Liqueur" and put the bottle in some ice, next to two wine glasses (yes, it's not wine - but I had to improvise LOL). Neither of us drink, but I thought we'd give it a try. It came in a very pretty pink bottle.

Here's a peek inside one of the cards (Yes, I bought him more than one). The front of the card was a black and white photo of a little girl and boy holding hands - so on the inside, I made copies of baby pictures of me and him, cut them out in heart shapes and glued them inside the card. He loved it.. lol

Ever since we've started dating, George has always cut out the "Love is" poems from the newspaper and given them to me (if he thought it pertained to us). I copied all of my favorite ones and gave them back to him. We read them together and had some laughs. I also put fake Valentine themed lottery tickets all over the room for him to scratch for fun.. haha!

Lastly, I lit some red candles that I placed all over the room & when he walked in the room he was so surprised and loved every bit.

We wasted no time and went down to the casino where he played poker, and I played slot machines. We stayed at the casino all night and went back up to the room to eat a bunch of the goodies & get some rest.

We had some fun at the Casino again on Saturday and went to dinner. The restaurants were packed for Valentine's Day, so we ended up eating at the Buffet. No complaints! I was very surprised by the quality of food they had. Everything was very good!

I always like taking pictures of my dessert...

Then George joined me and played slots and we ended up playing till around 5 AM.. We were both zombies by that time & we went back upstairs and slept like babies :)

Sunday morning we stayed for lunch and made it back home by the evening. It was a really nice time! I really didn't take any pictures.. Me and George weren't in the "picture mood" all weekend.

As for today, Valentine's Day.. I'm not doing anything because George unfortunately is working late. He did bring me flowers, a card and balloon in the morning which was sweet.. But no going out for me today :( I'm not bummed though because we kind of combined Valentine's Day into George's Birthday.. and it was kind of like a Valentine's/Birthday weekend. 

That's pretty much it! What are your plans for tonight? Anyone staying home too??

OCC Hush, Divine and Trick Lip Tars Review and Swatches!

OCC Divine, Trick and Hush Lip Tars

For a brief review, Obsessive Compulsive Lip Tars are ultra-pigmented lip colors that combine the opaque pigment of a lipstick with the ease and application of a lipgloss. In fact, they are so pigmented that you can't apply them directly from the tube. For the best results, the use of a lip brush (or your finger) is needed. They feel incredibly light on the lips, and are comfortable to wear. There is a large selection of colors, which are meant to be mixed to create your own unique lip color!

After trying out my first Obsessive Compulsive Lip Tar in the shade Cha Cha a few months back, I knew I wanted to purchase more shades. So, like I mentioned in my haul post this past Wednesday, I caved in and purchased three more lip tars. I chose shades that don't require mixing and would be practical for every day.

After going through countless swatches of lip tars via google, I decided on Trick, Hush and Divine.

Trick is a light-medium, neutral peach-beige with a hint of pink-brown.
Hush is a light, neutral, mauvey pink.
Divine is a bright neon coral-pink, or flamingo pink.

occ lip tar swatches
From left to right: Hush, Trick and Divine. 

occ lip tar swatches
Swatches from left to right: Hush, Trick and Divine.