Saturday, July 31, 2010

Friday's FOTD! Neutral Browns/Taupe..


Face:
Clinique Pore Minimizer (After I moisturized, I applied this on my chin where I have larger pores)
MAC Studio Fix Fluid (2/3 parts NC30 & 1/3 parts NC40)
MAC Studio Finish Concealer NW25
Chanel JC Powder Blush "Orchid Rose"
MAC "Sunbasque" Powder Blush
NARS "Albatross" Powder Blush (Highlight over my blush and on the bridge of my nose)
Ben Nye Neutral Set Powder (Dusted all over my face and under my eyes)

Eyebrows:
MAC "Cork" Eyeshadow

Eyes:
MAC "Cork" Eyeshadow (all over my lid & smudged on my lower lash line)
MAC "Honey Lust" Eyeshadow (on my lid up to the crease)
Urban Decay "Twice Baked" Eyeshadow (above my crease, mixed with Cork)
MAC "Ricepaper" Eyeshadow (highlight on my brow bone)
MAC "Coco Bar" Liquid Last Liner
Covergirl Lash Blast Mascara
Falsies cut in half

Lips:
MAC "Oak" Lip Liner
MAC "Shygirl" Lipstick
LA Splash "Sparkling Coral" Lip gloss

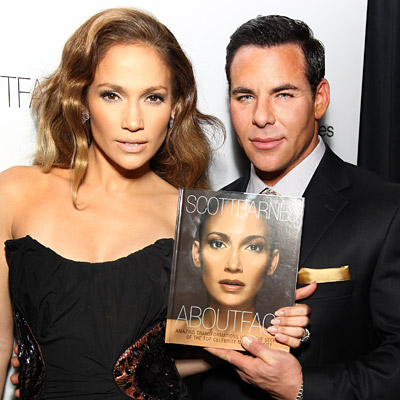
My crease color was a lot more vibrant and defined looking in person. The color was actually applied a little over my crease.. which is something I haven't really tried before. I really liked the way it looked. It looks a little washed out in the photos. I was going for a look I saw in my Scott Barnes "Face Forward" book.

Kind of similar to this look... but with slightly different colors.. not as matte.

Thursday, July 29, 2010

Sally Hansen Natural Beauty (Inspired by Carmindy) Makeup Review and FOTD!

Every once in a while I like to browse product reviews on makeupalley in each category descending from the largest amount of reviews. Last month I found myself taking extra time to look through the highest rated drugstore foundations. That's how I came across Sally Hansen Natural Beauty Foundation. I never heard of it until that point. I know I've seen the "Natural" section before at my local CVS Pharmacy, but I never looked at any of it. Why? Because "Naturals" honestly didn't sound very appealing to me. It automatically makes me think of products that won't have good coverage or products with little to no pigmentation. Call it Cake Face Beauty and I probably would know all about it. Haha! I'm joking, but what's sad is it's probably true.

When I started reading reviews, I quickly realized this foundation is no tinted moisturizer. Several reviews claimed this foundation has an excellent medium coverage.. and compared it to several high end foundations. It's rated a 4/5 based on 326 reviews with a buy back rate of 70%.


Click the screenshot to be redirected to makeupalley's review page for this product!

There are 12 different shades.

Based on reviews, I had it in my mind to get Sandy Beige or Tawny Beige for my MAC NC35-40 skin-tone. I'm usually NC40 all year round, but lately I haven't been self tanning as often as usual. So I've been wearing NC30-NC35 a lot. I knew if the color runs a little light from a NC40, it's no big deal. Just as long as the undertone is correct.

I even read that some NC40's were wearing True Beige and Golden Beige. Golden Beige is a little on the grayish side, so definitely a neutral shade for those of you that don't have much yellow. True Beige definitely has a pink tone to it.

Anyways, once I arrived to ULTA I couldn't find Sally Hansen products anywhere! I was about to leave and I decided to check the clearance rack real quick for good deals. And what did I see? ALL SALLY HANSEN PRODUCTS WERE CLEARANCE. In a way, I was excited because they were half off & in a way I was like "Come on Seriously? You're going to discontinue something good?"

Rest in Peace my beloved Maybelline Shine Free.. We were best friends in high school.. We had plans!! We were supposed to do everything together!! *tear*

Lmao, last night I was talking funny because it was late, and now it's my lack of sleep.

Soo, I ended up getting both Tawny Beige and Sandy Beige. They were I believe.. $6.99 each.

Once I got home and swatched them on my hand, I right away favored Sandy Beige. It's lighter than Tawny Beige and has more of a golden yellow tone to it. Tawny Beige looks almost identical except it is slightly darker and has a slightly.. reddish tint to it? It still has a yellow tone to it, but not as prominent as Sandy Beige. Sandy Beige is more for the lighter NC40's that can go down (nc37) instead of up (nc42).

This picture is taken in a room with fluorescent lighting - no flash


Same room as before, but an area where there is less light - no flash


Comparisons of MAC Studio Fix Fluid in NC30 and NC40 to both Sally Hansen Foundations. (The photo is taken with flash)

Application & Review
I've tried two different methods of applying the foundation. I've tried it with my fingers and I've tried it with a MAC 131 Brush. I highly favor the brush method for a flawless look. I found the coverage to a definite medium plus coverage. I found the coverage is similar to MAC Studio Sculpt Foundation. The texture is very creamy and applies very smooth. It reminded me a bit of Giorgio Armani Luminous Silk texture wise (thin, not heavy, runny, yet creamy). The end result is a beautiful airbrushed look with a slightly dewyness. I did not find this foundation to be too oily. After I've applied the foundation, I set it with a blot powder and re-blot once later in the day. My makeup stays put till the time I go to sleep. I wore this foundation practically my whole Vegas trip and I loved it (even in extreme heat). Love this stuff & will repurchase.

Here is what it looks like on my face. This picture was taken in the daylight with no flash.


This is basically my plain every day look..

Face:
Sally Hansen Natural Beauty your Skin Makeup in Sandy Beige
MAC Select Cover up Concealer NW25 & a smudge of Lancome Effacernes Concealer
MAC "Pleasureful" Blushcreme
MAC Blot Powder Med. Dark (a light dusting all over my face)

Brows:
MAC "Cork" Eyeshadow
MAC "Girl Boy" Brow Set

Eyes:
MAC "Cork" Eyeshadow (smudged into upper and lower lash line)
MAC "Coco Bar" Liquidlast Liner
Covergirl Lash Blast Mascara Black

Lips:
MAC "Pleasureful" Blushcreme
LA Splash "Sparkling Coral" lip gloss

Sally Hansen Natural Beauty products can be purchased online at CVS.com, Rite-Aid.com and Drugstore.com.

Wednesday, July 28, 2010

How to avoid your self tanner from settling in your pores & Tips for a perfect tan!

Q: Why is it that when I self tan, the tan settles into my pores and makes them look more noticeable!?

(If you haven't had this happen to you and you don't know what I'm talking about, it's when you apply self tanner and your pores appear darker and more noticeable)

First of all, you're not really going to know if this will happen to you unless you are familiar with the product you are using. Considering everyone's skin reacts differently, you can follow all of the right steps. Shower, exfoliate, shave & moisturize. Then, before you hit the sack you apply the self tanner with pristine skill, wait for it to fully dry and go to sleep. Then you wake up to legs full of dark dots. While your BFF did everything you did, and woke up with legs good enough to be in a Skintimate commercial.

Typically, you are more prone to these spots when you use a self tanner that provides a deep, dark tan with a very dark color guide (color guide: a dark colored lotion, essentially a bronzer that "guides" you from missing spots that a clear lotion can miss).

So, dark self tanners such as: St. Tropez Self Tanning products, SUN Labs Tanning products, St. Moriz, Bare Essentials Faux Tan, Neutrogena Instant Bronze.. shall I go on?

Tips for an Even Tan, Spot Free!

1) Avoid salt & sugar exfoliate. They might sound great because they make your skin feel super soft and give an overall polished look. You think your skin is the perfect canvas. But no, your exfoliate has fooled you. It has just left an oily film on your skin that actually, creates a barrier between your skin and your self tanner. So when you apply your self tanner, your skin isn't absorbing it efficiently. Thus, giving the opportunity of an un-even tan. Also if you're planning on shaving.. a salt exfoliate can irritate your skin. Think. You just revealed new, sensitive, fresh skin cells with the help of large grains of salt and now you're going to shave. I don't know about you, but it makes me cringe. I automatically think about salt on open wounds.. which also makes me think of the Texas Chainsaw Massacre. LOL!!! (Don't mind me, it's late) An exfoliation glove works great with a shower gel. Plus, they are inexpensive. You can pick one up at Dollar Tree, for yes.. a dollar. Just buff your skin in gentle, circular motions.

2) Invest in a good razor. Generally, more expensive razors = better quality razors. They tend to protect your skin better (many have an aloe or lotion strip) & will give you the closest shave. You definitely want the closest shave you can get so you won't have to end up shaving over your self tan. Using a cheap razor (please don't get your razors from Dollar Tree while you're there) can irritate your skin once you apply your self tan. I've had it happen before and it stung, a lot!! Really, what's an extra few dollars to spend to have silky smooth, non irritated legs? It's one thing I don't like to go cheap with. That and my Secret Clinical Deodorant (dang you, Secret for charging so much!). I use a Schick Quattro for men and I love it. I change the blades constantly when they dull. If you know your skin in sensitive, try to avoid shaving right before you apply your self tanner. If possible, shave the day before or in the morning if you're planning on tanning at night. Give your skin a little time. Avoid oil based shaving creams or hair conditioner. A shave gel is preferred.

3) The right moisturizer. Moisturizing is a preference. It's not necessary. Some people swear by moisturizing prior to applying their self tanner. Some never use a moisturizer with equally great results. It's whatever you like. Moisturizing your skin may help the self tanner smooth evenly on your skin. Just make sure it's not... (you should know this by now) oil based. Use a water based moisturizer that will absorb into your skin. Not a moisturizer that will sit on top of your skin. You can tell if your lotion is water based by looking at the first ingredient on the back. It should say "Water". Too many excess oils can cause your skin to break out. I've experienced using an oily exfoliate, an oily shave cream and applying body cream before tanning. I woke up with pimples on my neck. I thought, what in the world!? I've never had a pimple on my neck. But it makes sense. Exfoliating your skin and then applying so many excess oils to go straight into your pores.

4) The right temperature. Believe it or not, this plays a roll. If you're planning on self tanning once you've just gotten out of your steamy shower, give a little time to cool off instead. Let the bathroom air out. Applying in warm or hot conditions is not ideal for your self tan. When you're showing in hot or warm water, all of your pores open up. Applying self tanner when all of your pores are open is a no-no. This can be one of the main culprits of having your self tan settle in your pores. I know, who wants to stand around naked and cold to apply their self tanner? Apply it at room temperature or with a fan nearby. If you're prone to having very visible pores after tanning, likely on your legs, face or arms.. splash or run cold water on your skin and pat your self dry with a towel. Then apply the tanner right away. When your skin is cold, your pores tighten. Cold water might be unpleasant, but it works.

5) Tighten your pores even more. Use a toner. Witch Hazel works great for me. Apply some on a cotton pad and smooth it over your skin. There are other products like Tendskin, that work great as well. Again, when your pores are tightened and your skin is free of oily residue, your skin will absorb the tan like nobodies business. And that's exactly what you want. You'll notice less color will wash off in the shower.

6) Application method. Make sure to wear tight fitting gloves. I prefer latex gloves over plastic gloves because they are better fitting and have a softer texture. If you're wearing loose fitting plastic gloves, like the ones you'd get in a box of hair dye.. you have more chances of getting a streaky tan. I personally like gloves mostly for lotions. For mousses and sprays, I prefer a self tanning mitt as it covers more area in one swipe.. not to mention it applies liquids very evenly.

7) Drying Time. Allow your skin adequate drying time. This is one reason I like sprays. Most contain alcohol, making the drying time very fast. If you've just applied a lotion, allow a little extra time for your tan to dry. Wear loose fitting clothes and don't come in contact with water.

8) Longer is always better. Ehem. The longer time you wait for your tan to develop, the better. If you're using a super dark self tanner, the DHA (what's essentially making you bronze) needs time to develop. With most self tanners, you need a minimum of 8 hours. I like to have my self tanner on for at least 10 hours before I bathe. My tan ALWAYS looks the darkest, and best when I've kept it on the longest. If you're going to be home all night, don't always wait for the moment you're going to go to bed. Try tanning as early as you can so there is more development time.

9) Rinse. Yes, shower. If you followed the steps, you shouldn't be scared of losing your tan by scrubbing your body like usual. Like I mentioned, the more your skin absorbs the tanner, the less color will wash off each time. If your tan developed with a barrier between your skin, your tan won't be as intense. Thus, more will rinse off in the shower because SO much less product was actually absorbed in your skin. **When it's time to shave next, this is where having a good razor will come in again. Using a good razor generally won't take your tan away. Bad razors can cause streaks in your self tan or remove it.

10) Moisturize. Make sure to keep your skin moisturized to maintain your tan! :)

I hope some of these tips helped you!! Do you have any tips of your own?

Neostrata Self Tanning.

I purchased this online from Canada a couple of weeks ago, because the reviews I read were all very positive & it has a high rating on makeupalley. I was really hard to hunt down.. and I haven't done much research, but is this stuff discontinued?? Anyway, I finally received it in the mail today & I'm so excited to try it out tonight!

I purchased the Sunsation Insta-Tan for the Face Mousse (Dark) because I am always on the lookout for a good facial self tanner. Sun Labs spray is the only self tanner I've used on my face that gives me a deep, even color and doesn't break me out. I'm crossing my fingers it won't break me out.


Has anyone tried this or other Neostrata self tanning products? What do you think of them?

I'll have a full review and additional info about the brand later in the week.

Tuesday, July 27, 2010

June/July Favorite Beauty Purchases!

Since July is coming to a close end, I thought I'd go ahead and do a favorite beauty purchases post for the month. I also tossed in some products I discovered in June that I'm still favoring now.


1) MAC 131 Duo Fibre Blush Brush - I purchased this at a CCO for around $25. Reg. $40 at MAC. I completely stopped using my 187 and I've only been using this brush for my liquid foundation. I highly prefer it over my 187. The shape and size is perfect to get around smaller areas that the 187 couldn't. If I end up going back to the CCO and they still have it, i'd probably get a back up.

2) Walmart Powder Brush (High Definition) - This costs around $7 and you can only get it at Walmart. The synthetic bristles are soo soft & it's just an overall great quality brush. I use it for my setting powder and my bronzer.

3) Walmart Angled Blush Brush (High Definition) - I love this brush for applying my blush. It's denser than the powder brush and it's made of the same, soft synthetic fibers.

4) MAC Pleasureful Blushcreme - This isn't something new of mine.. I got it at the CCO months ago & never really wore it. Lately, I started to really love it for a dewy pop of pink on my cheeks. I also love using it on my lips. It reminds me a lot of NARS Honolulu Honey lipstick.. one of my old HG's I haven't purchased in a while.

5) The Body Shop Body Butter - I haven't tried anything from The Body Shop.. but when I spotted this at TJMaxx for $6 after hearing juicystar07 on youtube say their body butters are awesome, I thought i'd give it a try. Run on sentence, much? The scent I got mine in is "Black Velvet Apricot". I'm not sure if it's a discontinued scent, but I love the smell. Its a very feminine, sweet apricot. Oh, and it feels amazing on the skin.. ;)

6) MAC Cork Eye Shadow - I've been into browns a lot lately. I own lots of dark browns, but I don't really have any light browns that are similar to cork. I've been using it on my brows almost every day.. and I love smudging it into my lash line for a natural look.

7) MAC Sorcery Eye Shadow - I love shades like this. It does wonders for my hazel eyes. It's a raisin color (a mixture of burgundy/brown/purple piled into one color) similar to MAC Folie. I love smudging this under my lower lash line. It looks great paired with browns and other neutrals.

8) NARS Galapagos Eye Shadow - A chocolate color with gold shimmer. I love NARS eye shadows. I only have one other.. and they are so amazing. Amazing pigmentation and blends like a dream.


9) Alima Pure Mineral Foundation - Absolutely love this. Great coverage.. will be purchasing a full size to use as a setting powder for under my eyes & face. I'll be getting a lighter shade (Warm 3, equivalent to MAC NC30.)

10) Victoria's Secret Dream Angels Heavenly™ Shimmering Hair & Body Spray - I have become addicted to being shimmery this summer. I purchased this on my b-day (June 2nd) and have used it just about every day on my body. It gives a perfect subtle golden shimmer. I JUST ran out, so I'll be getting another one next time I visit Victoria's Secret. It's $10 at the checkout.

11) Sally Hansen Natural Beauty Foundation (Inspired by Carmindy) - Amazing medium + coverage drugstore foundation. I'll be posting a review soon!

12) Orly Mirror Mirror Nail Polish - It's rare for me to find a nail polish I like so much that when it's time to take the polish off my nails, I use the same color.. over and over. I've been doing that with this color. I wear lots of grays.. so it pretty much matches what I'm wearing all of the time. It's a bluish, dove gray.. different from many other gray nail polishes. Lasting power is also good, it gets me through a week.

13) Covergirl Bronze Fire ShadowBlast - Perfect for every day. Check out my full review here.

14) LA Splash Sparkling Coral Lip Gloss - I purchased this at ULTA on a whim, and I'm so happy I ended up loving it. It's my every day lip gloss. It's a light, warm pink with golden shimmer that makes it appear slightly coral. I love the sponge applicator too. It's longer & flatter than a traditional sponge applicator and slightly slanted.

Here's a swatch on my hand.

And on my bare lips.

15) NYX "Pumpkin Pie" Round Lip Stick - I mentioned this lipstick in June. I've been wearing it almost every day since I purchased it. If I'm not wearing Pumpkin Pie, I'm wearing MAC Shygirl.. :) You can view swatches from my past post here.

What are some of your favorites this month??

NOTD & Review of Eyeko Nail Polishes!


From Left to Right: Vampira Polish (Black with fine red glitter), Tea Rose Polish (A true mauve) & Coral Polish (A bright coral red).


The swatches in this picture are very true to color. Especially "Tea Rose" which looks a little brighter and pink in the 1st picture.

My favorite of all three is the Coral Polish and it's what I have on my nails today!

This is 2 coats, no top or base coat.

My Overall thoughts:
From what I see so far, these polishes are great. Coral and Tea Rose both have a similar formula. They are slightly thick, very opaque & apply very well with no streaks. Two coats is more than enough. Vampira is a little bit of a different formula. It is a lot thinner, and you need around 3 coats to achieve the actual color. I would highly recommend top coats with these polishes so you don't get any nicks on your nails. With thick polishes, they sometimes tend to dry like a soft plastic and you definitely need to protect them.

Eyeko Nail Polishes are $5.50 each and can be found here!


I really like the looks of Posh (taupe), Lilac & Nude.. all pictured above. :)

Do you own any Eyeko polishes? Which are your favs?

Disclaimer: These products were sent to me for review. I was not paid for this review, nor am I affiliated with Eyeko. The opinions expressed in this post are from my personal experience in using these products.

Monday, July 26, 2010

What's YOUR favorite beauty book?

I was at Barnes & Noble last week and browsed through the health & beauty/fashion section. Some of them looked very interesting. I unfortunately didn't have much time to look through all of them, but a few titles rang a bell. I've heard a lot about different beauty books, but I've never picked any up.

I'd like to get some opinions & recommendations. Are there any MUST HAVES?

I ended up purchasing one book. It is Scott Barnes "About Face".


When flipping through the pages, I noticed he does lots of contouring with foundations. That's something I've always wanted to do and always wondered.

Contouring arose my curiosity after seeing this picture of Kim Kardashian a while back, with her makeup artist Mario D. I was never able to find information on what exactly he uses or how its done.


I found the book to be very informative, and an overall great read. For me, it was worth it and I can't wait to try some of the tricks!

Do you have any beauty/makeup books? Did you learn new things? Was it worth it?


Get a Sunless Tan Instantly with L'Oreal Sublime One Day Gel!

L'Oreal Sublime One Day Tinted Gel for Face & Body

I discovered L'oreal Sublime Bronze Tinted Gel randomly one day while I was at CVS Pharmacy shopping for self-tanner. After reading the information on the front and back of the bottle, it really caught my interest that it's said to provide instant color that can be washed off by the end of the day. I figured it can come in real handy.

Have you ever planned to apply self tanner the night before you were supposed to go somewhere & you accidentally fell asleep & woke up the following morning cursing?! OR, applied a self tanner, went to bed & woke up to NO tan what-so-ever?! It's happened to me several times when trying something new or if I didn't wait long enough for the lotion to dry & went straight to bed (holy tan lines!). With self tanner, you never really know what you're going to wake up to. It may not happen often when using the same products, but on occasion you may wake up to a tan that falls beneath your expectations. That's where this awesome product comes in. I'm starting to sound like an infomercial.

Well, it's obviously not only to fix goof ups. That's just an added plus.
-If you're not a self tan user and you want some color and self tanner makes you nervous.. this is a great alternative.
-Maybe you already have an awesome natural tan and you want something to apply to your skin to add an extra glow and to slightly deepen your tan.
-It's for anyone, of any skin tone that wants some extra color and glow.
-It's a "commitment free" tan.


There aren't many steps to the process and there is no difficult technique to follow. It's not necessary to exfoliate prior to application (although it can't hurt). 

(These are the steps as listed above)
Step 1:
Start out with clean, dry skin. You can moisturize your skin with a body lotion prior to application, but it's not completely necessary. Having freshly lotioned skin, makes the blending time go a little faster (It only takes about a minute anyway). You can always apply lotion afterward to blend everything better. If you're applying this to your legs, shave prior to application. Put on a pair of plastic gloves or you can use a self a self tanning mitt. Put a couple of pumps of lotion in your hand or directly on your skin. It's alright if you under estimate how much to apply. You'll be able to add more without worrying if the color will cake.
**I've made the mistake of applying this with my hands because I figured, it's not a self tanner. But it temporarily dyed my hands & I had to scrub them vigorously for a few minutes to get rid of the color. It washes off a lot easier on your body. Just a little water and soap.. but for some reason, your palms really soak up the color.

Step 2:
Spread the color all over the area you want to cover with your hand. Then, blend the color in your skin using circular motions. If you need more lotion, go ahead and add a couple more pumps. If you see it looking too dark, add a little of your own moisturizer and continue to blend the area in circular motions to lighten it up. Once it all looks blended, let your skin dry. It dries in less than a minute. If you applied a body lotion prior to the application of the bronzing lotion, it may take an extra minute for your skin to dry.
**I love applying a shimmering body lotion after my tan has dried. Even though this lotion has a slight shimmer to it, I love for my skin to shine!

That's it! Once your skin is dry, you can get dressed.

Also, one thing to mention. Once you've used this for the first time, the next time you use it, put one pump (or a half a pump) in the garbage first. The very end of the lotion that sits in the pump tends to harden up and you will end up smoothing around a tiny clump of bronzer with your application.

Here are some addition pictures of me applying the lotion to my FULL arm.


Questions you may have?
Does it rub off on your clothes?
No. If it has dried, it shouldn't rub off. I was nervous when I first starting using it, and applied it to my arms and wore short sleeves out. I thought, what If I rest my arm on something and I'm going to have white marks on my arms?? It didn't end up happening. It has always stayed in place for me. Now, if you're sweating a lot, the color may bleed onto your clothing like any body bronzer would.

It has not stained any of my clothes after I washed them.

If I apply it to my hands, am I able to still wash my hands?
Yes.. but not several times. If I ever need to use it on my hands, I don't spend a lot of time running my hands under the water. I focus on my palms rubbing gently, rinse the soap off and pat my hands with a paper towel. The tan may disappear after a few quick hand washes.. but it shouldn't disappear after only washing them once. Just again, make sure to be very gentle and pat your hands dry.

Happy Tanning!

Have you used this product or a similar product? What did you think?

Sunday, July 25, 2010

Eyeko Graffiti Eyeliner Pen Review, Photos and Swatches!

Eyeko Graffiti Eyeliner

Eyeko Graffiti Eyeliner Pen is a liquid liner pen with a precision brush that can be used to draw thick or thin lines.
Eyeko says: For fool proof eyeliner dot across the upper lid as close to the lashes as possible then simply join the dots! Wing it, flick it, have fun with it! Team with lashings of Eyeko Magic Mascara for a flirtatious flutter! 
Eyeko Graffiti Eyeliner Pen is smudge-proof, fade-proof and long lasting!
Eyeko Graffiti Eyeliner Pen is available in four (4) shades: Jet Black, Navy Blue, Brown and Purple.


This is a great liner pen in comparison to many I've tried.. such as ELF, Styli-Style, Milani & more. The pointed felt tip is very sturdy and doesn't bend or lose its shape during application. It's very simple to apply and (for me) the point makes it easy to create a precision line. It lasts all day with minor fading by night near the tear ducts of my eye. It's pretty budge proof. If you've made a mistake, it's best to fix it right away before it dries, with a wet q-tip. Once it's dry.. you'll need makeup remover. Yay for long lasting! Also, It doesn't irritate my sensitive eyes. Overall, I think it's a great product. The only con I can think of is, I wish the applicator was a little more soaked in product. I find it to be slightly dry.

Alima Pure Satin Matte Mineral Foundation Review!


Alima Pure Satin Matte Mineral Foundation is hypoallergenic -- it goes on easy and feels like nothing at all, naturally. It evens out your skin tone, enhances your complexion and reduces the appearance of fine lines and pores. And, with 61 shades, there's a match for just about everyone.

You have the option of purchasing a sample jar of their mineral products for only $1.50. So, I figured its not a huge loss if it doesn't work out. A full size of their mineral foundation is $20 for .24 oz or 7.5 grams. They have an excellent color section. I believe there is a color that should suit about anyone. They make it easy for you by breaking up the colors in different skin tones. There is Cool, Neutral, Beige, Warm, Golden & Olive. And if you aren't one specific shade, you can have a custom blend of up to 3 shades.

Picking my color-I researched what several MAC NC40 skin tone wearers wore. The majority wore W-4. (Warm 4). I read that a few wore one shade up W-5, but I believe W-5 is better suited for those who are a darker NC40.. that can get away with wearing NC42. A true NC42 can wear W-5 and W-6. If you're more of a neutral NC40, B-4 or even B-5 (Beige-4,5) may work for you. I think its very well work getting a few samples before you purchase the full size. Having your exact color match can make or break your decision of loving or hating a foundation.

I ordered Warm 4, Warm 3 and Golden 3 and Golden 4. From the website swatches, I was unsure if the warm shades were going to be golden enough. I really liked the yellow tones in the golden shades, so I got both.

I also ordered a couple blushes and shadows.

My order arrived very quickly with a few extra samples. Nice!


Testing the shades:
Right away, I tested all four shades on my face side by side above my jawline. I had no makeup on my face. Just a little moisturizer. I let it sit on my face for a few minutes and looked at my face in a few different lighting conditions. The best lighting to view if your foundation is the right shade is in natural sunlight on an overcast day. When its sunny out, you can make the mistake of thinking your foundation is lighter than it really is. I've made the mistake of doing my makeup in front of a sunny window and applying way too much blush because in the light, it didn't look so heavy. If its not cloudy out, wait till later in day when the sun is starting to go down.. or shut your window shades and still standing by the window, look at your face in the mirror. You can also look at your face in your visor mirror in the car in the middle of the day. When I'm shopping for a foundation at the store, I ALWAYS leave the store before I pick a shade. If the store has fluorescent lighting, it will alter the way your skin really looks, and give your skin a bluish green tint.

Furthermore, When looking at my face in the mirror, the shade that seemed to disappear into my skin was Warm 4. The 2nd runners up was Golden 4. The golden shade was almost identical except for a slight hint of yellow. I can wear either one. W-4 matches my face better and G-4 matches my neck better because of the strong yellow tone that comes from my self tanner. Golden 3 and Golden 4 were almost exactly the same as well. Warm 3 was too light, perfect to add dimension to areas of my face or to put under my eyes to brighten. A good match for NC30. I put a swipe of MAC Select Sheer Powder in NC40 on my hand next to all of the shades and it was almost identical to W-4. The Golden shades were far more yellow.

Review: I've only used this twice (alone) on my face. I applied it over moisturized skin with a goat hair kabuki and did lots of buffing. It did a pretty good job at covering blemishes. For extra coverage on blemishes, I used dampened a small brush and dipped the brush in the powder and applied it to the blemish. It provided full coverage to those small spots.. and dried to a powder that blended in with the rest of my face. Lastly, I spritzed my face with MAC Fix+ to set everything in place. It didn't irritate my face and it lasted through the day.

Will I be tossing my current foundations and use this? No. Only because in the end, I still prefer liquid over powder. BUT, I am confident in saying I can toss my other powders and use this as a setting powder (Okay, so I won't be tossing anything.. but you get what I mean). I've been using W-3 every day to set my concealer and apply above my cheekbones to highlight the area. It provides amazing coverage and adds extra coverage to my under eyes. It never cakes.. never budges.. never have to reapply. This product definitely screams HG (Holy Grail). I've also used it to set some of my lighter coverage foundations to provide extra coverage and it works wonderfully!! I'll be ordering a full size powder this week of W-3. My sample is running low and I'm getting nervous! haha!

Update: I did purchase the full size of W-3 and I use if often to set my under eye makeup or brush over my foundation for added coverage.

Sunday, July 18, 2010

Covergirl Smoky Eye Look Sets Review, Photos and Swatches!

Covergirl Smoky Eye Look

"Become a Make-Up Master and Create a Celebrity Look in 3 Steps"


Covergirl came out with kits to create many variations of the smokey eye. When you hear the words "Smokey Eyes".. many assume that "Smoke" refers to those sexy, smoldering blacks, gunmetals and grays you see on many celebrities and high fashion ads...


But really, smokey eyes doesn't necessarily have to mean dark. Smokey describes the actual application of an eye shadow and the way it is blended to create a smudged or "smoked" out look.

Smoke can be any color you want it to be. So don't limit yourself to only black.. there are so many other gorgeous colors! Personally, brown smokey eyes are my favorite.

There are 3 different Sets to create 3 different looks:
A Glamorous Look
A Bold Look
A Natural Look

Each Set contains:
1 SmokyShadowBlast Cream Shadow Stick
1 Lash Blast Mascara
1 Line Exact Liquid Liner
Step by Step Instructions to guide you through creating your desired look


Monday, July 12, 2010

Back Home!

Hey Everyone!

I arrived back in Chicago today after a long, long 2.5 weeks in Las Vegas. Sadly, I didn't have internet the whole trip (until the last couple of days.. pffft). I pictured having coffee in the morning and posting day to day pictures and my many experiences/adventures. Well, the hotel I stayed at (Rio) Charged $15 a day or .35 cents a minute for internet. I figured that I would purchase a couple days and lounge around and do the usual.. browse makeupalley, check my e-mail, read my fav bloggers latest posts and view f21's latest arrivals. Well, it didn't happen one time. *sigh* My last few days we switched hotels which had complimentary high speed internet (Venetian) and I was able to share some pictures with my family.. but that was about it. I'll have posts to come to share my experiences!

I'm soo happy to be back home :)