Friday, December 31, 2010

Urban Decay Naked Palette Review, Photos and Swatches!

urban decay naked palette

Urban Decay Naked Palette

PRODUCT DESCRIPTION: You can look great NAKED! This long, lean, seductive case is packed with  twelve (12) gorgeous neutrals. Shades range from delicate champagnes to dark, gritty gunmetal, and feature five (5) new shades with names like Darkhorse, Virgin and Buck. We've also included a range of textures: everything from glitter to shimmer to matte. 

The chocolaty velvet case is emblazoned with the word "NAKED" in gold foil lettering. (Just wait 'til your friends see you pull this sexy thing out of your bag. Jealous!) The mirrored case also includes a professional quality, cruelty-free Good Karma Eyeshadow Brush, AND a travel-size Eyeshadow Primer Potion in original formula. This is a shadow palette everyone can use, and a truly spectacular gift. Experiment with office-appropriate neutrals, summertime bronzy looks, or sultry smokiness. With such a diversity of neutral shades at your fingertips, there's more to neutral than meets the eye.

The Urban Decay Naked Palette, as stated above contains twelve (12) shades: Virgin, Sin, Naked, Sidecar, Buck, Half Baked, Smog, Darkhorse, Toasted, Hustle, Creep & Gunmetal.

The palette retails for $48, which sounds expensive, but is an extremely good value. Each shadow weighs in at .05 oz - which is the SAME size as a a regular Urban Decay full sized eyeshadow ($17 each) and actually, .01 oz larger than a full size MAC Eyeshadow (.04 oz, $14.50 each). In addition, you are getting a good brush, and a travel size Primer Potion.

Virgin, Sin, Naked, Sidecar, Buck, Half Baked

Smog, Darkhorse, Toasted, Hustle, Creep, Gunmetal

Swatches

Most shades in the Urban Decay Naked Palette are shimmery or frosted. The only two matte shades in this palette are Naked and Buck. Naked and Buck are actually two of my favorite shades in this palette - both being great blending shades and natural crease colors. Buck also works on my brows as a filler.

My favorite shades of all (and the ones that get the most love on a daily basis) are: Naked, Sidecar, Buck, Half Baked, Smog and Darkhorse. All of the shades are pigmented and apply smoothly. 

 Here's a recent eye look I did using only the Naked Palette. The main colors I used were Darkhorse, Half Baked, Buck and Creep.


I guess the only downside I can say about the palette is that there aren't enough matte shades, so for "daytime" looks, there aren't as many options. I also kinda wish the black was a matte black, rather than a shimmery black.

Also, I'm not a fan of the packaging. It's pretty for a short period of time, but soon after, the velvet attracts dust and the gold lettering starts to wear off.

Overall, I am very happy with it and I think it was very much worth the investment.

Do you own the Naked Palette?

Thursday, December 30, 2010

L'Oreal Telescopic Explosion Mascara. Have you tried it?

L'Oreal Telescopic Explosion Mascara

L'Oreal Telescopic Explosion Mascara + Covergirl Lash Blast Mascara


Do you ever layer your mascara?

My best friend has been complaining about how terrible this mascara is, so she passed it on to me to try. I already had on a coat of my Covergirl Lash Blast, but I applied this over that. Right away my lashes were thick and clumped together. Quickly, I grabbed my Tweezerman Lash Comb and combed out the clumps. I applied two coats and combed my lashes through. And wow! I had some major volume. When I went out that night, I got asked if my lashes were real, which is really rare for me. I didn't have any smudges or flakes by the end of the night.

I did the same thing today as well and I loved the results again. I love that you can reach the corner lashes really well and that you can build so much volume so quick!

I haven't tried this mascara on its own and I'm not too sure if I will. But, I know I will continue using this as a layering mascara to build very dark, voluminous lashes.

This mascara has a terrible rating on Makeupalley (Currently 2.6/5 stars with a 34% repurchase rate). The main con reviewers are complaining about is that it's very clumpy. I think a metal lash comb is the way to go for clumps - It's definitely a must-have if you're a fan of thick lashes..


Here were my results today. I didn't go too thick. I applied one coat of Covergirl Lash Blast and one coat of Telescopic Explosion.

L'Oreal Telescopic Explosion Mascara Results

So I'm curious. Have you tried this mascara? What did you think of it??

NOTD: Forever 21 Love & Beauty Grey Nail Polish!

Two (2) coats of polish and one (1) coat of Sally Hansen Insta-Dri top coat.

I purchased this polish last week and I used it for the first time today. I love this polish! I think it may be a new favorite of mine. It's a very deep gray with a golden/green pearl.. which gives the effect of a very deep olive/gray.

What's on your nails?

Wednesday, December 29, 2010

Guerlain Parure Extreme Foundation Review!

Guerlain Parure Extreme Foundation

Guerlain Parure Extreme Foundation ($58) is a luminous, extreme-wear foundation with SPF 25 that is water resistant, non-transferable and long lasting.
"Guerlain Parure Extreme Luminous Extreme Wear Foundation leaves the complexion glowing with a naturally matte finish. This Tibetan Rhodiola plant formulation helps cells withstand temperature variations, intense heat, and stress—making this product last for at least eight hours."
Guerlain Parure Extreme is available in nine (9) shades: 02, 03, 04, 05, 06, 13, 23, 24 and 25.

I debated whether to purchase #3 or #4, and I ended up purchasing #4 Beige Moyen. It turns out that the shade is a bit dark and pink for me, but if I mixed it with a lighter, golden foundation it works fine - or if applied very sparingly. I did end up purchasing shade #3 and it works much better. *Guerlain numbers their foundations with the even numbered shades being pink toned, and the odd numbered shades are yellow-toned. 

It's pretty unfortunate there are only nine shades, so there's only a limited range of skin tones that can wear this foundation.

The consistency of this foundation is very light and creamy. It's not heavy at all - in fact, it's somewhat runny. If you apply a pump on the back of your hand, it will start to run, but it's not thin/watery.

You must give this foundation a good shake before applying it for the best results. My favorite way of applying this foundation is actually with my fingers. I start off by moisturizing my face, and dot the foundation on each area of my face and blend together with my finger tips in circular motions (as if I was applying a moisturizer). After it's all blended, I like going over my face with a flat-top foundation brush to further buff it it in. Less is more. I have found that when I've applied too much, I look very unnatural - it seems to oxidize slightly, and when I apply too much, it looks like I'm wearing a mask. Start out with 1/2 a pump, and when you're done blending it in, add more if necessary. The result is completely flawless. It dries to a satin-matte finish. For my balanced skin, a powder isn't necessary, and I prefer not wearing a powder because the finish is beautiful.

Tuesday, December 21, 2010

NOTD: Revlon Gold Coin Nail Polish!

I picked up this polish the other day on my trip to ULTA.. It's "Revlon's Gold Coin" Nail Enamel from the Heavenly Metal Collection. The collection had three shades in total.. a golden shade, silver and copper shade. Since I've been on the lookout for a pretty gold, I decided to give it a try.

I applied (2) coats and (1) top coat (Sally Hansen Insta Dry). The formula is opaque, not too thick - and not watery at all. The color is a a metallic silvery gold. In the light, it appears more silver. I love the color and how well it stands out. Metallics tend to apply streaky, but I didn't have any streaks. Only on a couple of my nails my ridges are slightly highlighted. Also, when I usually apply my top coat.. my nails look very lustrous and have that clear shiny top coat look to them.. for some reason it doesn't even look like I'm wearing a top coat. I may try applying another.

Pros: Great formula, Pretty shade - very bright & lustrous, Wears well (no chips or dents yet), Affordable ($3-4)
Cons: Doesn't dry as fast as I'd like (it's definitely no OPI), Is not very forgiving if you smudge your nail and paint over it, Isn't very shiny with the top coat.

Overall, I like this polish a lot and I'll update this post to let you know how long it lasts before it chips. :)

I took a picture of my ring too.. lol I got it a few days ago from New York & Co. and I've been wearing it every day. So pretty!

Whats on your nails this holiday season??

Friday, December 17, 2010

Some Updates & My New Puppy w/ Pics!!! Help me name him??

Hey everyone.. Hope you're all having an awesome week.. It's finally the weekend - yay!! (Well, almost) I just thought I'd post a couple of updates.

If you follow me on twitter, you might know that George surprised me with a puppy two days ago. He is 6 weeks old and is a Maltese & Yorkshire Terrior mix. Everyone is asking me what I named him and whatever I choose, George doesn't like and whatever he chooses I don't like! *Sigh* Does anyone have any suggestions for cute boy names for a little dog? I thought of Teddy, Rocket, Tiger (he bites on everything), Brownie, Benji, Comet, Meeko (he reminds me of a little raccoon).. I can name 100 that I thought of.. George likes the names Snickers & Rocky. But I think it sounds goofy yelling out Snickers and I don't think he really looks like a Rocky? Any ideas? :) I've been so busy with him.. he is such a handful! I barely have been able to get on the computer because he starts going underneath the desk and tries to nibble on all of the wires as soon as I sit down in the chair.

In other news, lol
I received my Sephora order in the mail yesterday. I only ordered one thing.. Guerlain Parure Extreme Foundation. I put it on my face last night to run to the store to buy the new pup some sweaters.. and I couldn't really tell since it was night time, but it seemed very nice (and I love the smell of it).. I should be posting a full review with a swatch of the color and a FOTD along with it within a few days.

Also, a few days ago I started on a contouring with a light and dark foundation tutorial.. and It took me SO long. I happened to take the photos during sunset.. and with every next step, the lighting became darker and darker and by the time I reached the final step, the sun was down and it was completely dark. So, for the last step and final result I couldn't get a good natural lighting photo. I'm not sure yet.. but I may have to re-do the tutorial. This post should be up within a few days as well.

I've also been testing out the ELF Complexion Perfection powder and the ELF Translucent Mattifying Powder from the Studio line and I should be reviewing these soon too!

Talk to you soon!!
xoxox

Wednesday, December 15, 2010

The Brush Guard Review!

You can purchase these in different variety packs for $5.50 (tax & shipping included) from http://www.thebrushguard.com/. I purchased mine from Coastal Scents for $4.95 (+ shipping).

View the reviews for the brush guard on makeupalley here.

Review: The basic concept of this product is to keep the bristles of the brush together while drying.. and to dry the brushes upside down so excess water won't seep into the wooden handle and cause the handle to separate from the brush in the future. I didn't really buy into the whole idea of the brush guard (considering these have been around for a while).. Although it's a good concept and it makes a lot of sense, I never really found the urge to purchase them. But while I was making a purchase on Coastal Scents, before checkout I was tossing in some last minute things and I figured I'd give them a try. I couldn't think of any other method or tool to use to dry my brushes facing down. When I clean my brushes, I usually lay them flat to dry and by the following morning, they are usually dry and fluffy. No problems. No serious issues with my brush bristles fraying or straying away.. and haven't had any brushes separate from the handle (well, high end at least). When I used the brush guards, it dried my brushes just as good & it kept all of the bristles together. I find the drying time to be very long (for this post, I had them drying for 10 hours and they were still damp. I had no choice but to use them by that point, so I couldn't take a picture of them dry). You really need 24 hours for them to dry completely. I find that my goat hair/natural bristle brushes dried in a much shorter time (it's always the case anyway) than the synthetic brushes. I do think this will help maintain my brushes well and that it will give my brushes a longer life span. Overall, I think it's a good product. Nothing I'd continuously rave about.. but, worth the $5.

Do you own these or anything similar? What are your thoughts?

NOTD: Love & Beauty Camel!

I finally had a chance to use the nail polish I posted about a month ago that I purchased from Forever 21. (View post here). The shade is "Camel" and can be purchased for $2.80. The colour is a light, creamy tan (no pearl or iridescence). It looks very natural and is a perfect shade for the winter! I wear tan very often.. so depending on how well this nail polish wears throughout the week.. I'm hoping to wear this shade a lot more throughout the season.

Have you tried this shade or any similar shades? Share your favorite taupe/brown nail polish in my comments! :)

On a side note.. it was 7 degrees outside today!! *tear* Every year I get more and more aggravated with the winter.. (Well, it's not so bad yet.. )
Here I am this morning.. lol fumbling to put my gloves on or something.. My hands were frozen within 5 minutes.. and ouch that hurts!

Hope you all have a great day today! Be sure to bundle up if it's cold outside.. I sure am.

Monday, December 13, 2010

My Top Drugstore Picks (Unfinished Post)

Hey Everyone! I had planned to do a drugstore top 10 post, but as I looked through a lot of my products I noticed that I was picking up too many repeats (example: I would pick 5 concealers).. So, I thought it may be better for me to give categories and go over my top picks from each category, as I get the question often what my favorite drugstore products are. Most of the products are repeats of items I've mentioned previously. But, I don't have all of the items listed in one organized post. So here is an overview. (Also, I have not added all of the pictures yet. This post will be updated in the next couple of days.. There are still some missing categories. Some photos may not contain all of the products listed because I ran out of some of the products mentioned).

Be sure to share your favorites below in my comments!


Mascara
I can almost say I've tried 90% of drugstore mascaras. My top picks are Covergirl Lash Blast, Covergirl Volume Exact & L'Oreal Lash Out. All three mascaras give me great build able volume and a little bit of length. Also, they don't smudge under my eyes like most mascaras tend to do with me. Other mascaras I'd be willing to give a try are: Covergirl Professional Super Thick Lash, Covergirl Lash Exact, Max Factor Lash Perfection, Max Factor False Lash Effect & Rimmel Extra Super Lash Mascara based on positive reviews from makeupalley.com. Have you tried any of these? What are your thoughts?
not pictured: l'oreal lash out
Eyeliner
I have tested several, but wasn't impressed with the majority. The problem with many of the drugstore liners I've used are that they weren't long lasting, weren't pigmented enough or the applicator wasn't good (for precise lines with liquid liner). I'm more likely to purchase a pot (gel or cream formula) eye liner and use a brush of choice because I have found they tend to be the darkest & they are easy to smudge for a soft look. Here are my top picks:

For pencils, my top picks are L'Oreal Extra Intense Liquid Liner Pencil (Very smooth formula, soft and pigmented. Great for smudging. The only problem is that because the formula is so soft, it may end up under your eyes if you apply it heavily. To prevent this from happening, I like to go over the liner with a thin brush to smooth it out. Also, this pencil tends to run out quickly). Revlon Colorstay EyeLiner Pencil (I like this for my waterline because it is longer lasting than most pencils I have tried. With kohl and kajal liners, they tend to all fall under my eyes and fade from my waterline. This pencil stays pretty much in place for hours. It isn't the blackest black (in my opinion) but I go back to it because of its staying power for a pencil. You have to be careful to always have this capped because I have had a couple of mine dry out). As for liquid liners, I can't really say there are any I have tried that are worth mentioning. I do like Wet n Wild Creme Liner (Smooth formula with good application & the color is very black. The only thing with this liner is, it fades throughout the day). I haven't tried any other drugstore pot liners (L'Oreal HIP or Maybelline Eye Studio), but they have great reviews and I would love to try them in the near future.
not pictured: revlon colorstay eyeliner
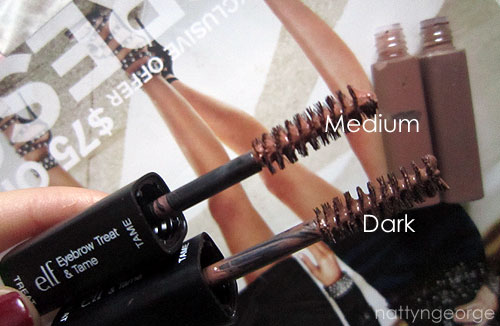
Eyebrows
My criteria for the perfect eyebrow pencil/powder is one that applies naturally, pigmented - but not too pigmented where it looks unnatural, has a natural shade of brown (not overpowering with orange tones like several brow pencils) and is easy to use. I have tried almost every brow pencil from the drugstore and these are my picks:

Maybelline Define a Brow (A dupe for the MAC brow crayon. The product is the perfect consistency. It isn't soft, and it isn't too dry. It's the perfect in between. It creates precise lines that look natural. I like to go over my brows with a spoolie to blend the color better or a dry angled brow brush. The brush on the other side of the pencil is only useful to comb my eyelashes). Rimmel Professional Eyebrow Pencil (A good standard pencil that again, isn't too soft and isn't too pigmented where the color cakes on your brows. With light strokes, this product is very natural. The brush on the other side can be used to blend the color into your brows better with light sweeping motions). ELF Eyebrow Kit (See review here). Essence Eyebrow Pencil (Practically the same as the Rimmel Pencil. The brown is a perfect shade of brown. No reddish or orange tones..)

Concealer
I haven't tried many drugstore concealers. I'm not sure why, but probably because there haven't been any raves about any of them. I'm currently testing out Maybelline Superstay Concealer, which seems to work pretty well.. but the color is way too light so I can't tell for sure how I like it without the proper color. The problem I run into with drugstore concealers is usually the color selection and the formula. I can never find the correct color and most of the formulas are either too watery or too dry. I have yet to find the perfect creamy, full coverage drugstore concealer. Is the one out there??? Well, here are the ones I have liked:
Palladio Stick Concealer (Nice soft texture, blends well and offers full coverage), Maybelline Cover Stick (Blends well and offers full coverage - but, it can look heavy if to much is applied) & NYX Concealer in a Jar (A good standard pot concealer. Nice texture.. buildable medium to full coverage, doesn't look heavy).
not pictured: NYX concealer in a jar
Foundation
I have tried many of the top rated drugstore foundations and I can honestly say that none are rave worthy. The main problems are usually the color match and the length of wear. Most of the drugstore foundations I have tried looked great upon application and within a few hours have managed to fade off my my face. I don't have many favorites in this category, but there are my picks: Sally Hansen Natural Beauty Foundation (my review is here. The only problem with this foundation is the store availability is very limited). Rimmel Lasting Finish Foundation (Yes, the color selection is terrible. The darker the shades are, the more orange and pink the shades are. But, I found a shade that works when my skin tone is considerably lighter than my average self tan created NC40. It is a good medium coverage, looks natural, easy to blend and has a nice creamy texture. Also, it has a nice smell. lol Overall, average foundation.. nothing to rave about. I like to use it on my "bummy" days). I was 60/40 on Revlon Photoready Foundation.. I haven't used it in months.. but I do think it's a pretty decent foundation. In my experience, it looked very good at first, but faded significantly throughout the day. I would probably only use this as a "go out to dinner and go home" foundation. You can read my review here. Last week I have purchased Revlon Colorstay. It is my third attempt and third color choice. The reason I have given this foundation multiple tries is because it looks so good on so many different people and it has high reviews. But for some reason, I can't get myself to like it!? I'm not someone who finds any odd fragrance offensive, but I really cannot stand the smell of Colorstay. It reminds me of fresh terracotta clay I use to create vases and bowls with in junior high. So yeah, it smells like mud. Also, I don't like the texture. Its not the creamy consistency I like with liquid foundations and I find that it's not very easy to blend because it dries quickly once it comes in contact with my skin. Any advice Colorstay lovers out there? Also, when I purchased Colorstay, I also purchased L'Oreal True Match. I used it a few times and I'm still deciding how I like it. If you would like me to update you in the near future with reviews of both foundations, post a comment letting me know.
Powder
I haven't come across a powder that I like solely for a foundation (drugstore or high end) but for setting powders & powders to add a little extra coverage after I've applied my liquid foundation.. these are my picks:
Palladio Wet/Dry Foundation (Soft, very blendable & provides good coverage. I like taking a powder brush and applying it all over my face after my foundation for an extra airbrushed look. Or, I like applying it under my eyes to add additional coverage to my concealer). Rimmel Stay Matte Transparent Powder (Doesn't have color, but it's pigmented and can lighten up areas. I like using it with a powder brush all over my face or under my eyes to set my concealer and add brightness to the area).

Bronzer/Blush
I haven't tested or owned many drugstore bronzers and blushes. Mainly because I typically look towards higher end brands for my blushes & bronzers. But, there are a few worth mentioning:
Rimmel Natural Bronzer (Soft & pigmented. All of the shades are great - for a soft bronzed glow, I like using Sun Light). NYX Powder Blush (I love using Sand as a shimmery Bronzer and Desert Rose as a darkened pink blush. View swatches of all shades here). I also really like using Hard Candy Baked Blush (I use the shade Honeymoon. It doesn't provide tons of color.. but it's a very soft, pearly pink. Some use it as a highlight.. I love using it lightly over any of my blushes to add a soft pink glow to the color. There are other shades that look very pretty, but Honeymoon is the only one I have tried).

Lipstick
I don't own that many drugstore lipsticks. Usually when I like a lipstick, I wear it and wear it until I find something I like better. But some that I like are: Revlon Colorburst Soft Nude, NYX Pumpkin Pie and Wet n Wild MegaLast Matte in the shades Think Pink and Pink Suga.


Lipgloss
When it comes to lip gloss, I always look to Revlon. I love Revlon's Super Lustrous Lipgloss.. the consistency is great, it doesn't dry out my lips and they come out with some really nice limited edition shades. Currently, the one shade I use from their permanent collection is Revlon Super Lustrous Nude Lustre. And, as you all know.. Life's a Peach was my favorite.. which is now discontinued. I have also found nice colors in their mineral lip glazes, which were limited edition. But, I haven't tried any in their current permanent collection. LASplash has great glittery lip glosses, also with a nice consistency that doesn't dry out my lips. I like LASplash Lipgloss in the shades Sparkling Coral and Girl Crush. These glosses have limited availability, as I can only find them at UTLA.. but on their website they have a fantastic selection of colors. I also like NYX lip glosses.. although I don't really like the scent of the round lip gloss (lemons? fruity pebbles cereal?) I love the shades Whipped and Sorbet. I also like their Megagloss.. the shade I wear is Smokey Look. Some other drugstore lip glosses I like are Milani Glitzy Gloss in the shade Designer Label and L'Oreal Infallible lipgloss in the shade Plumped Pink.

Saturday, December 11, 2010

Review: Eyeko Cream with Extra Glow (3 in 1) + Photos & Swatches!

Product Description: "Eyeko Cream with Extra Glow is a multitasking highlighter with all the benefits of your favorite cult classic Eyeko Cream. This NEW dreamy pink cream is loaded with micro light reflecting pigments perfect for creating a soft focus sheen. Add a flattering highlights to brow and cheek bones, your cupids bow, even collar bones and shins for a touch of moonlit magic." - source: http://www.eyeko.com

Eyeko Cream with Extra Glow can be purchased at http://www.eyeko.com for $14.00 (USA). Click here to be re-directed to the product page.
The product looks somewhat similar to Benefit High Beam, so I did a side by side swatch on my hand for comparison.
 
They look almost identical in color and luminosity. The only difference is Benefit High Beam appears a tiny bit more pink.

Once blended, I can barely tell them apart.

My thoughts: I've had this product for a couple of months now and I really like it. It claims to be a highlighter, eye cream and moisturizer all in one. I like to use this product as a highlighter/illuminator for my face and under my eyes. The consistency of the cream is like the texture of a body butter. It's not very soft and creamy nor is it thin and watery. It feels very condensed, but to the touch it is lightweight and slippery. I wouldn't call this product a moisturizer. I didn't find it to moisturize at all. (Based on man reviews I've read, others said the same) But I love it as a brightening product for my face. How I typically apply it is by first prepping my face with moisturizer and then taking a tiny bit of the cream with my fingertip and rubbing it all over my face (as I would apply any moisturizer). Other times I take a little in my palm and mix it in my hands with my moisturizer and apply it all over my face. Using a moisturizer helps spread the product more evenly over my face. If you have dry skin, I recommend you mixing it with a moisturizer, as it may not apply evenly. I haven't had any problems myself. My face is left glowy and radiant. It doesn't leave my face looking greasy, oily or like a disco ball (lol). I haven't found it to be drying and I haven't had any skin reactions to it despite my sensitive skin. I really like using this under my eyes prior to the application of my concealer. I feel like it provides a nice illuminating base for my concealer to sit on. Once I apply my foundation (depending on which I use - with heavy coverage foundations, there is little to no difference. Its more evident with a lighter, dewy foundation) I do notice a slight brightness to my face. I have tried applying this over my foundation by patting it on my cheek bones with my finger or my MAC 131 brush (as I would apply Benefit Moon Beam) and I didn't like the look of it. It actually dulled my cheek and because of the high amount of pearl, it almost made my foundation in that area look gray. So, Benefit is much better for using OVER foundation. But, I really do like this under foundation and under my eyes and I even use it sometimes on my neck and chest mixed with a little lotion or jojoba oil for an extra healthy glow. This is a product I would re-purchase. Plus Eyeko has coupon codes all of the time, so you can purchase it for pretty cheap.

Have you used this product? Or Eyeko's Tinted Cream? If so, post your thoughts in the comments!

Thanks for reading!

Follow Eyeko on twitter by clicking here.

Disclaimer: This product was sent to me to try for free from Eyeko. I was not paid to write this review and I have no affiliation with Eyeko. This is an honest review from my personal experience in using this product.

Lipgloss Dupe: L'Oreal Color Juice in Strawberry Smoothie - Compared to Revlon Life's a Peach! + Swatches!

I picked up L'Oreal Color Juice in the shade Strawberry Smoothie #510 last week at my local drugstore and noticed it is very similar to one of my favorite discontinued lip gloss shades (Revlon Life's a Peach). I thought I'd share my findings :)

Next to each other they look almost exactly the same except the color in Strawberry Smoothie is a little more intense. It has a little more pigmentation as the formula is thicker and I notice there is more of a pearly sheen. I prefer to pat my lips with a little foundation prior to application to tone down the pigmentation of my lips and then apply lip balm so my lips won't dry out. Life's a Peach is a tiny bit lighter and more sheer. I prefer the formula of Revlon Super Lustrous because I don't really care for lip glosses that are too thick, but thicker glosses tend to stay on your lips for a longer period of time, so I can't really complain..
Applied to my bare lips.. (the photo is taken indoors with flash)
View a swatch of Revlon Life's a Peach here in one of my previous posts.

Do you have any dupes for your favorite lip glosses? Post a comment and let me know! :)

Wednesday, December 8, 2010

Tuesday's FOTD! (wearing my elf peachy keen blush)


 Here's a couple of angled shots to show the blush better.. 

Face: 
Estee Lauder Time Zone Line & Wrinkle Reducing Lotion (my face has been really dry lately)
Maybelline Coverstick Concealer #Medium Beige
Cinema Secrets Ultimate Foundation #301 (applied lightly under my eyes for added coverage)
NARS Sheer Glow Foundation #Stromboli
MAC Powder Blush #Taupe (to contour cheeks & hairline)
ELF Studio Blush #Peachy Keen

Eyes:
Shiseido Mascara Base
Covergirl Lash Blast #Black
Ardell 111 false lashes cut in 1/2
Hard Candy Walk the Line Liquid Liner #Praline

Brows: 
ELF EyeBrow Kit #Medium
ELF Eyebrow Treat & Tame #Dark

Lips: (most of it wore off by the time I took the pictures)
Sephora Nano Lip Liner Pencil #2
Hard Candy Lipstick #Fire Alarm
Clear Lip Gloss

 G'nite all! :)

Review: ELF Studio Eyebrow Kit & Eyebrow Treat & Tame + Swatches & Photos!

I have a couple more reviews of ELF Studio products for you tonight!

Considering I haven't tried any ELF makeup prior to my recent order, I really had no idea what to purchase. So I basically purchased items that had the highest ratings. The "Eyebrow Kit" is rated 4.5/5 stars based on 300+ ratings and the "Eyebrow Treat & Tame" is rated 4/5 stars based on 100+ reviews. I love experimenting with new brow products, so I thought I'd give them a try.

I purchased the Eyebrow Kit in the shade "Medium" and the Treat & Tame in the shades Medium and Dark.

ELF Studio Eyebrow Kit contains a colored wax on one side and a brow powder on the other side as well as a small double sided taklon brush that has a rounded side for filling in and an angled side for defining. The kit comes in four (4) different shades. Light, Medium, Dark and Ash. All shades can be viewed here. In the shade Medium, the wax is dark brown and the powder is a chestnut brown. Luckily, it matched my brows very good. The consistency of the wax is not thick or cakey like other brow waxes I have tried in the past. It has just the right amount of pigment.. It applies very lightly and natural & is not at all harsh or overpowering. The brow powder is also very nice. Again, it is not too pigmented and harsh. The two work great together. I have used the brush and it works fine, but for my personal preference, I like to use a full sized brush. I used Coastal Scents Divine Taklon liner brush. I really liked the outcome.
ELF Studio Treat & Tame is a double sided tube that contains a vitamin infused gel that is formulated to "stimulate" hair follicles to re-grow & thicken your brows and the other side is a tinted brow mascara that is infused with fibers so it will grip to your brows and keep them in place. So you've got your treat and your tame. The Treat & Tame comes in four (4) different shades. Light, Medium, Dark and Ash. You can view all of the shades here. As mentioned before, I purchased Medium and Dark. I purchased both because I couldn't find any swatches of the shades to see what they really look like. I was pleased to see that neither shades have any reddish/orange tints to them. The dark brown is like a milk chocolate brown and the medium is simply a shade lighter. I was hoping this was going to be something like MAC's Brow Set.. and I am pleased to say that it is somewhat similar. MAC's Brow Set is much more thick and pigmented though. I always have to wipe off the applicator to make sure I don't apply too much. With the Treat & Tame, it's somewhere in between. It's not tinted for no reason ( like Revlon's Brow Fantasy has a tinted mascara on one side and a pencil on the other.. and the mascara adds absolutely no color to the brows. It may as well be clear). It's pigmented enough to tint my brows to match my brow powder. This gives a better overall, natural look to my brows. Another product I am very pleased with. I haven't actually used the Treat side, and I'm not sure if I will.. but I may just to see if it does anything. 

I used Dark in this photo and it's what I have been using. It matches my hair very well.

Overall, these products worked great for me.. and you can't beat the $3 price tag!

As always, I hope this post was useful for you! And, if any of you have tried these products.. post your thoughts in the comments! :)

Disclaimer: I am in no way affiliated with ELF. I was not paid or compensated in any way for this review. I paid for this product myself and as always, my reviews are honest and are based on my personal experience in using the product.