Showing posts with label false lashes. Show all posts

Friday, March 9, 2012

Review: KKCenterHK False Lashes!

KKCenterHK False Lashes

I'm a huge fan of false lashes. Maybe a year ago or so, I was wearing false eye lashes every single day. Some of you might think I'm nuts, but once you get started with falsies, it becomes an addiction (not a bad one of course!) I'd never wear a full-strip, because that's just too much for every day, but I'd snip those babies in half and wear them on the outer corners of my eyes, and they'd blend in perfectly with my other lashes.

They'd give the effect of larger, elongated eyes that looked uber girly. Just a little bit of liner and lipgloss and I was out the door!

Needless to say, purchasing eyelashes every other day was becoming way too pricey. Especially since I noticed a small price increase at my local drugstore on Ardell/Andrea lashes. It took about a week or two to get use to the way I look without lashes. For a whole week it seemed like something was missing from my face! Now I usually only wear lashes when I'm going out, and I want to look my extra best, which is much easier on my wallet.

If you're an avid reader of fashion and beauty blogs, you may have heard of KKCenterHK. I've seen reviews for their eyelashes featured on several of my favorite beauty blogs (MakeupbyLacy & HollywoodHeels to name a couple).

KKCenterHK is a company based out of Hong Kong that sells false lashes, makeup, wigs, nail products and accessories. It's a very popular site to purchase false lashes from because you can buy a large quantity at a low price.

I picked out two different styles: ES A562 and ES A601. So far, I've worn both styles and really like them. The bands are thin and very flexible, so they adapt well to the shape of your eyes and they feel comfortable after several hours of wear. Both sets retail for $16 for ten pairs, so it ends up being $1.60 a pair.

Left: Style #ES A562, Right: Style #ES A601

Here I am wearing ES A601.

READ MORE!

Friday, May 6, 2011

Step by Step: How to Apply Individual Flare Lashes!


 What are individual lashes? Individual Lashes differ from the traditional "strip" lashes as they aren't applied all at once. They are applied individually. Individual Lashes are mainly sold in "flares" or, small clusters of about 5 - 10 lashes. They typically come in three different lengths; Short, Medium and Long.

Why individual opposed to strip? The awesome thing about individual lashes, is you can control exactly how you want your lashes to look. With strip lashes, you don't have as much control. Individual lashes are very fun and you can layer them on top of each other for very voluminous & dark lashes and you can mix up the sizes for any look you please. Also, if you want added length, but want to keep your look extra natural, individual lashes are great, because you can add a few flares to the top corner of your lash line and your eye shape will look elongated & your overall look will be more "girly".

Here's a few ideas of how you can use them:
 Short flares starting at the corner (where your lashes are the shortest), then medium flares towards the middle, and long flares toward the end.
Medium flares all across with long flares on top for long, and thick dramatic lashes.
Medium flare, short flare, medium flare, short flare all the way across.
Long flare, medium flare, long flare, medium flare all the way across.
Medium flares starting at the middle of your lashline and long flares toward the end. (to imitate half lashes)
Medium (or long) flares starting at the middle all the way to the end. (to imitate half lashes)

Remember, you can add them wherever you want! You don't have to apply them all across your lashline. You can apply them wherever you want added length or volume.

Tools you'll need:
-Individual False Lashes
-False Lash Adhesive (Strip Adhesive)
-Tweezers
-Mascara
    Step 1: First, apply all of your eye makeup, as applying false lashes should be your last step. Apply one coat of mascara.
    Step 2: Squeeze a small amount of lash adhesive on a clean surface. I'm using my lash tray as a surface for my adhesive. Then, pick up one flare with your tweezers. Pick them up as close to the bottom as possible. Don't apply too much pressure or you can bend the lashes. Then, dip the end in the adhesive.
    Step 3: It's not as necessary to wait as you would with strip lashes, because with strip lashes, the strip can lift off if the glue isn't tacky. Individual lashes won't fall off. But, if you'd like to wait for the glue to become tacky for 10-15 seconds, you can go ahead and do so. For reference, I don't wait. :)
    Step 4: While looking forward in a mirror, tilt your head back slightly so your eyelid flattens. You should have a clear view of your lashline. You can start from any area you want, but I like starting from the middle. So, starting from the middle, place the lash down on your lashline, as close as possible to the roots of your natural lashes, but not on top of them. The glue should be on your eyelid, not your lashes. The flare should be laying on top of your own lashes.
    Step 5: Close your eye that you just placed the lash on. Examine your placement with your other opened eye. The false lash should be going in the same direction as your natural lashes. If they are going in the opposite direction, take your fingertips and push them slightly so they are going in the correct direction.

    Step 6: Continue with placing another lash next to the first one. If you want thick lashes, apply it directly next to the first one. For more of a natural look (what I'm doing), leave a tiny space in between.
    Step 7: Again, examine your eye to see if your placement is correct. (repeat step 5)
    Step 8: Continue applying the lashes to your lashline going outward. At this point, I've applied 5 flares. You can click on the image to see a close up of the image. You can see how much of a space I left in between each flare for an overall natural look.
    Step 9: To make your lashes extend outward, add an extra flare to the very end of your lashline.
    Step 10: Wait at least 5 minutes. Once the glue is completely dry, very carefully apply a coat of mascara to your top and bottom lashes. You want to be gentle because you can make the mistake of lifting some of the lashes off with the mascara wand.

    Thursday, March 31, 2011

    A Look at Various Revlon Lashes + Lots of Photos & My Thoughts About Them! (Very Pic Heavy)

    Revlon contacted me a few weeks ago and asked if I'd be interested in trying out some of their false eyelashes. I of course accepted, as I've always been a bit curious about them every time I spot them at Walmart or other drugstores.

    There are three different categories of Revlon false eyelashes. There is Beyond Natural, Runway and Fantasy Lengths. All three types do not include glue, so you will need to purchase it separately. But! Fantasy Lengths has an option of self-adhesive (no glue needed), great for those who struggle with using lash glue.

    In this post, I'll be sharing with you my thoughts about the lashes I've tested from each category. As well as, my thoughts about Revlon Precision Lash Adhesive.

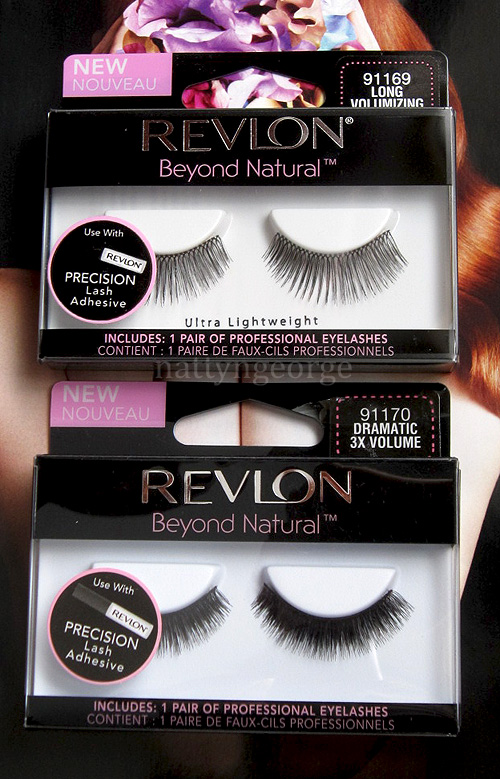
    Revlon Beyond Natural Professional Lashes
    (#91169 Long Volumizing & #91170 Dramatic 3X Volume)
    Revlon Beyond Natural Professional Eyelashes
    Revlon Beyond Natural Professional Eyelashes #91169 & #91170
    Revlon Beyond Natural Professional Eyelashes #91169 & #91170
    Beyond Natural Eyelashes are available in (3) different styles. They are synthetic and handmade. I tested #91169 Long Volumizing &amp & #91170 Dramatic 3X Volume. Style #91170 are medium in length and are very thick. There are a few layers of lashes combined at different lengths to make the lashes appear fuller, darker and natural. Even though these are thick and synthetic, I found them easy to bend and apply. They are not "plastic" or stiff feeling, and without close inspection, I would of thought these were human hair. The particular style though, is not my preference. I prefer longer, less thick false lashes. I found these to be slightly uncomfortable on my lids. But, if you are use to wearing thicker lashes, you won't have a problem with these. Style #91169 are long and voluminous. I think they are the perfect length and thickness, so they won't "scream" fake lashes. These are extremely light weight and conform to the shape of your eye with little to no effort. Think of ELF lashes - very lightweight, pliable and comfortable on the eyes. I personally love this style and it's the style I would typically wear. I want to compare them to Ardell 105's or 111's in thickness - but they are completely different in length/shape.

    Revlon Runway Professional Lashes 
    (#91202 Smokey Glamour)
    Revlon Runway Professional Eyelashes
    Revlon Runway Professional Lashes #91202
    Revlon Runway Professional Lashes #91202
     Revlon Runway Lashes are available in (2) different styles. Like Beyond Natural, these lashes are also synthetic & handmade. I put #91202 Smokey Glamour to the test. Style #91202 are fairly long in length & pack mild volume. They are the ultimate "flirty" lashes and on the eyes look incredibly natural. They may look like "IN YOUR FACE" lashes in the box, but because of the thin, almost invisible ends, they look like your real lashes. These lashes are actually two thin sets of criss-crossed lashes layered on top of each other. Although the actual lashes are lightweight, because of the "layering" of the lashes, the band is twice as thick as a regular pair of lashes. The thick band requires a little extra work getting it onto your lid. Although these didn't bother me, I did feel them on my lids while I was wearing them. I would recommend this style to more advanced false lash wearers, as the band may feel uncomfortable to beginners.

    Revlon Fantasy Lengths False Eyelashes (self adhesive)
    (#99500 Intensifying)
    Revlon Fantasy Lengths Professional Eyelashes (self adhesive)
    Revlon Fantasy Lengths Professional Eyelashes #99500
    Revlon Fantasy Lengths Professional Eyelashes #99500
    Revlon Fantasy Lengths False Eyelashes (self adhesive) are available in (4) different styles. I tried out #99500 Intensifying. Style #99500 are medium to long in length and have a mixture of shorter lashes for a more natural appearance. They are self-adhesive, requiring no glue. So I figured, "Pft, yeah.. self adhesive.. whatever that means." I remember purchasing lashes in high school that claimed to be "self adhesive" and the glue wouldn't adhere after putting it on my eyelids. I would try to avoid wind, blinking - MOVEMENT for that matter, as I didn't want to end up with one of my eye lashes sitting on the top of my cheek and the other one raised up to my eyebrow. Well, I'm very pleased to say that Revlon mastered "self adhesive" lashes. The glue is incredibly sticky, and (smart) they included a plastic applicator to ensure you will stick them to your lash line, and not your lashes. They also include one extra pair of self adhesive strips so you can use the lashes again. I found these to be comfortable, and no budging - YAY!

    Revlon Precision Lash Adhesive
    Product Info: 
    -Ultra thin brush allows for precise application on entire lash band or even the corners of lashes.
    -Saves time! Easy to apply with no hassle.
    -No need for extra application tool (such as cotton swab or brush) to apply onto lash band.
    -Easy touch-up anytime, anywhere.
    -Convenient and purse friendly. Waterproof & Latex Free 
    (info courtesy of http://revlon.com) 

    I was actually eyeballing this glue for a while, but I never purchased it because I was afraid it wasn't going to live up to my DUO adhesive. What I love about this product, is the packaging... *Angels singing*. I think I need a moment of silence. Finally, a non squeeze tube adhesive, that delivers! I don't know about you, but I've been applying false lashes for around 5 years now and I still manage to get my lash adhesive everywhere. I KID YOU NOT, I have ruined several handbags with leaky tubes, ruined my bedsheets with lash adhesive stains, ruined my carpet with lash adhesive, ruined my beloved MAC 187 b/c it leaked into the bristles.. the list goes on. Those tubes just scandalously, BLOB the product out. And, if you're out to dinner and excuse yourself to "powder your nose", and notice your lashes are falling off, it's not so easy & convenient to add more glue. You'll have to squirt it out on a clean surface or gently squeeze it so it doesn't go everywhere, and use a thin tool to apply glue to the area. Pain in the bee-hind. Revlon Precision Lash Adhesive makes all of that history. It's a small tube with a thin, slightly dense brush applicator to apply the product to the lashes in a thin, even band. You can pop it in your bag with no worries and quickly touch up at any time. No blobs, no explosions. The product itself had a thin, milky texture - much more "watery" in texture than Ardell, Modlash or Duo. The color is a fluorescent white, that almost looks blue, and dries clear. No fishy smell with this adhesive.. it actually smells exactly like a fresh can of paint. Don't worry though, it doesn't linger. From what I've noticed is that it sticks very well, but I can't say for sure how long lasting it is, because I haven't tested it throughout the day. I will keep you updated.

    Each style on my eyes (no mascara added to the false lashes)

    Revlon false eyelashes sell for an average of $4-6 a pair. They are usually $1-2 more expensive than Ardell/Modlash. They can be found where ever Revlon is sold. I've spotted them at my local CVS, Walgreens, Wal-mart & Target for an average of $5.99.

    Disclaimer: The products mentioned in this post were provided by Revlon for consideration. I am in no way affiliated with Revlon. All of my opinions about the products mentioned are 100% honest, as always.

    Friday, February 25, 2011

    Tutorial: How to Apply Fake Lashes! (Very Long Post)

    How To Apply Fake Eyelashes

    Applying eyelashes is very simple once you have a little bit of practice. In this tutorial I will explain step by step how to apply False Lashes. Last week, I posted about my favorite lashes, where you can purchase false lashes as well as other general information regarding false lashes. To be re-directed to that post, click here. Otherwise, Keep Reading!

    Tools you will need: 
    False Full Strip Eyelashes (I am using ELF Essentials Dramatic Lash Kit)
    Lash Adhesive (I am using DUO Dark Tone Lash Adhesive)
    Tweezers

    Optional Tools:
    Liquid Eyeliner or a Dark Eyeshadow
    Small brush (eyeliner brush, angled liner brush, smudge brush, etc.)

    Where to start? Applying false lashes will be the last step of your eyes. So, make sure to prime your eyes with an eyeshadow primer, apply your eyeshadow and eyeliner & you'll be ready to apply your false lashes!

    Why apply them last? You apply false lashes last because you want your lashes to be very black and clean of any eyeshadow or other products. If you apply them first, you may have lashes that are full of eyeshadow. If you'd like, you can apply a thin coat of mascara beforehand. But it's not necessary. I like having a thin coat of mascara on my lashes before I apply false lashes.

    Let's Begin! I've included photos of each step along with a caption. I have written out the steps, and they are more detailed than the actual captions.

    Step 1: Take your false lashes out of the box. Using your tweezers (or fingers), gently peel the lashes off of the tray. You don't want to apply too much pressure, or else you may bend or damage the band.

    Step 2: Using your pointer finger and thumb, you want to hold both ends of the eyelashes at the bottom band. Lightly move both of your hands up and down a centimeter or so. Doing this will stretch the band so it isn't as stiff. This will help the lashes sit better on the contour of your eyelid. (Think of it as stretching a balloon before you blow it up) In the photo of Step 2, the top lash is properly curved and the bottom lash has not been touched yet. You can tell the band on the bottom is a bit straighter.

    Step 3: Now we are going to test the lashes to see if they are the correct length for your eye shape. If you have smaller eyes, you may need to cut a little bit. Pick up the according eyelash to you eye. The shortest part of the lashes should be matched up near your tear-duct. The longest part should be at end. The way you will set them on your eyelid is with the curl facing up. Set the lashes down in the middle of your lashline. Look to see where your natural lashes start (inner corner) and pull the false lashes to the same spot. Look to see if the band extends farther out (outer corner) than your natural lash line. If it extends out longer, grab the end with your thumb & pointer finger and lift them off.

    Step 4: With your scissors, cut off any excess lashes. (Set it on your lash line again to see if you cut enough)

    Step 5: Squeeze a little dab of lash adhesive on a clean surface. Don't apply it from the tube directly to the lashes. A lot of product comes out at once and you don't want to damage the lashes.

    Step 6: Using any tool you'd like for precise application of the glue, (many like to use a toothpick or the opposite side of the tweezers. I'm using the opposite corner of the lash adhesive tube) pick up the glue up. Don't worry it's too much. You don't want it to be too little, otherwise your lashes might not stick well.

    Step 7: Pick your lashes up with your fingers or your tweezers and drag the glue across the band of the lashes. Apply a little more to each end of the lashes, as they are the spots that tend to wear off.

    Step 8: Pick the lashes up with a tweezer, holding them in the middle - close to the band but not touching the glue.

    Step 9: It's difficult to apply lashes while looking straight forward into a mirror. The easiest way is by sitting down or standing up and tilting your head back a little - so when you look forward, your eyes are slightly squinted. This way, you'll be getting a better view of your lashline. Like you did in Step 3, set the lashes down on your eyelid as close as possible to the base of your natural lashes, but not touching them. They should be on your eyelid, not your lashes. Make sure they are lined up with the start of your natural lashes before you press them down on your skin.

    Step 10: Once the lashes are lined up with your lashes, grab the beginning of the lashes with your tweezers and press it down on your lid. Again, make sure they are lined up with the start of your natural lashes. You don't want them to be any closer to your tear-duct, or it may cause your eyes to water or a pinching sensation. There should be a small space. Grab the outer end and press it down on your skin. Work Quickly before the glue sets.

    Step 11: Go along the whole band, pressing it down onto your skin with the tweezers.

    Step 12: To make sure it's very secure, use a brush (smudge brush, eyeliner/brow brush, etc) or sponge applicator and go across the band again pressing it down on your skin.
    Step 13: Wait patiently for 1-2 minutes while the adhesive dries completely. 

    Step 14: For this step, you can use eye liner (liquid/pencil or gel) or a dark eyeshadow (brown, black, etc). If you're using an eyeshadow, take a small smudge brush and smudge the shadow on your lid, close to your lashline - blending it into the band of the false lashes. This will blend in the band better as well as cover up any adhesive you may have gotten on your eyelid. If you're using a liquid liner, line your eyes as you normally would - against the band of the lashes.

    Step 15: Apply a coat of mascara to your lashes, starting at the base of your natural lashes all the way up to the end of the false lashes. This will blend your natural lashes in better with the false lashes as well as make the lashes look darker. 

    You're all finished! Enjoy your long, lush lashes!

    To see how it's done, check out Kandee Johnson's video tutorial!

    Saturday, February 19, 2011

    False Eyelashes 101. (Where to purchase, Styles & brands I like, etc.)

    It was requested to do a post on how to apply false lashes and which lashes in particular are my favorite. Once I started to write about false lashes, I realized that this post was going to be very, very long. So I decided to break it up into three different posts. This post is basic information & common questions regarding false lashes (strip lashes), my second post will be a picture tutorial of how to apply false lashes and my third post will be regarding individual lashes. If you have any questions that you think should be added to this post, comment and I will add your question along with my answer.

    Check back later for my tutorial! :)

    Where to Purchase False Lashes in-store:
    There are several different places you can purchase false eyelashes. You can purchase them at your local drugstore (CVS Pharmacy, Walgreen's, Etc), Target, Walmart, Beauty Supply Stores (Sally Beauty Supply, ULTA, Etc.) and more.

    Walgreen's & CVS Pharmacy typically carry Modlash by Andrea, Ardell Fashion Lashes, Revlon Fantasy Lengths & Maybelline Lash Expert Lashes. I've also spotted new "Kiss" brand lashes at my local Walgreen's. Most lashes range from $3.49 to $6 a pair. I usually find them cheaper at Walgreen's opposed to CVS and Walgreen's often has sales on them.

    Target carries limited styles of Ardell Fashion Lashes, a couple styles of N.Y.C false eye lashes and a few styles of Sonia Kashuk Lashes. It depends on your location as well. Larger Target stores will carry a larger selection. My nearest locations sell Ardell's for around $3.69 or so a pair.

    As far I recall, Walmart carries a range of Salon Perfect lashes, which I believe are Ardell/Andrea lashes with a different name sold exclusively at Walmart. I like purchasing Salon Perfect lashes because they are the same as Ardell's but cheaper! The regular price for a pair is $3 at my nearest location. They also carry Revlon Fantasy Lengths.

    You will find the largest selection of lashes at your Beauty Supply stores. Sally's Beauty Supply carries all styles of Ardell and Andrea false lashes, whereas your local drugstores only carry limited styles. Depending on how large your ULTA store is, they may have a decent selection. The ULTA stores near me carry Ardell, and don't have many styles. Often times they don't have the style I am looking for.

    You may be lucky enough to find decent lashes at your local Dollar Store.. I found some great Fashion Lashes at my local Dollar Tree. But, every location is different and certain items sell out quick. So, it can't be guaranteed that you'll find them. (You can view my post here about them for reference)

    Where to purchase False Lashes online:
    http://www.cherryculture.com. Cherryculture stocks NYX lashes & Sassi Lashes for $4.00 a pair. Although I've ordered from Cherry Culture, I've never purchased their lashes.
    http://www.eyeslipsface.com. If you're on a budget, ELF has a few different styles of false lashes for $1.00 each. 
    http://www.madamemadeline.com. The ultimate online store to purchase various brands of false eye lashes. They carry Ardell, Andrea, Red Cherry, Revlon, Sherani, Gypsy Lashes, Elise & more. Make sure to check out their specials as they have monthly sales.
    http://www.nonpareilboutique.com. They have a large variety of their own "Nonpariel Boutique" lashes for $3 a pair as well as other brands (NYX, Red Cherry, Etc.)

    You can also find eyelashes on ebay, your local drugstores website and more. If you want to share any of your favorite places to purchase eyelashes, post in the comments at the bottom of this post!

    Brands of False Lashes I like:
    I usually purchase Ardell and Andrea brand lashes. Since I wear false lashes often, I try and wait for a sale and I will purchase several to have on hand. I purchase Salon Perfect lashes from Walmart often, as they are less expensive. I have never tried Maybelline or Revlon lashes. I've tried N.Y.C lashes, but they only have two styles that I don't care for.. so I don't purchase them. My favorite styles are Salon Perfect #26, #23 & #28 (A longer version of #26). With all three of those styles, I always cut them in half for a less dramatic look. My favorite styles in Ardell are #105, #111 (very long & dramatic) #119, #107 & Lacies. Sometimes I purchase #103's. My favorite style in Andrea are #23, #26 (Same as Salon Perfect) & #45.


    Synthetic or Human Hair? Ultimately, it's up to you to choose which you prefer. I like both, but I prefer human hair eye lashes for a few different reasons. Real human hair false lashes are made to better blend in with your lashes and give a more natural appearance. They have more "give" to them than synthetic lashes and can be bent to the shape of your eye to be worn for comfortably. They are also lightweight and should feel comfortable on your lashes. But, these are more fragile than synthetic lashes and you will typically get less uses out of them. Synthetic lashes can be made of various different fibers to best resemble real lashes. They are more stiff and you have to bend them quite a bit to fit to the shape of your eye. Depending on the brand, the band may be very stiff and it may lift off the ends, which would require frequent touch ups. Because they aren't real human hair, they hold a curl very well and are ideal if you want sky high glamour lashes. Synthetic lashes are typically shiny and can sometimes look unnatural, but once you apply a coat of mascara on them, they will blend in better with your lashes and appear less glossy. The reason many choose Synthetic lashes is because they are less expensive & they are more durable - which means that they will usually last longer.

    What to look for when purchasing: It really depends on what "look" you are going for. Lashes that are very dark and thick are very noticeable and dramatic. They tend to appear less natural because of the thickness & can sometimes feel slightly heavy on your eyes. Nevertheless, they are beautiful for photo shoots or a night out. I recommend real human lashes if you want thick, because synthetic thick lashes (if they are long as well) appear very shiny, tend to curl very high and unnatural and can sometimes look "drag-ish". Steer more towards thick lashes with a natural length to add a lot of definition to your eyes.
    This particular style of N.Y.C lashes are very thick and dark. You can tell that they are synthetic because they are very shiny. They are dramatic, but they aren't very long - So, they will enhance your eyes and make your eyes look darker and sultry. (Image source: www.superdrug.com)
    Lashes that are natural in length and volume (refer to the "Ardell" photo above and look at #123 for example) are ideal for those with very short and fine lashes for a natural appearance. 

    Lashes that are natural in volume and long in length are ideal for those with short to average lashes and average volume. (refer to Ardell #121)

    Lashes that are long in length with added volume are ideal for those with average length & volume who would like added length and a darker look to their lashes. (refer to Ardell #105)

    The possibilities are endless. You just want to make sure to pick lashes that are longer than your own. I've purchased lashes before that were actually shorter than my lashes - but much thicker and once I applied mascara to my lashes, they looked very unnatural. If you can't decide which to purchase, steer more towards lashes that are more natural in appearance. Then, you will get an idea of if you need more length or volume, so you'll know what to purchase next time!

    Lash Adhesive/Glue: There are two basic brands of Lash Glue most that most locations carry. It is Ardell LashGrip Adhesive & DUO Eyelash Adhesive. I prefer DUO over Ardell because DUO is a stronger glue. I find that when I use Ardell lash glue, my lashes are falling off by the end of the night. That doesn't happen when I use DUO. DUO comes in two shades of glue, Dark or Clear. The dark glue is gray colored when wet, and dries to black. This is ideal if you are wearing black eyeliner or a black/dark smokey eye. The clear glue is white/off white when wet and will dry clear. Don't be alarmed by the scent of the glue if it's your first time applying false lashes. It has a offensive fishy smell, but goes away once it has dried. You may also see Ardell Lashtight Adhesive for Individual Lashes.. but don't purchase that one. It is not for strip lashes. It's for eyelash extensions. I've bought it before on accident thinking I was purchasing regular adhesive. Also, you may find the Ardell glue in a different colored box.. such as yellow, blue, black or pink. It is all the same exact product.


    How to Clean False Lashes: There are several ways to clean your lashes. If you have real human hair lashes, they require a very delicate touch to clean. Apply a few drops of water to them and comb them through with a lash comb to get rid of any dust, dirt or mascara. It should also soften the glue so you can pull it off easily. Let them dry flat overnight. If they are drenched in water and you let them sit, the lashes can get clumped together and will stay that way. Synthetic lashes are easy to wash. You can run them under lukewarm water and with your fingers lightly rub the lashes so any mascara or dirt runs free. Lay them on a flat surface to dry.

    How long False Lashes will last: It mainly depends on how well you take care of them. If you don't apply mascara to them or curl them with a lash curler, it will extend the life of your lashes. Make sure to always take them off at the end of the night and don't sleep with them. If you sleep with them, you may wake up to your lashes being pressed in different directions and you won't be able to wear them again. Gently peel them off at the end of the night and store them in the plastic container you purchased them in. It's important to keep them in a closed place because if you put them on your nightstand, they will collect dust and particles over night. I typically get 3 or 4 uses out of them. Sometimes I can get 5-7 uses out of them if I take extra care of them or if they are synthetic.

    Friday, February 18, 2011

    My Face of Today + Foxy Lashes!

    I dyed my hair last night with my usual Clairol Natural Instincts Brass Free Brunettes in 5C Med. Brown.. So it may look slightly darker. And my hair was soo flat today because I loaded my hair with conditioner. Also, testing out my new Foxy Locks Extensions. I'll have a review on them soon for you!

    Since I was wearing my military jacket, I thought it was only necessary to take a photo with my new aviators. haha! Got them at Forever 21 for $5.80.

    Today was one of those days where you love your makeup and can't get a decent photograph. *sigh*

    Face: MAKE UP FOREVER (MUFE) HD Foundation #128
    MAC Moisturecover Concealer #NW25
    NARS Irresistiblement Bronzer
    Illamasqua Lover Blush
    MAC Vanilla Pigment (highlight)

    Eyes:
    MAC Bare Canvas Paint (all over lid as a base)
    MAC Vanilla Pigment (brow bone - highlight)
    MAC Espresso Eyeshadow (in crease and slightly above & smudged on lower lash line)
    MAC Tempting Eyeshadow (applied over espresso)
    MAC Grand Entrance Eyeshadow (applied all over lid)
    MAC Typographic Eyeshadow (darkened crease near the end)
    Bobbi Brown Blank Ink Gel Liner (top lashline)
    Foxy Lashes - Flirty Flare 02
    Covergirl Lash Blast Mascara

    Brows: MAKE UP FOREVER (MUFE) Eyebrow Corrector #3 Dark Ash Brown
    MAC Brow Set #Girl/Boy

    Lips: MAC Lure Lip Pencil
    Obsessive Compulsive Lip Tar #Hush
    NYX Round Lipgloss #Pinky Natural

    Here is a closer look at the lashes I am wearing. They are one of the two styles that foxylocksextensions.com has to offer. I really love them and think they look natural, yet glamorous! You can click here to view more product info on these.

    Tuesday, February 8, 2011

    Spotted: Faux Lashes at my local Dollar Tree!

    Hey Everyone!

    I wanted to do a quick post about these awesome lashes I picked up at my local Dollar Tree store. I had first spotted these last summer and was SO thrilled to find inexpensive lashes. I wear faux lashes very often, and wearing them often really adds up! The price for faux lashes went up in price in the past year at my local drugstores. It's now over $4 for one pair of Ardell lashes (which is ridiculous!!). I try as much as I can to get them when they're on sale at ULTA or Sally's Beauty Supply. Well, to make a long story short.. (it's actually not a long story at all.. lol) When I went back to purchase more lashes, they didn't have one pair. So I went searching high and low to all of my local dollar tree stores and saw nothing. Just tubes of eyelash adhesive. Big disappointment. I know Dollar Tree carries items that are purely close outs (sometimes there are N.Y.C, LA Colors, ELF, Etc. products) and there is stuff that comes directly from their supplier. You'll know if it's a Dollar Tree item if the label says "Distributed By Greenbrier International, Inc. Chesapeake, VA 23320. These are in fact, Dollar Tree lashes.. not close outs or overstocks of another brand.

    Anyhow, I was shopping at Dollar Tree for party favors and came across my beloved lashes again. Thrilled, I picked up 8 or 9 pairs. There were probably around 40 pairs total on the rack of all different styles.

    All of the lashes I purchased were the same style. They don't have a specific style number, but they looked the longest, featheriest (is that even a word?) and the most natural. I didn't think to compare bar codes, but in case you wanted to track these down in particular, the code is 639277893550. There also appears to be an item number of 989354 1010. It is most likely though that all of the styles have the same bar code. If you are familiar with Ardell Lashes, lengthwise they are longer than the 105's but shorter than the 111's. Although it doesn't state if they are 100% human hair or synthetic, I can tell you that they are synthetic. I normally don't purchase synthetic lashes for a few different reasons. 1) They can be stiff and difficult to apply 2) Because of the stiffness and plastic material, they can be uncomfortable 3) They can sometimes be too shiny & look un-natural. But, if you find good synthetic lashes the plus side is 1) They hold a curl better and 2) In my experiences, they have lasted longer b/c they are a little less "delicate" than the natural ones. 

    I wouldn't be posting about these lashes if I didn't like them. I think they're great.

    Here's a closer look..
    I have used this style before and they looked super natural and blended in very well with my natural lashes. I typically cut the lashes in half for a less dramatic look. 

    So, if you're near a Dollar Tree store on your next shopping trip out and are in need of faux lashes, check them out for yourself! I hope they will continue re-stocking these.. I've got my fingers crossed.

    Have you spotted really inexpensive faux lashes in your area? Share in the comments!