
Products used in this tutorial:
- Spoolie Brush (or clean mascara wand)
- Scissors
- Tweezers (Tweezerman or Revlon are my favorite)
- MAC Espresso Eyeshadow
- Clear Brow Gel
- Concealer
- Highlight Eyeshadow
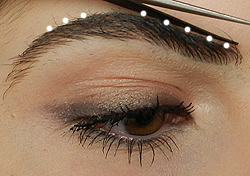
**The little white circles in the photos are shown as guides.
STEP 1:
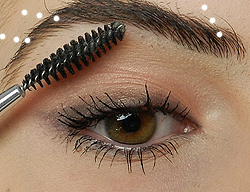
This may not be a necessary step for those with sparse or fine brows, but very necessary for those with coarse and/or unruly, bushy brows. Use your spoolie and brush your eyebrows upward.
STEP 2:
Now take your scissors, and line them across the topmost, thickest part of the brow. Trim any hairs that are too long.
Already looking better!
STEP 3:
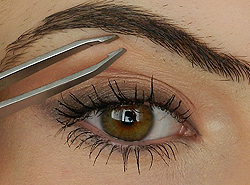
Using your tweezers, pluck any re-growth.
STEP 4:
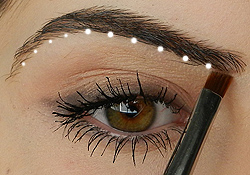
I always like starting on the underside of my brow and working up. Starting at the beginning of the under-side of the brow, follow your natural brow shape all the way across. The underside can be the harshest line, because it's usually the cleanest/most precise part of your brows if you got them waxed, threaded, etc. The top of the brow is usually more natural. *Make sure to apply light pressure, and don't apply too much product towards the ending (tail) of the brow.
STEP 5:
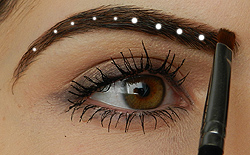
If your brows are sparse (mine aren't sparse, but I colored them in for the sake of the tutorial) and need to be darkened overall, lightly fill the inside (think of the top and bottom of your brows as borders, and you need to color in between the lines) of your brow with whatever residue is on your brush from Step 4. Again, don't apply too much pressure. Small, light brush strokes work the best. Additional product shouldn't be necessary as you don't want your brows to look harsh or "painted" on.
STEP 6:
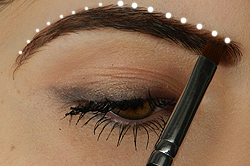
Lastly, trace the uppermost part of your brow making sure not to apply too much product towards the beginning or end. To avoid looking unnatural, you can start towards the middle or arch of your brow.
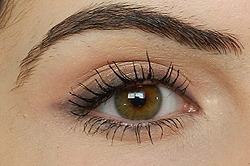
STEP 7:
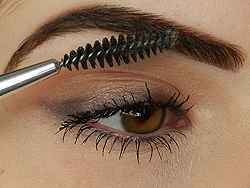
Comb your lashes with a spoolie to soften any harshness and blend the shadow in better with your brows.
Did you make your brows appear thicker than you wanted to?
Simply take your concealer and a small concealer brush (a Q-tip or clean sponge eyeshadow applicator would work if you don't own proper brushes) and trace the borders of your brow. The concealer acts as an eraser, and will thin out the shape of your brows if you made them too large.
Add a highlight to your brow bone
Adding a shimmery highlight to your brow bone will emphasis the arch in your brow, making your brows appear clean, well-groomed and making your eyes look fresh and more awake. *Adding a bit near your tear ducts wouldn't hurt either!
I hope you found this tutorial helpful!
In addition, here are some swatches of some brow products I own. I couldn't for the life of me find my MAC Brow Crayon in the shade Spiked.

The only pencil I really don't like out of the bunch swatched is the NYC pencil. It is very creamy and goes on clumpy. I prefer a drier textured pencil for my brows. All of the others I like and use depending on the shade of my hair. My favorites remain MAC Espresso & Cork, Maybelline Define a Brow & MAC Eyebrow Crayon.
I really like this post. I've stopped wearing makeup for a while and now I'm just going to start filling in my brows using your tutorial!
ReplyDeletexoxo Debby
great tutorial! right now i use and love the anastasia brow powder and the pencils too :) I never thought to use a regular e/s- good idea!
ReplyDeletegreat post!
ReplyDeleteamazing tut and final outcome!! i wish i took the time everyday to improve my eyebrows, lol. i do the optionals on special occasions :)
ReplyDeletethank you for this post!!!
wow this is a fabulous tutorial! great post! :) x
ReplyDeleteamazingly helpful tutorial
ReplyDeleteGreat post! I'm not good at grooming my eyebrow, I have given it up! :P I have tried the steps so many times, but I never get a nice result.
ReplyDeleteNice tutorial! I think the concealer trick is my favorite for the cleanest, most polished look!
ReplyDeleteThanks for sharing...I'm hooked on doing mines and others with MAC fluidline Dipdown. Have you tried that? Works great...
ReplyDeleteDhalia of mzfashioncloset.com
I envy your brows, so lucky to have a high arch!
ReplyDeleteGreat tutorial!
http://meggmasquerade.blogspot.com/
Nice steps to fill eyebrows. I definitely gone a try out.
ReplyDeleteexcellento!
ReplyDeletepalm angels t shirt
ReplyDeletebapesta
off white
OFF-White
supreme new york