Tuesday, May 25, 2010

Kardashian Tanning Gel?

Kardashian Glamour Tan Self Tanning Gel


I didn't know the Kardashian sisters had launched a tanning line until I was searching the editors picks on Sephora.com. Apparently it hit stores on May 19th and there are already several reviews. The price is $34. Eh, a little over priced if you ask me. But, it is a little tempting.. considering I'm a self tan fanatic. The reviews are mixed.. but overall pretty good. I may pick up a tube this week.

Product Info:
- A clear, odorless, non staining self tanning gel that allows you to get a glamourous and natural bronze tan for the face and body without dangerously exposing yourself to the sun. Not only does this gel deliver a natural looking tan, but its designed to uniquely moisturize with antioxidants and vitamin D.
Click here to view the product at Sephora.com
Interesting. I have a strong feeling this stuff is going to be like Jergen's Natural Glow.. they state that there are no harsh chemicals.. but chemicals in self tanner is not really an issue to me. I can deal with self tanner odor as long as I get a nice, browned tan. Also, not sure about the colorless aspect.. I think when its colorless, its easier to miss a spot. I'm still debating whether to pick this up or not. I probably will anyway. But, $34?? Come on Kardashians.. I love you guys and all.. but your name isn't that big to be charging that much.
What are your thoughts??


Monday, May 24, 2010

How I remove unwanted hair on my face!

Hi Guys! I've been asked the question a few times if I have any facial hair and if so, do I remove it? And, how? I know this may be an embarrassing topic, because not many women like to admit they have facial hair. But my answer is yes I do, and I'm going to tell you what I use to remove it.

First, I'll explain what I mean by facial hair and why I remove it. I have a layer of peach fuzz all over my face. Below my sideburns to the corner of my jaw, the hairs are a little darker. The hairs are also a little darker above my eyebrows, on the sides of my eyebrows and below my bottom lip. Although these hairs may not be noticeable, if you're a daily user of liquid foundation like myself, you may begin to notice that your makeup would probably look better without those little hairs. And, if you set your foundation with a powder.. or if you use a powder foundation, they become more noticeable. I began to notice that when my cream blush wasn't going on so smooth, it was because of these little culprits. With a fuzz-free face, my makeup looks so much better.. it doesn't look as heavy/thick and my face looks so much smoother.

I've tried several methods for hair removal. For the darker hairs, I use a tweezer. For the colorless hairs, I've used different waxes, depilatory creams.. you name it. I've used Sally Hansen and Surgi wax depilatory creams and they worked alright, but it wasn't the best solution. What the creams would do is dissolve (or break) the hair at the base. When it was time to wipe away the hair, some of the hair wouldn't wipe off and I would be left with an irritated face. In my opinion, its no different than shaving. For me, waxing is the best solution. It offers a longer term result and it pulls the hair out from the root. I've tried several different waxes.. and I've had quite a few disasters.. such as ripping off my skin with certain waxes (this can be avoided by applying powder prior to the wax.. so the wax will only adhere to the hairs and not your skin cells). My favorite wax is Surgi wax Hair Remover for bikini, body and legs. There is an identical wax for the face, but it is the same exact thing in a smaller jar. I buy the larger jar.


-First, prep your skin by removing all of your makeup. Pat your face dry.
-Heat the jar in the microwave. Since every microwave heats differently, start by heating it for 30 seconds. My microwave isn't very powerful, so It takes my jar almost 3 minutes to get to the liquidy/taffy-like texture. Stir the wax with the spatula.
-Test out a small area on your wrist (or where ever) to check if the temperature isn't too hot and that the consistency is good. Do this by dipping the spatula in the wax and smoothing it on your skin in the same direction as your hair growth. Wait until the wax hardens (approximately 20-30 seconds) and pull it off in the opposite direction of the way you applied it. If the wax is too hard to smooth onto your skin, you'll need to pop it in the microwave again.
Now you're ready to apply it to your face!
-Apply a light dusting of talcum powder (or baby powder) to the area you want to remove the hair from. (optional) It's good to use powder on your face because your facial skin is very sensitive and this will put a barrier between your skin and the wax. With this wax in particular, I never had to use powder and had no problems. If you're using a very sticky wax, a honey wax for instance, you'll need a powder 100%. This wax doesn't seep into the skin and pores like a honey wax.
- Start anywhere you want. You can either start up and work your way down, or vise-versa. I usually start at my chin and work my way up. Do small applications at a time. Smaller applications will insure that all of the hairs will be gone. If you work larger, you may miss some.


Pictured below is how I would break up the areas of my face to wax. I only apply a little at a time in small strips.

Because the hairs are so fine, you may not be able to see them in the wax after you've pulled it off. You can tell by bending the piece in the light and those little fuzzies will be exposed. :)

-After you've done your whole face, apply aloe vera. I like to use Aloe Vera Gel, it cools my face down and calms any redness.

The wax that you used can be used again. Just crumble it back into the jar and you can heat it again next time!


That's it!

What's your favorite summertime foundation?

I've been so tired lately of applying my liquid foundation every single day. I've been alternating between NARS Sheer Glow & Giorgio Armani Luminous Silk which are my favorites for every day. But I've been feeling like I want to switch it up and let my skin breathe a little more. Lately I've been using Korres Wild Rose Foundation. I'm really liking Korres Wild Rose as a summertime foundation. It applies well with the fingers and although it's sheer.. it evens out my skin tone and made my skin look very fresh and radiant. And, its VERY lightweight. I'll definitely be reaching more for it since it's starting to get so hot out.. Today it was 90 degrees!

My HG summer foundation last year was Make Up Forever Face & Body Foundation. It's a great foundation as well, but I wasn't satisfied with my color match. Also, I've gotten a hold of MAC Face and Body.. but its too sheer for me. It's good to mix with foundations to thin them out. Whats your favorite summertime foundation? I'll probably be going to Sephora this week to browse around. :)


I wore it today.. (lighting was a little weird..)


I was opening a bottle of perfume.. lol

Sunday, May 23, 2010

Great Handbags at ALDO!

Aldo has a great selection of sale and clearance handbags! I walked in the other day and almost walked out with 10 different handbags. But, I pulled myself together and purchased just one. since I'm TRYING (yes.. it is necessary to emphasize the word trying.. LOL) to be on a budget (considering.. I technically should/have to be on a budget) Well, that's all besides the point.

I never knew Aldo had such cute bags!? The sale bags are mostly $30 and under. As for the clearance bags, they are mostly $20 and under. Sweet deals! These bags are synthetic, but many of the styles have that soft glove leather appearance/texture.. and look like real leather.

Their non-sale bags are just as cute and aren't very expensive either. They mostly range from $40-$45.


I purchased this little drawstring bag. I'm not sure what drew me to it.. it's not really my style, but I kind of liked that its a little different and I don't have anything like it! I love the combo of black and gold and I'm a sucker for tassels on bags. This bag was reg. $45 on sale for $30.


My BFF bought this one.. It is soo adorable. Wasn't on sale though.. :(


CLICK HERE to Shop Sale!
CLICK HERE to Shop Clearance!

Disclaimer: I am in no way affiliated with ALDO.

NARS Duo Concealer Review!

nars duo concealer review

Nars Duo Concealer

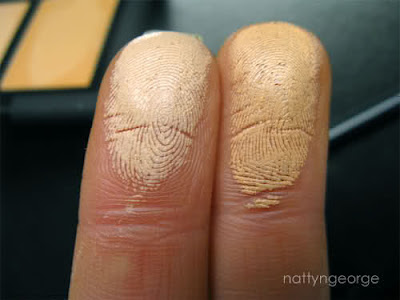
Nars Duo Concealer is a cream compact concealer containing two shades in order to create your perfect color match. I have the Custard/Ginger Duo, which contains Custard (yellow-undertone for light to medium complexions) and Ginger (golden undertone for medium complexions). It's the perfect duo for my MAC NC40 skin tone. I believe it's best suited for NC30-NC40 skintones. 

*The lighter shade (left) is Custard and the darker shade is Ginger (right).
Two complementary shades suit variations in skin tone: The lighter shade brings brightness to the eye area, while the darker shade can be blended directly onto the skin to obscure imperfections and dark spots. 
All-day, crease-proof wear; easily blendable for a flawless finish. 
Long-wearing Enriched with moisturizing Vitamin E
The texture different than any of my other cream concealers. Because it's a cream, you'd expect it to be dense, creamy and thick. It's creamy - yes, but it's very lightweight and has a powdery feel once applied. A very familiar texture if you use silicone based products.

nars custard ginger concealer swatches

Friday, May 21, 2010

Dyed my Hair with Clairol Natural Instincts Brass Free Brunettes!

Hey Everyone! I thought I was going to get this post out earlier, but I didn't get a chance to. I dyed my hair about one week ago. I was basically just getting tired of my hair color. My natural hair color is a medium/dark brown that pulls towards brassy tones very easily. If ever dye my hair a different shade of brown, it will always fade to the exact same color. A caramel/light to medium brown with auburn-ish tones. Although, it is a pretty color, I'm not sure if its the most flattering color for my skin tone. I think when I'm tanned, a little deeper brown compliments me better. I was a little stumped what dye to purchase.. I decided that I would like to go with a semi-permanent dye (ammonia free) rather than a permanent dye so I will lessen the damage, and just to not completely change my hair color, but darken/deepen it a bit.

I ended up purchasing Clairol Natural Instincts Brass Free Brunettes in 5C Medium Brown. It claims to "counteract unwanted red or orange tones in your blonde or brunette hair color. Use it once a month and Brass Free will give you all the color without the brass." And, it says it will last through 28 shampoos. I thought that it sounds great since I don't want a drastic change. I just want to remove the auburn tone in my hair from past highlights.

What I really like about this is, you only need to put it in your hair for 10 minutes. I first sectioned off my hair. I took about 1/3 of my hair, from around the middle of my ears across I tied it in a tight ponytail and swirled it around into a clip. That section of my hair I did not want to dye. The reason I didn't want to dye it is because I wanted my lighter hair to show through a little bit. I thought it would add a nice little pop of color through the bottom of my hair. I then, very quickly started to apply the mixture to my hair starting at the roots on the top of my head (where my part is) and bringing the mixture down to my ends. I worked very quickly at applying it everywhere. I rubbed very lightly on my scalp (do not massage into your scalp) and I massaged my hair for about a minute to make sure the hair was coated very well. This dye is harder to get off your skin than the regular 40 minute hair colors, so once it hits your skin, be sure to rinse it off right away or you will be scrubbing for a long time. :) I waited about 12 minutes. Yes, I took 2 extra minutes because I wanted to make sure my hair color wasn't going to be too light still. Then, I showered. It says on the box "for the best results, wait 24 hours before shampooing". Considering I took 2 extra minutes, I shampooed. My hair felt pretty dry. Then, I applied the conditioner that was included and my hair was like silk. It was probably the best boxed dye conditioner I ever used. I actually shampooed over the conditioner once more because I don't use conditioner because it takes double time for my hair to dry. My hair felt slightly dry again, so I ended up putting a little more conditioner on my ends only.
viola!


I really like the color. It's very rich and shiny. I do believe I will be using this dye again in about a month. :)

Saturday, May 15, 2010

NOTD - OPI My Private Jet!! My FAVORITE OPI Nail Polish!!!

I am in love with OPI's My Private Jet! I purchased it about two weeks ago. So far, I've had it on my toes for a little over a week and it hasn't chipped yet. That's pretty miraculous for me because my pedicures never stay in tact for long. My big toe (nails) always split.. so the color always ends up chipping off. I'm really loving the formula of this one. It's very creamy, dried quick and didn't nick. I hope I can get a full week of wear on my finger nails.

I love dark colors.. Especially grays. I've tried Black a couple of times and it just didn't warm up to me. I didn't find it at all flattering. This polish is probably the closest I can go to black. It looks like a deep gunmetal with very, very fine glitter that reflects green and gold. It looks more holographic than it looks glittery. I'm not sure if glitter is the correct word. In the sunlight, this color is soo gorgeous. I'm probably going to buy a couple of back ups of this shade.

1 Coat of Seche Clear Base Coat, 2 Coats of My Private Jet & 1 coat of Seche Vite Top Coat. Thank you guys for the suggestion of Seche Vite for a top coat.. it's the best top coat I've used. Super shiny and dries fast!

I had such nice nails until I went bowling.. Lol, I had like 4 of my nails break off.


Its not too dark, I promise.

What's on your nails?

Friday, May 14, 2010

Sugar Bliss Cake Boutique. Yum!

Hi Guys! I don't have a beauty related post today.. just a couple yummy pictures! After George got out of his morning meeting in the city, he picked me up a little treat. He was waiting for the valet to bring back his car, when he caught a glimpse of lots of people walking out of a little boutique with cupcakes in hand. We both loved Sprinkles Cupcakes back when we were in California. This place reminded him of Sprinkles, so he ran across the street to get me one (or a couple LOL) to do a taste test to see if their cupcakes would compare.

I was at home today doing lots of cleaning and re-organizing.. I was so happy that I was doing so much moving around and that I had eaten very healthy all day. Then yeah, George pulled up my driveway with a little box in hand and my healthy eating did a quick spiral downhill. Part of me wanted to choke him considering he knew I wanted to stay clear of sweets, especially since my birthday is in a couple of weeks.. and the other part of me wanted to slam the car door and run in the house to grab a fork. *sigh* The power of sugar. But, its the thought that counts right? Lol. Anyways, I thought I would share a couple of pictures and thoughts!


Pure Chocolate
Dark chocolate cake with rich dark chocolate buttercream


Texas Red Velvet
Red velvet cake with cream cheese frosting


Thoughts: Right away, I stuck my finger in the cream cheese frosting off of the red velvet cupcake. And YUM. It's extremely light & silky in texture. It tastes very home made and very fresh. It wasn't rich or overly sweet. The texture of the cake was similar to the texture of fresh cornbread.. it wasn't all that moist, but overall very tasty. As for the pure chocolate, The frosting was a complete different texture. It was creamy, but I found it to be pretty thick (not like birthday cake frosting, thick like peanut butter. Where it coats your tongue and the roof of your mouth when you eat a fork full). It definately has a strong dark chocolate taste. Again, it wasn't overly sweet or rich.. it had a nice slight sweetness to it. The cake I was a little disappointed with. It was very moist, but it reminded me of the Pillsbury $1 a box chocolate cake mix. I did enjoy the cupcakes, and if I ever decide to go, I would try out a different flavor. Maybe the "Strawberry Dream" or the "Vanilla Milk Chocolate".

Conclusion: Sprinkles still holds my trophy for the yummiest cupcakes.


Sugar Bliss Cake Boutique is located on 115 N. Wabash Chicago, IL 60602. A few blocks down from Millennium Park.

http://www.sugarblisscakes.com/

Has anyone else tried their cupcakes? If so, which ones?? :)

OH, And if you're a Red Velvet Cake lover, there is a great recipe on the Food Network website. It was a huge hit with my family when I made it. http://www.foodnetwork.com/recipes/sara-moulton/southern-red-velvet-cake-recipe/index.html