Monday, February 28, 2011

NOTD: Love & Beauty (Forever 21) Nail Polish in Coral!

Two (2) Coats of Love & Beauty Coral Nail Polish (No Top Coat)

Coral is a beautiful, vibrant coral-red. When I first purchased this polish, I thought it was going to be "salsa" red - basically an orange/yellow red, but this coral is absent of any yellow tones. It's almost like a vibrant, salmon-coral. I think it's a pretty close dupe to the Essie Escapades Nail Polish from Essie's Summer of '08 Collection. As for the nail polish itself, it is quite sheer with one coat and is very opaque with two. Some may prefer three coats - as when I look at my nail in the light, I can see my nail line. The formula is creamy and dries quickly. I was able to apply a second coat within a minute or two. The finish is actually very shiny, but a top coat is necessary so you won't "nick" your nails.

This Nail Polish can be found at Forever 21 stores.

Sunday, February 27, 2011

TAG: Products I'm using right now!

 The last time I did this particular tag was over a year ago, and it was a tag that I really liked & enjoyed reading on other blogs. Since it's been so long, I thought I'd post an updated one!

Shampoo: Paul Mitchell Color Protect Daily Shampoo or Kiss My Face Big Body Shampoo.
Conditioner: I don't use Conditioner, but periodically I use the tube of conditioner that comes with the box of hair dye I use (Clairol Natural Instincts). I mainly just work it though my ends if I feel my hair is a bit dry.
Treatments: Unrefined Coconut Oil or Caster Oil. I also just purchased Beyond the Zone Protein Cocktail; which I'm loving so far.
Styling products: Fantasia Heat Protector/Polisher, Beyond the Zone Flipped Out Hair Spray & Bedhead After Party.
Styling Tools: Remington Sleek and Curl Tourmaline Ceramic Straightener & Hot Tools Ceramic Titanium Hair Curling Iron.
Shower Gel: I use whatever is in arms reach - Lately I've been using up my Bath & Body Showel Gel in the scent Sweet Pea that I received for Christmas. I also like to use Coastal Scents Black African Soap, or my good ol' pink bar of Dove.
Body moisturizer: Unrefined Shea Butter & Jojoba Oil.
Deodorant: Secret Clinical Strength.
Fake Tan: SUN Labs Dark Spray & St Tropez Gradual Tan Everyday Body Lotion.
Cleanser: Neutrogena Cleansing Towelettes & Coastal Scents Black African Soap - I don't use any specific cleansers right now.
Exfoliator: Nothing currently for my face. I sometimes use a exfoliating face brush but it's a little too harsh. I like using an exfoliation glove in a warm shower if I feel my face needs it.
Primer: Hard Candy Sheer Envy Primer (I'll be reviewing this soon)
Foundation: I switch off foundations very often. I've mostly been wearing Cinema Secrets, though.
Foundation brush: ELF Studio Stipple Brush & my new Sonia Kasuk Synthetic Flat Top Brush.
Concealer: I'm finishing up my sample of Keromask & I've been using Maybelline Fit Me Concealer quite a bit - despite it's not the best.
Powder: Rimmel Stay Matte Transparent Powder
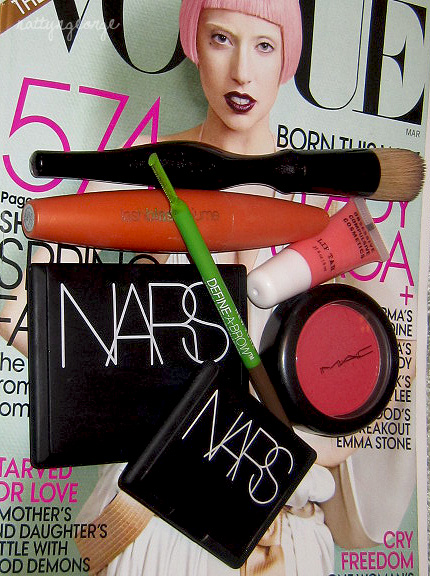
Blusher: I wear different ones all of the time. My most worn this past month have been NARS Madly, MAC Frankly Scarlet, MAC Improvise & Illamasqua Lover.
Bronzer: Again, I wear different ones all of the time.. but my most worn this month have been NARS Irresistiblement, NARS Luster (which is actually a blush, but it's quite golden) & Rimmel Sun Dance,
Highlighter: Urban Decay Sin Eyeshadow. I've had this eyeshadow for over a year and barely used it.. I just recently discovered that its an amazing highlighter for the face and I use it every day!
Eyeshadow base: None - But, once in a great while I'll use MAC Bare Canvas.
Eyeshadows: All of the browns in my Napoleon Perdis Smoke Signals Palette, NARS Coconut Groove, MAC Cork
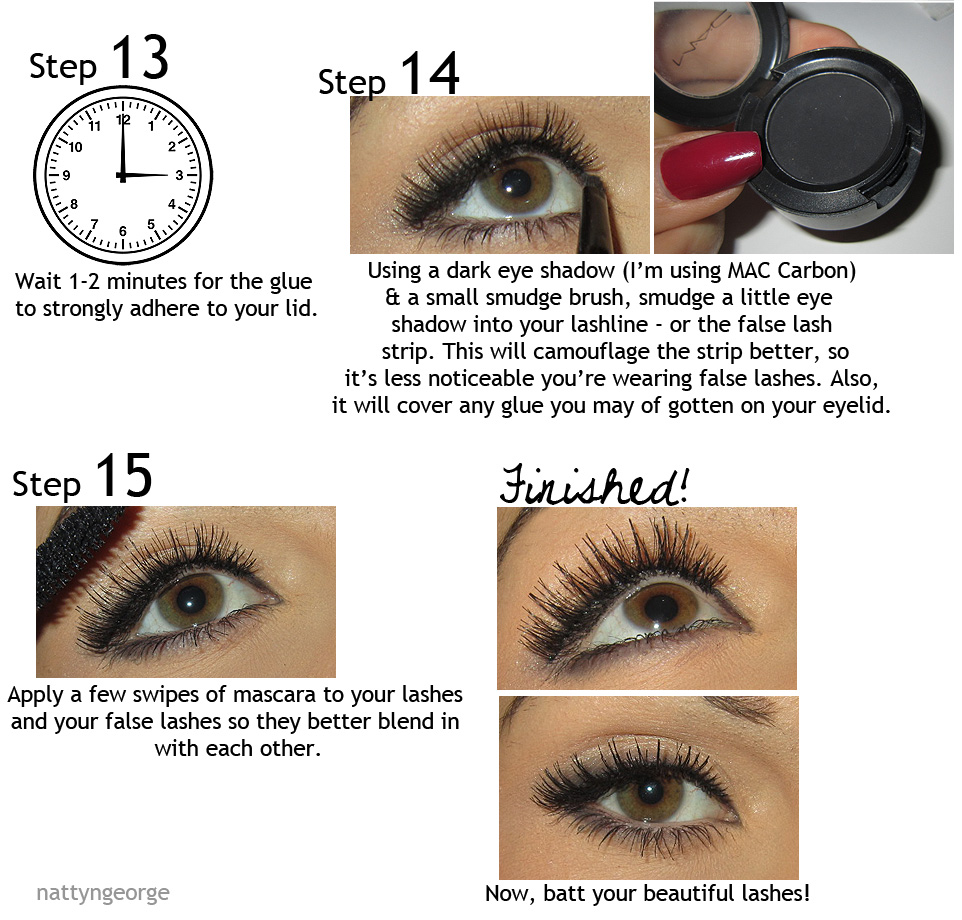
Eyeliner: Haven't been wearing it much, but usually MAC Point Black Liquidlast Liner and I've been using Wet n Wild's Creme Liner more often..
Curler: Shu Uemura
Mascara: Shiseido Mascara Base, Covergirl Lash Blast (orange tube) & Covergirl Professional Super Thick Lash Mascara
Brows: I use different ones all of the time because I have so many brow products I want to use up. Ones I grab for the most lately have been MUFE Eyebrow Corrector, ELF Eyebrow Kit, Maybelline Define-a-Brow & Essence Brow Pencil. To set my brows I use ELF Tame & Treat or MAC Brow Set.
Lipstick: OCC Lip Tars all month.. It's either a combo of Hush & Divine or a combo of Divine & Trick.
Lipgloss: I actually haven't been really using any colored glosses. I mostly wear clear over my lip tars, so I've been trying to use up my Victoria's Secret Lip Plumper Extreme. I like using it with the lip tars because the brush applicator makes it easy to blend the colors together. I won't repurchase this product again though..
Nail Colour: Nothing is on my nails right now because I'll be painting them tomorrow morning. I've been alternating every week, but I have to say my favorite has been Revlon Top Speed Fast Dry Nail Polish in the shade Cupid.

I'm not going to tag anyone in particular because I know some people don't like being tagged. So, I'll leave it up to you guys! I would love to see you do this tag though - if you do, please post the link to your post in my comments! If you don't have a blog and want to share "what you're using right now", post in my comments as well! I'm excited to read them!

Saturday, February 26, 2011

E.L.F Studio Complexion Perfection Powder Review!

ELF Studio Complexion Perfection Powder

Product Description: Create a balanced and radiant complexion that is beautiful and healthy. The lightweight formula evens out the skin tone and absorbs excess oil. The sheer formula brightens, mattes and neutralizes the skin. The colors are meant to be blended together as the Blue neutralizes orange, the Green neutralizes red, the Pink neutralizes grey and the Yellow brightens and neutralizes red. (http://eyeslipsface.com)


So whats the theory behind having a powder with four different colors? Well, like mentioned in the product description above, these colors will neutralize certain tones your face may have that you'd like to correct.

Look at the color wheel for instance. Any color you'd like to neutralize, find it on the color wheel & across from it will be the color that it will cancel that certain color out.

Friday, February 25, 2011

Tutorial: How to Apply Fake Lashes! (Very Long Post)

How To Apply Fake Eyelashes

Applying eyelashes is very simple once you have a little bit of practice. In this tutorial I will explain step by step how to apply False Lashes. Last week, I posted about my favorite lashes, where you can purchase false lashes as well as other general information regarding false lashes. To be re-directed to that post, click here. Otherwise, Keep Reading!

Tools you will need: 
False Full Strip Eyelashes (I am using ELF Essentials Dramatic Lash Kit)
Lash Adhesive (I am using DUO Dark Tone Lash Adhesive)
Tweezers

Optional Tools:
Liquid Eyeliner or a Dark Eyeshadow
Small brush (eyeliner brush, angled liner brush, smudge brush, etc.)

Where to start? Applying false lashes will be the last step of your eyes. So, make sure to prime your eyes with an eyeshadow primer, apply your eyeshadow and eyeliner & you'll be ready to apply your false lashes!

Why apply them last? You apply false lashes last because you want your lashes to be very black and clean of any eyeshadow or other products. If you apply them first, you may have lashes that are full of eyeshadow. If you'd like, you can apply a thin coat of mascara beforehand. But it's not necessary. I like having a thin coat of mascara on my lashes before I apply false lashes.

Let's Begin! I've included photos of each step along with a caption. I have written out the steps, and they are more detailed than the actual captions.

Step 1: Take your false lashes out of the box. Using your tweezers (or fingers), gently peel the lashes off of the tray. You don't want to apply too much pressure, or else you may bend or damage the band.

Step 2: Using your pointer finger and thumb, you want to hold both ends of the eyelashes at the bottom band. Lightly move both of your hands up and down a centimeter or so. Doing this will stretch the band so it isn't as stiff. This will help the lashes sit better on the contour of your eyelid. (Think of it as stretching a balloon before you blow it up) In the photo of Step 2, the top lash is properly curved and the bottom lash has not been touched yet. You can tell the band on the bottom is a bit straighter.

Step 3: Now we are going to test the lashes to see if they are the correct length for your eye shape. If you have smaller eyes, you may need to cut a little bit. Pick up the according eyelash to you eye. The shortest part of the lashes should be matched up near your tear-duct. The longest part should be at end. The way you will set them on your eyelid is with the curl facing up. Set the lashes down in the middle of your lashline. Look to see where your natural lashes start (inner corner) and pull the false lashes to the same spot. Look to see if the band extends farther out (outer corner) than your natural lash line. If it extends out longer, grab the end with your thumb & pointer finger and lift them off.

Step 4: With your scissors, cut off any excess lashes. (Set it on your lash line again to see if you cut enough)

Step 5: Squeeze a little dab of lash adhesive on a clean surface. Don't apply it from the tube directly to the lashes. A lot of product comes out at once and you don't want to damage the lashes.

Step 6: Using any tool you'd like for precise application of the glue, (many like to use a toothpick or the opposite side of the tweezers. I'm using the opposite corner of the lash adhesive tube) pick up the glue up. Don't worry it's too much. You don't want it to be too little, otherwise your lashes might not stick well.

Step 7: Pick your lashes up with your fingers or your tweezers and drag the glue across the band of the lashes. Apply a little more to each end of the lashes, as they are the spots that tend to wear off.

Step 8: Pick the lashes up with a tweezer, holding them in the middle - close to the band but not touching the glue.

Step 9: It's difficult to apply lashes while looking straight forward into a mirror. The easiest way is by sitting down or standing up and tilting your head back a little - so when you look forward, your eyes are slightly squinted. This way, you'll be getting a better view of your lashline. Like you did in Step 3, set the lashes down on your eyelid as close as possible to the base of your natural lashes, but not touching them. They should be on your eyelid, not your lashes. Make sure they are lined up with the start of your natural lashes before you press them down on your skin.

Step 10: Once the lashes are lined up with your lashes, grab the beginning of the lashes with your tweezers and press it down on your lid. Again, make sure they are lined up with the start of your natural lashes. You don't want them to be any closer to your tear-duct, or it may cause your eyes to water or a pinching sensation. There should be a small space. Grab the outer end and press it down on your skin. Work Quickly before the glue sets.

Step 11: Go along the whole band, pressing it down onto your skin with the tweezers.

Step 12: To make sure it's very secure, use a brush (smudge brush, eyeliner/brow brush, etc) or sponge applicator and go across the band again pressing it down on your skin.
Step 13: Wait patiently for 1-2 minutes while the adhesive dries completely. 

Step 14: For this step, you can use eye liner (liquid/pencil or gel) or a dark eyeshadow (brown, black, etc). If you're using an eyeshadow, take a small smudge brush and smudge the shadow on your lid, close to your lashline - blending it into the band of the false lashes. This will blend in the band better as well as cover up any adhesive you may have gotten on your eyelid. If you're using a liquid liner, line your eyes as you normally would - against the band of the lashes.

Step 15: Apply a coat of mascara to your lashes, starting at the base of your natural lashes all the way up to the end of the false lashes. This will blend your natural lashes in better with the false lashes as well as make the lashes look darker. 

You're all finished! Enjoy your long, lush lashes!

To see how it's done, check out Kandee Johnson's video tutorial!