Wednesday, October 23, 2013

Face of the Day Walk-through | Full Coverage Face & Soft Eyes


You can call me a ride-or-die medium coverage kind of chick. I've tried countless foundations - many of which I loved and some.. not so much. The ones I love all share a common factor - they all have a solid medium coverage. That basically means that the coverage is somewhere in-between light and full - A medium coverage will even out skin discolorations, cover blemishes, yet the foundation only looks like a silky veil on the skin rather a mask, and sometimes, my freckles, sunspots and sometimes even a little redness will slightly shine through. I actually kind of like that - it gives the illusion of clear skin, while not erasing every single spot.

But of course, I love switching it up and sometimes I really like an airbrushed, blemish-free face. Recently, I've been enjoying wearing a full coverage face, especially on nights out when I really want my makeup to hold up for several hours. Light and medium coverage foundations can break down a bit with sweat, etc, but when I bust out my heavy duty full coverage makeup, I know that my makeup isn't going anywhere all night. I'm going to take you through a quick run through of what I've been wearing lately.


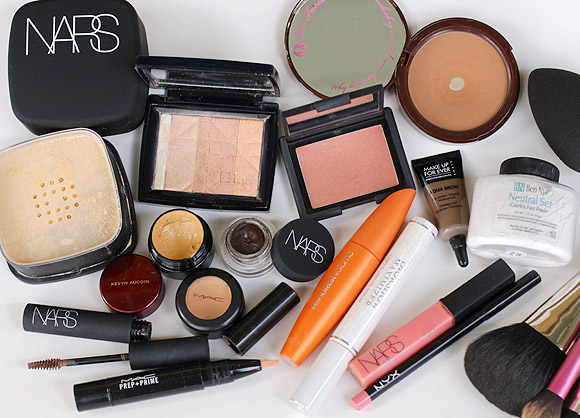
I like to start out with applying a water based moisturizer to my entire face as it will allow my makeup to spread and blend effortlessly without looking dry or cakey. I always apply a moisturizer liberally to my under-eyes so the skin under my eyes will look rejuvenated, giving the illusion of well rested eyes. My favorite full coverage concealer is MAC Studio Finish Concealer. I like applying it with my middle or ring finger and tapping/patting the product (not wiping) to blend.

Kevyn Aucoin Sensual Skin Enhancer has been my go-to full coverage foundation. It's an incredibly dense, tacky cream and you only need the tiniest bit for the whole face. I like to dot it on each area of my face, and then with a damp Beauty Blender sponge, spread and pat the foundation into my face until it's completely blended. If I want my face to look really perfect, I'll add a second thin layer.

Now, with full coverage foundations, you need to pop some dimension back in your face as an opaque coverage can flatten the face and make the natural contours less apparent. I love using MAC Prep + Prime Highlighter and applying it under my eyes and down the bridge of my nose and blending it out with a beauty blender. It really brightens up the face and gives more of a structured look.

I always set my under-eyes with Ben Nye Neutral Set Powder, which has been my favorite under-eye setting powder for years. I love that once I apply it, it really locks my concealer in and makes it budge-proof until I remove my makeup. Creasing and setting is never an issue. If I want a seriously opaque, Kim K kind of under-eye, I'll take a sponge and pat some MAC Studio Fix Powder under my eyes. For the rest of my face, I've been really enjoying NARS Loose Powder. It adds a hint of additional coverage, while softening the look of the skin, making the face look virtually perfect.


The skin is now a blank canvas, so I like adding some warmth into my skin and at the same time exaggerating the natural contours of my face. I've been loving Too Faced Chocolate Soleil Bronzer because it's a med-dark brown matte bronzer and mimics shadows really well. If you have very pronounced features, it's not really necessary, but for those with a fuller face, it can work wonders. With a small contouring brush I like to apply the bronzer below my cheekbones and blend upward, as well as up my temples and forehead, and all around the outer edges of my face. I like going back with my powder brush to further blend any areas that look too harsh.

Then, I like popping a little color on my cheeks. I chose NARS Lovejoy Blush - a lovely shade of rosy-bronze that is a very flattering every-day shade for warm skin tones. After I've applied my blush, I'm going to apply a highlighter with my fingertips across the highest points of my cheekbones. I used Dior Amber Diamond, a subtle ultra fine powder highlight that makes the skin look like it's glowing from within.

For my eyebrows, I've used a combination of NARS Eye Paint and MAKE UP FOREVER Aqua Brow. I have quite a bit of filling in to do, but I'm going to try making them look as natural as I can by not applying too much product at once. Since my natural brows are very dark, I always like to finish with a tinted brow gel to lighten them up slightly. It softens my brows so they don't look as harsh/tattooed. I'm using NARS Brow Gel.

The eyes I'm keeping rather plain today and I'm going to apply MAC All That Glitters Eyeshadow all over my lid and smudge NARS Eye Paint on my upper and lower lash line. Then I'm going to line my eyes with the eye paint as well.

Lastly, I'm going to curl my lashes, add a coat of Diorshow Maximizer Lash Plumping Serum and two coats of Covergirl Lash Blast Mascara. For a little extra intensity, I added some Red Cherry False Lashes.
Thursday, October 17, 2013

NARS Mesopotamia Eye Paint Review, Photos, Swatches!

NARS Mesopotamia Eye Paint

NARS Mesopotamia Eye Paint

NARS Mesopotamia Eye Paint ($25) is a multi-use eye product that can be both used as a cream eyeshadow and an eyeliner. It provides high-impact pigment with a silky, weightless feel. It glides on the skin smoothly and quickly dries down to a budge-proof finish.

So, you've tried one gel/cream eyeliner and you think you've tried them all. Well, despite the similarities between different brands of gel eyeliners, the formulas can differ quite a bit. Some formulas are drier than others, some are creamier, some are budge-proof and some smudge to no end.

I don't ask for much when I'm looking for a good potted eyeliner. My only requests are that the formula is smooth so that it will provide clean lines, opaque color and that it won't smudge/fade or crumble after several hours of wear.

I love the texture of NARS Eye Paint. The formula is more of a gel than a cream, as it has quite a bit of slip to it. Because of the slippery texture, it's very ideal for smudging and creating a smoked out eye. As with many cream products, once you apply it to your lid, you have to smudge it quickly, otherwise it won't budge. I love that fact that it doesn't set so quick that you have to worry about it drying before you're finished working with it (such as MAKE UP FOREVER Aqua Creams). It really smokes out nicely with a blending or smudge brush, and the intensity can be built up with additional layers.

Mesopotamia is a very dark intense brown. I think it's a great color for every day and I actually most of the time prefer it over black as it works well with my warm coloring and has a softer look. I've actually been using it on my eyebrows as well. For the brows, a little goes a very long way and I only have to lightly touch the product with the tip of the brush to fill in one of my brows completely.

The lasting power is very good. I notice that when If I don't apply a base, I'll have some fading when used as an eyeshadow, but when applied as an eyeliner it lasts well throughout the day. On my brows, the color doesn't budge all day.

NARS Mesopotamia Eye Paint Swatch
Swatches of NARS Mesopotamia Eye Paint

NARS Mesopotamia Eye Paint
NARS Mesopotamia smudged and lined on my upper and lower lash line as well as applied to my eyebrows

Tuesday, October 8, 2013

Million Dollar Tan Cabana Tan Extreme Face & Body Lotion Review!

Million Dollar Tan Cabana Tan Extreme Face & Body Lotion

Million Dollar Tan Cabana Tan Extreme Face & Body Lotion ($66) is Million Dollar Tan's Best Selling Formula for long-lasting, natural, ultra-bronzed color. It's made with organic ingredients and is paraben free.

I jumped on the Million Dollar Tan bandwagon after it seemed like every Youtube beauty guru was raving about it and deeming it their all-time favorite self tanner. Despite the hefty price tag, I gave in with expectations of a beautiful, deep tan.

I really like the consistency of the lotion. It's thin - therefore it smoothes on the skin easily and doesn't leave a heavy feeling on the skin. Also, the lotion isn't tinted, which has it's advantages as well as disadvantages. I really like the fact that it isn't tinted because it allows me to apply the lotion to my neck, chest and body in the morning after my shower, and I can look forward to bronzed skin hours later. The only disadvantage is that since it isn't tinted, you can easily miss areas of your body since it goes on clear. To avoid streaking/missing areas, work in small areas at a time.

Application

I don't typically like using my bare hands to apply self tanner, but it's my preferred method with this particular tanner. Latex gloves streaked the product on my skin and wouldn't properly blend, and a mitt seemed to absorb too much product. To apply, I would just simply pump some product into my palm and apply it to my skin as I would a normal body lotion - in circular buffing motions. To make the product go a little further, I'd like to add a pump of regular body lotion to every two pumps of self tanner. For my neck/chest, I like to be a little darker, so I usually apply around two layers of product. It dries pretty quickly, so once dry, you can apply another coat of product for a darker result.

*To avoid orange knees, elbows and feet, I will use a small amount of body lotion and rub it into those areas before and after applying the self tanner.

To avoid over-tanned hands and palms, I typically wash my hands a couple of times through the application process.

Monday, September 30, 2013

Estee Lauder Pure Color High Intensity Lip Lacquer Review, Photos, Swatches!

Estee Lauder Pure Color High Intensity Lip Lacquer

Estee Lauder Pure Color High Intensity Lip Lacquer ($25) is described as a full-impact liquid lipstick with high lacquer shine. This new collection of Lacquers is part of Estee Lauder's Fall '13 Metallics Collection that is centered around highly reflective and glass-like finishes for multi-dimesional color. So, if you're looking for a product with loads of color and a high gloss shine, these are it! The formula is also creamy and hydrating with a blend of Vitamins C, E and Conditioners. Available in (12) shades.

Liquid Petal is a medium-dark neutral peach with a hint of pink. It also has a some flecks of very subtle shimmer.

Chrome Kimono is a cool, medium rosy pink with bright pink shimmer.

Fuchsia Flash is a bright blue pink with purple and pink iridescent shimmer.

Hot Cherry is a true cherry red with shimmer. It's a beautiful holiday red that will flatter all skin tones.

Ruby Glow is a deep black cherry with no shimmer.

Electric Wine is a deep ripened plum with shimmer.

The consistency of these lip lacquers are really thick - maybe somewhat comparable to MAC Pro Longwear Lipglass, but they aren't at all sticky. Because of the consistency, sometimes adding a lip balm prior can help add a bit of slip to your lips for these lacquers to glide across, as you might find that you'll need to re-dip your wand a couple of times. Luckily, but you don't have to apply much for full-on color. They are opaque with one coat.


From left to right: Liquid Petal, Chrome Kimono, Fuchsia Flash, Hot Cherry, Ruby Glow and Electric Wine.