You can call me a ride-or-die medium coverage kind of chick. I've tried countless foundations - many of which I loved and some.. not so much. The ones I love all share a common factor - they all have a solid medium coverage. That basically means that the coverage is somewhere in-between light and full - A medium coverage will even out skin discolorations, cover blemishes, yet the foundation only looks like a silky veil on the skin rather a mask, and sometimes, my freckles, sunspots and sometimes even a little redness will slightly shine through. I actually kind of like that - it gives the illusion of clear skin, while not erasing every single spot.
But of course, I love switching it up and sometimes I really like an airbrushed, blemish-free face. Recently, I've been enjoying wearing a full coverage face, especially on nights out when I really want my makeup to hold up for several hours. Light and medium coverage foundations can break down a bit with sweat, etc, but when I bust out my heavy duty full coverage makeup, I know that my makeup isn't going anywhere all night. I'm going to take you through a quick run through of what I've been wearing lately.

I like to start out with applying a water based moisturizer to my entire face as it will allow my makeup to spread and blend effortlessly without looking dry or cakey. I always apply a moisturizer liberally to my under-eyes so the skin under my eyes will look rejuvenated, giving the illusion of well rested eyes. My favorite full coverage concealer is MAC Studio Finish Concealer. I like applying it with my middle or ring finger and tapping/patting the product (not wiping) to blend.
Kevyn Aucoin Sensual Skin Enhancer has been my go-to full coverage foundation. It's an incredibly dense, tacky cream and you only need the tiniest bit for the whole face. I like to dot it on each area of my face, and then with a damp Beauty Blender sponge, spread and pat the foundation into my face until it's completely blended. If I want my face to look really perfect, I'll add a second thin layer.
Now, with full coverage foundations, you need to pop some dimension back in your face as an opaque coverage can flatten the face and make the natural contours less apparent. I love using MAC Prep + Prime Highlighter and applying it under my eyes and down the bridge of my nose and blending it out with a beauty blender. It really brightens up the face and gives more of a structured look.
I always set my under-eyes with Ben Nye Neutral Set Powder, which has been my favorite under-eye setting powder for years. I love that once I apply it, it really locks my concealer in and makes it budge-proof until I remove my makeup. Creasing and setting is never an issue. If I want a seriously opaque, Kim K kind of under-eye, I'll take a sponge and pat some MAC Studio Fix Powder under my eyes. For the rest of my face, I've been really enjoying NARS Loose Powder. It adds a hint of additional coverage, while softening the look of the skin, making the face look virtually perfect.

The skin is now a blank canvas, so I like adding some warmth into my skin and at the same time exaggerating the natural contours of my face. I've been loving Too Faced Chocolate Soleil Bronzer because it's a med-dark brown matte bronzer and mimics shadows really well. If you have very pronounced features, it's not really necessary, but for those with a fuller face, it can work wonders. With a small contouring brush I like to apply the bronzer below my cheekbones and blend upward, as well as up my temples and forehead, and all around the outer edges of my face. I like going back with my powder brush to further blend any areas that look too harsh.
Then, I like popping a little color on my cheeks. I chose NARS Lovejoy Blush - a lovely shade of rosy-bronze that is a very flattering every-day shade for warm skin tones. After I've applied my blush, I'm going to apply a highlighter with my fingertips across the highest points of my cheekbones. I used Dior Amber Diamond, a subtle ultra fine powder highlight that makes the skin look like it's glowing from within.
For my eyebrows, I've used a combination of NARS Eye Paint and MAKE UP FOREVER Aqua Brow. I have quite a bit of filling in to do, but I'm going to try making them look as natural as I can by not applying too much product at once. Since my natural brows are very dark, I always like to finish with a tinted brow gel to lighten them up slightly. It softens my brows so they don't look as harsh/tattooed. I'm using NARS Brow Gel.
The eyes I'm keeping rather plain today and I'm going to apply MAC All That Glitters Eyeshadow all over my lid and smudge NARS Eye Paint on my upper and lower lash line. Then I'm going to line my eyes with the eye paint as well.
Lastly, I'm going to curl my lashes, add a coat of Diorshow Maximizer Lash Plumping Serum and two coats of Covergirl Lash Blast Mascara. For a little extra intensity, I added some Red Cherry False Lashes.

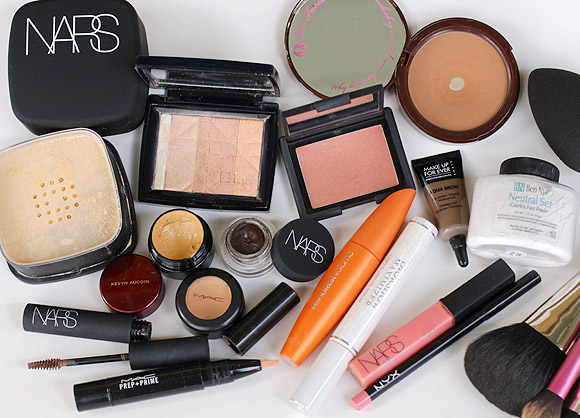
Full List of Products & Tools Used:
Beauty Blender Sponge - $28.95, Set of 2.
Too Faced Chocolate Soleil Bronzer - $30
Sephora Collection I.T. Face Contour Brush (Discontinued)
Sephora Collection I.T. Face Contour Brush (Discontinued)
NARS Lovejoy Blush - $29
NARS Brow Gel in Piraeus - $22
MAC #242 Shader Brush - $25
Sigma E30 Pencil Brush - $12
Red Cherry #600 Lashes - $2.50
NYX Slim Lip Pencil in Sand Pink - $3.50
Hope you are all doing well!
Gorgeous look Natty. You always have the best looks.
ReplyDeleteWhat an amazing post! Love the look xoxo
ReplyDeleteYou look beautiful! Have you ever used the Estée Lauder double light foundation? And if so what color do you use in that? Xoxo
ReplyDeleteHi Laura,
DeleteThank you so much! I've tried a sample of it in the past and I wasn't too crazy about it. I've been meaning to try it again though because I don't know if I gave it a fair enough chance. I used #3 and it was a good match.
You look so good! Love how you show the steps xxx
ReplyDeleteLife of Verity
Love this post and you are so pretty like always!
ReplyDeleteThis looks absolutely amazing!
ReplyDeleteAbsolutely stunning!
ReplyDeleteU look great!
ReplyDeleteWhat a helpful tutorial, I keep reading about Kevin aucoin products I think I need to try some!
ReplyDeleteLiza | Glambeautys | YouTube
You look amazing! And I love that you stepped us through with photos, it's so fun to watch the progression :) You have the most amazing lashes *_* Very jealous!
ReplyDeleteYou´re so beautiful, Natalie.
ReplyDeleteI love your hair colour!
xoxo
Du siehst großartig aus, toller Look :-)
ReplyDeleteLove this makeup look so much, looks prim and polished!
ReplyDeleteEloise | simplynaturale xo
You look beautiful!
ReplyDeleteThis is a really great review. I love having a look around at other bloggers content for inspiration.
ReplyDelete-------------------------
jui
http://onlinebeautyplace.com/
you look flawless! your skin looks like perfection
ReplyDeleteThis comment has been removed by the author.
ReplyDeleteHi Krystel,
Delete#5 is great for NC20.
This comment has been removed by the author.
DeleteHi Natty, Beautiful as always! Thanks for such an in depth post. I'd love to know what do you prefer for under your eyes, YSL Touche Eclat or Mac Prep n Prime? Thanks!
ReplyDeleteYou look beautiful!
ReplyDeleteNatty you are soo gorgeous I really need to try the Kevyn Aucoin skin enhancer
ReplyDeleteXO
Roxy
Love it! so gorgeous!
ReplyDeleteافضل شركة تنظيف فلل بالرياض
ReplyDeleteشركة تنظيف خزانات بالرياض
شركة صيانة خزانات بالرياض
شركة مكافحة حشرات بالرياض
شركة رش مبيدات بالرياض
شركة مكافحة حشرات بالدمام
شركة مكافحة حشرات بجدة
شركة مكافحة حشرات بريدة
شركة مكافحة حشرات بالجبيل
شركة مكافحة النمل الابيض بالرياض
شركة تنظيف واجهات زجاج بالرياض
شركة تنظيف بالرمل
شركة كشف تسربات المياه بالرياض
شركة تنظيف بالطائف
شركة جلي بلاط بالطائف
شركة تنظيف منازل بالطائف
شركة تنظيف خزانات بالطائف
شركة نقل اثاث بالطائف
شركة مكافحة حشرات بالطائف