Tuesday, October 29, 2013

Rocksbox Review Vol. 004!

Rocksbox Review

Rocksbox Review Vol. 004!

I received my fifth Rocksbox last week - So technically, this post should be volume five, but I didn't get a chance to share with you my fourth box before I returned it. I did share a photo on Instagram if you'd like to take a peek.

I'm a huge fashion jewelry and accessory junkie, so I can't help but get really excited each time I find a Rocksbox package on my doorstep.


What is Rocksbox? Rocksbox is a fashion jewelry based subscription service where members pay $19/month to rent an unlimited amount of designer jewelry. A stylist will handpick (3) pieces suited to your taste (based on your style survey & preferences) and will be promptly mailed to you. You can wear your items as often as you'd like up to 60 days. Whenever you feel like it, you can place the items in the prepaid enclosed padded mailer, and drop it in your nearest mailbox. In no time, a new package will be sent your way! There's no minimum amount of time you have to wait before sending your items back. If you decide that none of the items are for you, you can send the package back right away and you'll receive a new selection. If you love any of the items and can't give it up, you can purchase any of the items for 20% the retail price. To read more about the service, check out the FAQs.


My box contained: 
  • CC Skye Turnlock Cage Cuff in Black and Gold (retail price $175)
  • Gamine Zara Rings in Mixed Metals (retail price $56)
  • Urban Gem Pave Spike Earrings (retail price $42)

I'm pretty happy with my box. I requested CC Skye, and as always, Rocksbox delivers. I typically love all of CC Skye's designs, but the bracelet really isn't my style. I also wore the Gamine rings a couple of times, but they aren't really anything out of the ordinary. As for the earrings - I love them! Totally my style and I made sure to login to my Rocksbox account and purchased them right away! I didn't have to give much thought because they were actually the least expensive piece I received ($33.60 with the special member price).

Rocksbox Review

Rocksbox Review

Monday, October 28, 2013

NARS Brow Gel Review, Photos and Swatches!

NARS Brow Gel in Piraeus

NARS Brow Gel

NARS Brow Gel ($22) is a new product by NARS that tidies and grooms the brows with a glossy gel formula. A unique precision tapered brush adds shape and definition to every angle while creating a fuller, smoother brow look.

NARS Brow Gel is available in (4) shades: Oural (clear), Athens (blonde), Piraeus (medium brown) and Kinshasa (dark brown).

I'm a dark brunette, but I like my brows to be at least one shade lighter than my hair, so I chose the shade medium brown which is a soft, chocolately gray-brown. All of the shades appear to be very neutral (see swatches on Café Makeup) which is very ideal for the brows.

I love tinted brow gels because my natural brows are very dark and if I fill them in with a dark brown color that matches my brows, they can sometimes look a bit harsh. So I like to finish my brows off with a tinted brow gel in a shade or two lighter than my brows to lighten them up slightly so they have a softer appearance. The lighter gel adds almost a highlight to my brow, creating texture and definition as it coats my brow hairs.

Now, if you have very light or invisible brows, tinted brow gels can work to your advantage by choosing a shade darker than your brows and lightly combing over them to bring more attention to them.

In comparison to MAC Brow Set, NARS is more of a gel formula (similar to E.L.F. Studio Treat and Tame) whereas I find MAC to be more creamy and mascara-like, and a bit more pigmented.

As with many tinted brow gel formulas, a lot of product gets dispensed on the brush - almost too much if you have very sparse or thin brows. You can try wiping off the excess on the opening of the tube, but for the most part, I like taking a separate spoolie and patting it on the wand of the brow gel so I'll only pick up very little product and comb it through my brows. I do the same when working with MAC Brow Set, as the colored formulas can deposit too much color at once.

I really like the small tapered brush. It's easy to manuever through the brows.

The hold is really good, and it keeps my unruly brows in place all day.

NARS Brow Gel in Piraeus

NARS Piraeus Brow Gel

Revlon by Marchesa Nail Art 3D Jewel Appliqués!

Revlon by Marchesa Nail Art 3D Jewel Appliqués Royal Burgundy

Revlon by Marchesa Nail Art 3D Jewel Appliqués

Revlon by Marchesa Nail Art 3D Jewel Appliqués ($9.99 each) are a new, limited edition collection of intricate, textured nail appliqués inspired by couture house Marchesa's signature designs. Available in 8 shades.

I have Royal Burgundy and Silk Rosette. Royal Burgundy is a beautiful deep burgundy with an intricate textured gold design. I love the gothic feel of the pattern and I think the colors are perfect for the Fall. Silk Rosette is a beautiful teal floral design on a clear background.


Directions

  1. Start out by removing any oil or dirt from your nails. You can do this by taking a cotton pad with rubbing alcohol or nail polish remover and wiping it across your nails. This will allow the appliqués to adhere securely to your nails.
  2. Select the best size appliqué per nail by lining it up with your nail bed, making sure it reaches each side of your nail wall.
  3. Remove the appliqué from the film and lightly place it on your nail, lining it up with your cuticle.  
  4. Press down from the cuticle and work your way to the tips of your nail. Use the enclosed cuticle pusher to secure the edges. 
  5. Lightly fold the rest of the appliqué over your nail tip and take the enclosed nail file and lightly buff the edges to remove the excess product. I know it's tempting, but refrain from pulling it off, as it can rip the appliqué. 
  6. Enjoy your manicure! To get your manicure to last a couple extra days, you can add your favorite top coat.


Revlon by Marchesa Nail Art 3D Jewel Appliqués Royal Burgundy

They were really easy to apply and I finished both of my hands in just a few minutes. I don't think you need too much expertise with these.

It's important to take your time with the application to avoid any mistakes such as ripples/folds or not aligning it to your nail properly.

The only problem I ran into was that they didn't fit my nails that well. My nail beds are very curved, so I experienced some slight folds in application. Also, I found the strips to be a bit narrow. The strips didn't fully cover a few of my nails. Although none of these things are noticeable unless someone was to look closely at them.

They held up pretty well with some tip wear. I'm hard on my hands, so I removed them after three days. If you are really light on your hands, I'm sure you could get about a week out of them. I really liked that the removal process is so easy. I removed all of them within a minute or so.

I really enjoyed wearing these. I think they're a really fun treat to have once in a while or when you need to do your nails quick for a holiday or event.

Revlon by Marchesa Nail Art 3D Jewel Appliqués
Royal Burgundy and Silk Rosette 3D Jewel Appliques

Sunday, October 27, 2013

NARS Autumn Leaves Lipstick Review, Photos and Swatches!

NARS Autumn Leaves Lipstick

NARS Autumn Leaves Lipstick

NARS Autumn Leaves Lipstick ($26) is described as a shimmering, warm brandy. It looks really red in the tube, but it's definitely not your average red. It's a spicy red with tones of gold, copper-bronze, orange and even a hint of brown. There's also a slight golden shimmer to it that's not very detectable, but it makes the color shine nicely on the lips.

Autumn Leaves is a part of NARS Sheer Lipstick formulation, so the color has a bit of transparency to it. It's highly buildable, and it can get fairly opaque with multiple coats. What's great about the sheer formula is that with a color like this (which can be scary for some) it's incredibly wearable - even during the day in an office setting, which something with full coverage in this color might be too bold.

This is a great Fall shade especially for those with warm and olive skin tones. I can see it being a really beautiful shade on redheads, but its looks great on just about everyone that I've seen it on. I think it looks beautiful paired with a peachy cheek and a golden highlight. Check it out on Beauty Banter.. it looks stunning on her!

I don't own many NARS Lipsticks, but I have a few and I have always liked the formula. The color glides on super smooth with a balm-like texture and a featherlight feel and I also find it to be pretty moisturizing.

NARS Autumn Leaves Lipstick

NARS Autumn Leaves Lipstick

NARS Autumn Leaves Lipstick swatch
NARS Autumn Leaves Lipstick on my lips

Thursday, October 24, 2013

NARS Brow Perfector Review, Photos and Swatches!

NARS Caucase Brow Perfector

NARS Brow Perfector

NARS Brow Perfector ($22) is described as a "velvety" adjustable eyebrow pencil for creating slender to full brows. The pencil applies with smooth precision and ease. The tip has a unique oval shape for precise application and varying brow widths. The result is natural and long-lasting.

NARS Brow Perfector is available in (4) shades: Salzbourg (blonde), Kalamata (light brown), Caucase (brown) and Suriname (black).

My eyebrows are dark brown, and I opted with the shade Caucase. It's slightly lighter in color than my natural brows, but it works well. I could have chosen the darkest shade Suriname, as even though it's described as black, it's actually a dark brown (See Temptalia's Review).

NARS Caucase Brow Perfector

The consistency of the pencil is very stiff and dry at first. You have to break it in a little bit after the first use and it will warm up the product in order for it to apply better. It's like a very waxy crayon - the best comparison would probably be the Maybelline Master Shape Brow Pencil ($8), but it's much stiffer. Same waxy consistency though and similar color payoff.

The color payoff is never really completely opaque, so if you have a lot of shaping to do, or if you have coarse, sparse brows, I wouldn't really recommend this pencil. This pencil doesn't create smooth, fluid lines, and you have to continuously make small passes over areas to build the coverage. For those such as myself, I need an opaque product that will provide clean, crisp lines to shape my brows and then I can go in with something lighter and more natural to shade them in. This is a great product for that. It's also great for those who have minor filling in to do, or those with fine brow hairs that need to do some light filling in.

The result is really natural, which is something I really like. They don't look harsh or obviously filled in. Also, the waxy texture really holds the brow hairs in place, so I don't find a brow gel/finisher necessary. It also doesn't fade, smear or budge the entire day.

NARS Caucase Brow Perfector

Wednesday, October 23, 2013

Face of the Day Walk-through | Full Coverage Face & Soft Eyes


You can call me a ride-or-die medium coverage kind of chick. I've tried countless foundations - many of which I loved and some.. not so much. The ones I love all share a common factor - they all have a solid medium coverage. That basically means that the coverage is somewhere in-between light and full - A medium coverage will even out skin discolorations, cover blemishes, yet the foundation only looks like a silky veil on the skin rather a mask, and sometimes, my freckles, sunspots and sometimes even a little redness will slightly shine through. I actually kind of like that - it gives the illusion of clear skin, while not erasing every single spot.

But of course, I love switching it up and sometimes I really like an airbrushed, blemish-free face. Recently, I've been enjoying wearing a full coverage face, especially on nights out when I really want my makeup to hold up for several hours. Light and medium coverage foundations can break down a bit with sweat, etc, but when I bust out my heavy duty full coverage makeup, I know that my makeup isn't going anywhere all night. I'm going to take you through a quick run through of what I've been wearing lately.


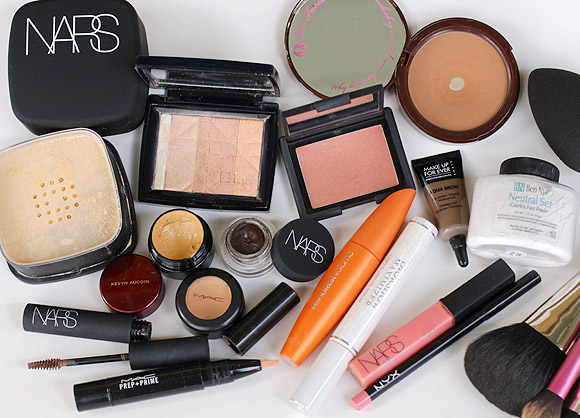
I like to start out with applying a water based moisturizer to my entire face as it will allow my makeup to spread and blend effortlessly without looking dry or cakey. I always apply a moisturizer liberally to my under-eyes so the skin under my eyes will look rejuvenated, giving the illusion of well rested eyes. My favorite full coverage concealer is MAC Studio Finish Concealer. I like applying it with my middle or ring finger and tapping/patting the product (not wiping) to blend.

Kevyn Aucoin Sensual Skin Enhancer has been my go-to full coverage foundation. It's an incredibly dense, tacky cream and you only need the tiniest bit for the whole face. I like to dot it on each area of my face, and then with a damp Beauty Blender sponge, spread and pat the foundation into my face until it's completely blended. If I want my face to look really perfect, I'll add a second thin layer.

Now, with full coverage foundations, you need to pop some dimension back in your face as an opaque coverage can flatten the face and make the natural contours less apparent. I love using MAC Prep + Prime Highlighter and applying it under my eyes and down the bridge of my nose and blending it out with a beauty blender. It really brightens up the face and gives more of a structured look.

I always set my under-eyes with Ben Nye Neutral Set Powder, which has been my favorite under-eye setting powder for years. I love that once I apply it, it really locks my concealer in and makes it budge-proof until I remove my makeup. Creasing and setting is never an issue. If I want a seriously opaque, Kim K kind of under-eye, I'll take a sponge and pat some MAC Studio Fix Powder under my eyes. For the rest of my face, I've been really enjoying NARS Loose Powder. It adds a hint of additional coverage, while softening the look of the skin, making the face look virtually perfect.


The skin is now a blank canvas, so I like adding some warmth into my skin and at the same time exaggerating the natural contours of my face. I've been loving Too Faced Chocolate Soleil Bronzer because it's a med-dark brown matte bronzer and mimics shadows really well. If you have very pronounced features, it's not really necessary, but for those with a fuller face, it can work wonders. With a small contouring brush I like to apply the bronzer below my cheekbones and blend upward, as well as up my temples and forehead, and all around the outer edges of my face. I like going back with my powder brush to further blend any areas that look too harsh.

Then, I like popping a little color on my cheeks. I chose NARS Lovejoy Blush - a lovely shade of rosy-bronze that is a very flattering every-day shade for warm skin tones. After I've applied my blush, I'm going to apply a highlighter with my fingertips across the highest points of my cheekbones. I used Dior Amber Diamond, a subtle ultra fine powder highlight that makes the skin look like it's glowing from within.

For my eyebrows, I've used a combination of NARS Eye Paint and MAKE UP FOREVER Aqua Brow. I have quite a bit of filling in to do, but I'm going to try making them look as natural as I can by not applying too much product at once. Since my natural brows are very dark, I always like to finish with a tinted brow gel to lighten them up slightly. It softens my brows so they don't look as harsh/tattooed. I'm using NARS Brow Gel.

The eyes I'm keeping rather plain today and I'm going to apply MAC All That Glitters Eyeshadow all over my lid and smudge NARS Eye Paint on my upper and lower lash line. Then I'm going to line my eyes with the eye paint as well.

Lastly, I'm going to curl my lashes, add a coat of Diorshow Maximizer Lash Plumping Serum and two coats of Covergirl Lash Blast Mascara. For a little extra intensity, I added some Red Cherry False Lashes.

Thursday, October 17, 2013

NARS Mesopotamia Eye Paint Review, Photos, Swatches!

NARS Mesopotamia Eye Paint

NARS Mesopotamia Eye Paint

NARS Mesopotamia Eye Paint ($25) is a multi-use eye product that can be both used as a cream eyeshadow and an eyeliner. It provides high-impact pigment with a silky, weightless feel. It glides on the skin smoothly and quickly dries down to a budge-proof finish.

So, you've tried one gel/cream eyeliner and you think you've tried them all. Well, despite the similarities between different brands of gel eyeliners, the formulas can differ quite a bit. Some formulas are drier than others, some are creamier, some are budge-proof and some smudge to no end.

I don't ask for much when I'm looking for a good potted eyeliner. My only requests are that the formula is smooth so that it will provide clean lines, opaque color and that it won't smudge/fade or crumble after several hours of wear.

I love the texture of NARS Eye Paint. The formula is more of a gel than a cream, as it has quite a bit of slip to it. Because of the slippery texture, it's very ideal for smudging and creating a smoked out eye. As with many cream products, once you apply it to your lid, you have to smudge it quickly, otherwise it won't budge. I love that fact that it doesn't set so quick that you have to worry about it drying before you're finished working with it (such as MAKE UP FOREVER Aqua Creams). It really smokes out nicely with a blending or smudge brush, and the intensity can be built up with additional layers.

Mesopotamia is a very dark intense brown. I think it's a great color for every day and I actually most of the time prefer it over black as it works well with my warm coloring and has a softer look. I've actually been using it on my eyebrows as well. For the brows, a little goes a very long way and I only have to lightly touch the product with the tip of the brush to fill in one of my brows completely.

The lasting power is very good. I notice that when If I don't apply a base, I'll have some fading when used as an eyeshadow, but when applied as an eyeliner it lasts well throughout the day. On my brows, the color doesn't budge all day.

NARS Mesopotamia Eye Paint Swatch
Swatches of NARS Mesopotamia Eye Paint

NARS Mesopotamia Eye Paint
NARS Mesopotamia smudged and lined on my upper and lower lash line as well as applied to my eyebrows

Tuesday, October 8, 2013

Million Dollar Tan Cabana Tan Extreme Face & Body Lotion Review!

Million Dollar Tan Cabana Tan Extreme Face & Body Lotion

Million Dollar Tan Cabana Tan Extreme Face & Body Lotion ($66) is Million Dollar Tan's Best Selling Formula for long-lasting, natural, ultra-bronzed color. It's made with organic ingredients and is paraben free.

I jumped on the Million Dollar Tan bandwagon after it seemed like every Youtube beauty guru was raving about it and deeming it their all-time favorite self tanner. Despite the hefty price tag, I gave in with expectations of a beautiful, deep tan.

I really like the consistency of the lotion. It's thin - therefore it smoothes on the skin easily and doesn't leave a heavy feeling on the skin. Also, the lotion isn't tinted, which has it's advantages as well as disadvantages. I really like the fact that it isn't tinted because it allows me to apply the lotion to my neck, chest and body in the morning after my shower, and I can look forward to bronzed skin hours later. The only disadvantage is that since it isn't tinted, you can easily miss areas of your body since it goes on clear. To avoid streaking/missing areas, work in small areas at a time.

Application

I don't typically like using my bare hands to apply self tanner, but it's my preferred method with this particular tanner. Latex gloves streaked the product on my skin and wouldn't properly blend, and a mitt seemed to absorb too much product. To apply, I would just simply pump some product into my palm and apply it to my skin as I would a normal body lotion - in circular buffing motions. To make the product go a little further, I'd like to add a pump of regular body lotion to every two pumps of self tanner. For my neck/chest, I like to be a little darker, so I usually apply around two layers of product. It dries pretty quickly, so once dry, you can apply another coat of product for a darker result.

*To avoid orange knees, elbows and feet, I will use a small amount of body lotion and rub it into those areas before and after applying the self tanner.

To avoid over-tanned hands and palms, I typically wash my hands a couple of times through the application process.