Thursday, April 4, 2013

The Jewelmint Midnight Blues Ring.

Jewelmint Midnight Blues Ring

I apologize for another accessory post, but my Jewelmint packages have been piling up over the past month. Recently, there was a promotion going on for 4 rings for $40 ($120 value). I quickly jumped on that promotion and promptly received my rings in the mail.

Jewelmint Midnight Blues Ring is my favorite ring of the ones I chose and it's easily one of my favorite Jewelmint items I own to this date. It features a cheetah with gray rhinestones and sapphire crystal eyes and a large sapphire crystal stone. The ring has an oxidized (antique finish) silver finish.

I really like that the ring itself is a statement piece without being too oversized. Sometimes similar style oversized rings can steer into tacky-ville, but I think it's the perfect size and looks really chic and eye catching on the hand.

The quality of this ring is really good and it's an item I would have definitely paid full price for. It's currently sold out, but if it happens to come back, it's an item I highly recommend.


Wednesday, March 27, 2013

My First Rocksbox - First Impressions, Review, Photos and Discount Code!

Rocksbox

My First Rocksbox

Rocksbox is a brand spanking new membership-based jewelry styling service. I know, another membership site, but Rocksbox is a bit different from the rest. As many other membership sites, you start out by taking a style quiz (or style profile) and based on your selections, a stylist will handpick items for you that should fit your own personal style.

In your Rocksbox, you will receive designer jewelry - (3) items to be exact to trial for up to 60 days. So unfortunately, all of the goodies aren't yours to keep permanently, but if you are interested in purchasing any items you received, you can with a 20% off member discount. What's really cool is that if you don't like your items, you don't have to wait for the month to be over. Just send the items back in the enclosed padded envelope and you'll be sent an alternative package. The amount of items for you to try each month is unlimited, and you will only be charged the one-time monthly fee of $19.

I wasn't sure what to think about borrowing jewelry, but once I received my box I quickly changed my mind.

Here's what I found in my little box:

Rocksbox

Rocksbox

Rocksbox Jewelry

Saturday, March 23, 2013

I'll be back soon!

Hey Everyone!

I just wanted to give you all a quick update and let you know why this whole week has gone by without any new posts.

About two weeks ago my aunt (who lives with my family) went to the hospital for pains she was having, as well as some other minor things. They did a series of tests on her and among some of the problems she was having, she was diagnosed with colon cancer. This past Monday she had surgery to remove the cancer, and thankfully it didn't spread to any of her other organs. So all of this week has mostly been spent in the hospital with my aunt until she recovers. She's doing really well and we're hoping to have her back home as soon as possible.

I asked for prayers on Twitter on the day of my aunt's surgery, and I really appreciate all of your kind responses. Thank you so much!

Hopefully I should be posting again this week.

Talk to you all soon!

xoxo

Saturday, March 16, 2013

MAC Large Duo Pro Palette Review with Photos!

MAC Large/Duo Pro Palette

MAC Large Duo Pro Palette ($25) is a new double-sided pro palette that accommodates two inserts. It has a see-through lid/divider so you can view all of your shades at once while keeping them secure and protected. What's cool about this palette is that you can customize it any way you want. For example, you could turn it into an every-day palette and put blushes, bronzers, etc on one side and eyeshadows on the other.

All of the inserts are sold separately, and they all retail for $9 each. You have the option of purchasing a 15-eyeshadow insert, 6-blush insert, 12-customizable insert (usually for cream foundations, concealers, etc) and 24-customizable insert (for lipsticks and other cream products).

So, if you were to purchase the palette and two inserts, it would cost you $43.

I never use the inserts on any of my palettes, so I took the route of skipping purchasing any inserts for the time being to see how I like the palette as is.

The palette itself is slightly shorter in length than the old style palettes and almost three times the height. Some may find it to be bulky, but I love the fact that the palette is deeper than the old palettes, so there are no issues closing it, unlike the older MAC palettes. It shuts with a magnetic closure, which is really nice.

The old palettes held 8 blushes side by side with no divider. What dissapointed me about the duo palette is because it's slightly shorter, it doesn't hold 8 blushes nicely and uniform like the old palette. Nevertheless, it does hold 8 blushes with a little shifting around.

If you have nails, the clear middle divider is easy to lift up. Sometimes I have trouble with it, which can be slightly annoying, but you can just tilt the palette to get the divider to swing to the other side.


Friday, March 15, 2013

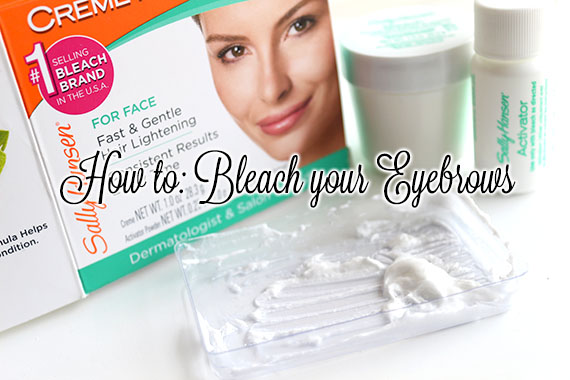
Step by Step: How to Bleach your Eyebrows!

How to: Bleach your Eyebrows

Bleaching my eyebrows was always a part of my regular beauty routine back when I had blonde highlights in my hair or when my hair was a lighter shade of brown. Everyone has their own preference and opinion about matching your eyebrows to your hair color or just bleaching/coloring the eyebrows in general (some like it, some don't), but when done properly, it can really enhance your look.

My eyebrows are very thick, coarse, dark, naturally high arched, non-symmetical (meaning they don't match) and grow quick. Or in other words, nightmare brows. So, I usually have a hell of a time getting them to match every day.

Because I have quite a bit of filling in to do, they can sometimes look too harsh, dark or obvious. I also think that when my brows are super dark, it can create too much emphasis on them, taking away from other features of my face. When they're lighter, the emphasis is taken off my brows and creates more emphasis to my eyes and lips.

In this post, I'm going to briefly go over how you can achieve lighter eyebrows in some really simple steps.

Tools Needed: 

  • Facial Bleach (I'm using Sally Hansen Creme Hair Bleach for the face)
  • Spoolie (or a clean cosmetic wand)
  • Vaseline (optional)
  • Purple Shampoo or Hair Toner (optional - I'm using Clairol Shimmer Lights Shampoo)

My Eyebrows before and after bleaching them. 

Sunday, March 10, 2013

Nars Lola Lola and Night Fever Eyeshadows Review, Photos & Swatches!

Nars Lola Lola and Night Fever Eyeshadows

I recently purchased a couple new Nars eyeshadows to add to my forever growing collection. Like I need any more eyeshadows, right? Well, after these I'm probably done one for a while.. don't quote me on that though.

I'm all about simplicity on most days, so I love a good eyeshadow single that can make me look quickly polished without the help of any additional eyeshadows.

Nars Lola Lola Eyeshadow is described as a neutral brown with shimmer. It looks copper/brick toned in the pan, but once swatched, the color is more muted and neutral. It definitely has some soft reddish tones (no yellow-orange) mixed with silvery/gray pigments, so it doesn't lean warm.

It's actually more unique than it appears. The slight shimmer/frost really pulls this shade together and makes it a really pretty, elegant shade. It's a nice shade for any eye color, but I'd think it would look especially nice on blue and green or hazel eyes.

The eyeshadow itself is super soft and pigmented and blends like a dream. I've been wearing it alone on  my lids and lower lash line for a soft daytime eye. I like that it's not super intense and has a softness about it so it's a shade that I can wear every day.

Nars Night Fever Eyeshadow on the other hand is a super dark and intense shade that I thought would be a great eyeliner shade. Night Fever is described as a black with red pearls. Pretty Simple. It's a super dark, matte black filled with fine red shimmers.

It's one of those shimmers that disappears when you wipe it, so to get the shimmer to show up, you have to pat the eyeshadow on as opposed to sweeping it. If you sweep it on, you'll only get a matte black. It doesn't transfer well when applied dry, but applied on top of a base (preferably a sticky one), it really helps the shimmers stick. They also show up when applied wet, but regardless, if you want the shimmer to stick, you need a creamy base and you have to dab it on.

Truthfully, I think it's too much work and I'd recommend skipping this shade all together. MAC Beauty Marked Eyeshadow and NYX Sensual Eyeshadow are both similar alternatives for a lower price.

To see these two shades in action, check my previous post where I'm wearing Lola Lola on the lid and lower lash line and Night Fever on the outer corners.


Friday, March 8, 2013

My Face of the Day.


Haven't posted one of these in ages! This is pretty much my usual makeup look using all products that I use on a regular basis. I don't wear false lashes often, but I recently ordered some Red Cherry Lashes and I've been wearing them almost every day because I love them so much! Strangely, my eyelashes are almost non existent as of lately and I'm not sure why. I think since I've begun using Covergirl Clump Crusher Mascara, I've lost all of my lashes. (This happened to me when I was using Covergirl Lash Perfection too - good mascaras, but for whatever reason, they pull my lashes out) So I've been resorting to falsies for the time being and I purchased the Ardell Brow & Lash Growth Accelerator treatment I used in the past to grow my lashes back.

I've had a few questions regarding my eyebrows because they are lighter than they were before. I bleach them every three weeks using Sally Hansen Creme Hair Bleach and I've switched to a lighter shade in my Make Up Forever Aqua Brow. I really like the way they look now.

Products Used-

Face
Le Metier de Beaute Peau Vierge (tinted luminizer, skin treatment and spf - used as a base)
MAC Pro Longwear Concealer NW25 (applied under my eyes)
Guerlain Parure Extreme Foundation #3
NARS Laguna Bronzer (applied all over the face)
NARS Oasis Blush (applied to the cheeks)
MAC Superb Extra Dimension Highlighter (applied to the highest points of my cheeks for shine)
Ben Nye Neutral Set Powder (applied to my undereyes and t-zone to set foundation)

Eyebrows
MAC Spiked Eyebrows Retractable Crayon (used to shape my brows)
Make Up Forever Aqua Brow #15 (used to fill my brows in)
MAC Girl Boy Brow Set (tinted brow gel)

Eyes
Nars Lola Lola Eyeshadow
Nars Night Fever Eyeshadow
Red Cherry #82 Eyelashes (my new favorite lashes!)
Covergirl Lash Blast Fusion Mascara

Lips
MAC Soar Lip Liner
MAC Insanely It Sheen Supreme Lipstick (very lightly dabbed on my lips)
Nars Super Orgasm Lipgloss (my new favorite lipgloss!)

*Nars eyeshadows not pictured.. oops!


I'm working on a post as we speak on the Nars Eyeshadows I used in this look - it should be up in a couple of hours!

Ulta 21 Days of Beauty 2013!

Ulta 21 Days of Beauty 2013

It's that time of year again! Ulta Beauty is hosting their bi-annual 21 Days of Beauty event at Ulta stores. The event will showcase Ulta's Spring and Summer trends, as well as provide makeup and skincare consultations and demonstrations from several brands in order for you to find the perfect products to suit you. There's also of course special offers and my favorite part of it all - the "Beauty Steals" which features a new product every day. The event will start March 10th and will be ending on March 30th. Appointments for each event are recommended, so make sure to visit your local ULTA store and sign up!

Continue reading for the full calendar of events-


Week 1 Events

SUN: 3/10
bareMinerals
Learn how to get flawless natural beauty with bareMinerals best sellers
Lorac
See how one palette can give you 3 gorgeous looks
Philosophy
Recapture hydration to eliminate wrinkles

MON: 3/11
Stila
Learn how luxurious complexion starts with perfectly prepped skin
Dermalogica
We'll give you a skin analysis and match you with the perfect skincare regime

Tuesday, March 5, 2013

Physicians Formula Super BB All-in-1 Beauty Balm Concealer Review, Photos, Swatches!

Physicians Formula Super BB All-in-1 Beauty Balm Concealer

Physicians Formula Super BB All-in-1 Beauty Balm Concealer ($12.95) is new twist-pen style concealer that's a part of the Physicians Formula Super BB line. The line consists of a BB Cream, concealer and powder that are all designed to perfectly compliment each other. The BB concealer is said to diminish the appearance of dark circles, puffiness, imperfections, blemishes, redness and uneven skin tone.

Physicians Formula Super BB Concealer is available in two shades: Light/Medium and Medium/Deep. I purchased Light/Medium which I'd consider to be around the MAC NC20 coloring. It's peachy toned, so it's ideal for covering up under eye darkness.

The consistency is very thin and creamy. If you're familiar with MAC Select Moisturecover Concealer, it has that similar thin, wet consistency, but creamy to the touch.

One quarter of a twist provides enough product for one eye. I apply it directly from the brush to my undereyes and then lightly pat the product with my finger tips to blend. Patting works best with this concealer as opposed to wiping to provide the best coverage. The product diffuses into the skin without much of a trace. It has a healthy, dewy (not greasy) finish much like the BB cream.

The coverage is light and can be slightly built, but not up to much. With two layers it can be built to a light-medium, but still fairly sheer. It never fully reaches what I'd consider to be medium coverage.

It doesn't completely camouflage my under eye darkness, but it does slightly lighten them up. Since I like a pretty opaque undereye coverage, I usually apply my regular concealer prior to my foundation and then after my foundation I like applying a brightener - something like YSL Touche Eclat or MAC Prep & Prime Highlighter. Sometimes I use a lighter concealer, and this seems to work pretty well for that. It's not opaque enough to do major brightening, but because of it's thin consistency and blendability, it's ideal for layering since it will never look thick or cakey.

It doesn't settle in my fine lines and it feels lightweight on the skin.

Here's the before and after of one layer. You can see from the after photo that some darkness is still visible and you can faintly see my sun spots.

Monday, March 4, 2013

Physicians Formula Super BB Cream Review, Photos, Swatches!

Physicians Formula Super BB Cream

Physicians Formula Super BB Cream

Physicians Formula Super BB Cream ($14.95) is a new all-in-one "miracle" multi-tasking cream that combines a hydrating moisturizer, light foundation and sun protection so you can simplify your morning beauty routine.

BB Creams (or beauty/blemish balms) are hugely popular because of the versatility of the product itself. You don't need a moisturizer, serum, primer, sunscreen or foundation because most BB creams do it all for you. Depending on the BB cream, it can treat blemishes/acne and provide anti-ageing. The coverage is typically light, but there are some pigmented formulas out there.

The Physicians Formula Super BB Cream is actually the first BB Cream I've ever tried. Quite honestly the sale tag at CVS and the holographic letting on the tube sealed the deal for me. (I'm pretty easy to please.)

Physicians Formula Super BB Cream is available in two shades: Light/Medium and Medium/Deep. I chose Light/Medium because it looked a little warmer than Medium/Deep. It's a little light for me, but definitely workable with some bronzer.

The consistency is thick and super creamy, so it blends really easily on the skin. Most of the time I apply the product with my fingers as I would apply a moisturizer and work it into my skin until blended. Then if I need any additional coverage, I'll apply a little extra product on a buffing brush and build the coverage wherever needed.

The coverage is light, but it builds really well to a medium coverage. It covers and perfects just about everything on my face unless I have a really red blemish, I might need extra concealing.

It provides a dewy (not oily) finish to the skin. I usually use a light setting of powder and I'm good for most of the day. With the creaminess of the product I'd almost expect it to crease after a few hours (around my mouth and such) and get oily, but it doesn't at all. It stays perfectly in place. (I have very normal or balanced skin for reference).

Physicians Formula Super BB Cream

Physicians Formula Super BB Cream Light/Medium
Here I am wearing Physicians Formula BB Cream, my brows filled in, tiny bit of mascara and a little lipgloss. My typical morning face.

Friday, March 1, 2013

Weekly Poll Results - What's One Item of Makeup you Can't Leave your House Without Wearing?

What's One Item of Makeup you Can't Leave your House Without Wearing?

I'm sure all of us beauty fanatics alike have become sort of accustomed to the way we look with makeup, so when we aren't wearing something in particular, we feel a little.. well.. naked. I remember a time period where I wore false eyelashes (snipped in half.. nothing crazy) just about every day. Then when I stopped, it took some time adjusting to the way I actually look without false lashes because to me without false lashes, it always looked like there was something missing on my face.

There's also the times where I had really over plucked eyebrows. I barely let anyone see me without my eyebrows colored in. I use to apply She Laq (discontinued product by Benefit to seal your makeup) to my brows at night so I'd wake up with my brows still filled. Only to wash my face and fill them in again. I guess we all go through phases.

Whatever it may be - maybe the greatest concealer ever or a really good mascara, many of us have that one item of makeup that we need to get through the day.

So the question was, what is one item of makeup you can't leave your house without wearing? (Or at least would prefer not to leave the house without wearing.. haha!)

The Results Are:

Foundation, Tinted Moisturizer or BB Cream - 73 votes (18%) 
Concealer - 37 votes (9%)
Mascara - 93 votes (23%)
Brow Filler - 18 votes (4%)
Eyeliner - 27 votes (6%)
Eyeshadow - 5 votes (1%)
Bronzer or Blush - 10 votes (2%)
Lipstick, Gloss or Balm - 41 votes (10%)
I can't choose only one! - 55 votes (14%)
I can get away with wearing no makeup at all! - 30 votes (7%)
Other - 0 votes (0%)

This poll is based on 389 votes.

The number one answer is mascara!

I'm having a hard time choosing, but I know that when I'm about to go run errands and I have no makeup on, I almost always need to conceal my undereyes because they're naturally reddish purple. My second next important thing is filling in my brows, and then mascara. I could very well go without a foundation if I have a concealer on many days, but since I can only choose one, my answer would be foundation.

How about you? What would you choose?

Thursday, February 28, 2013

My February Beauty Favorites!


Most Loved Beauty Products February 2013

I haven't done a monthly favorite in ages and I feel like I have so many products to talk about with so little time! I used so many different products throughout February, but I wanted to keep the list short and sweet. All of the products in this post have been used and loved throughout the whole month of February. Reviews will be up shortly for several of the products!

Physicians Formula Super BB Cream - $15

A moisturizer, foundation and SPF all wrapped up in one product. I honestly didn't have high expectations for this product but I seriously love it. It's been my go-to makeup every day for my "no makeup" makeup days and I even like it so much that I've been wearing it on nights out. The coverage is great for a BB cream and it makes my skin look like my skin but better!

YSL Multi-Action Concealer - $35

Two words when I first tried this. HELL. YES. This concealer is amazing and I don't think it gets the proper attention it deserves. This is by far the silkiest concealer stick I've ever tried and it glides on the skin like butter. (I know some of you hate that analogy, but it's seriously smooth - like a rouge volupte in concealer form.) It provides full coverage while remaining lightweight.

NARS Oasis Blush - $29

The moment I thought I didn't need another Nars Blush, I discovered this beauty. It's a really pretty rosy pink with a hint of plum and sparkles. Somewhat similar to Nars Sin, but rosier. Although it looks scary sparkly in the pan, they thankfully play a disappearing act once applied to the cheeks. I've been wearing this just about every day. Love!

Tuesday, February 26, 2013

Step by Step Smokey Brown Eyeshadow Tutorial!

Smokey Brown Eyeshadow Tutorial

Smokey Brown Eyeshadow Tutorial


A brown smokey eye is a great look if you want a dramatic look, without being too dark. The pop of gold on the inner third of the eye really brightens up the eye and adds a bit of light to make the eyes really stand out. This look works really well on all eye colors - brown, hazel/green or blue. If you're light complected and don't feel comfortable with a look this dark, you can soften it up a bit by skipping the black liner and using a deep brown or charcoal - or you can skip the liner all together. If you have small eyes, black on the waterline can make the eyes appear even smaller, so to avoid this, make sure the eyeshadow on your bottom lash line is extra smokey and extended out and apply a good coat of mascara to the bottom lashes. Adding a flesh toned, ivory or brown liner to your waterline is also an option to open up the eyes. To keep this look more daytime appropriate, you can stop at Step 7 and finish off with mascara. 


Products Used:

Nars Smudgeproof Eyeshadow Base (used in step 1)
MAC Wedge Eyeshadow (used in step 2)
NARS Galapagos Eyeshadow (used in steps 3 and 5)
MAC Tempting Eyeshadow (used in step 4)
NARS Etrusque Eyeshadow (used in step 6)
MAC Chamomile Eyeshadow (used in step 7)
Urban Decay Perversion 24/7 Eyeliner (used in steps 8, 11, 12 and 15)
MAC Carbon Eyeshadow (used in steps 10 and 11)
Ardell #45 Eyelashes (used in step 13)
Covergirl Clump Crusher Mascara (used in step 14)

You will Need:

  • A matte, light brown eyeshadow
  • A dark brown eyeshadow
  • A shimmery brown eyeshadow
  • A gold eyeshadow
  • A light matte eyeshadow for the highlight
  • A black eyeshadow
  • A black eyeliner pencil
  • Mascara
  • False Eyelashes (optional)

Sunday, February 24, 2013

Sneak Peak - MAC Mineralize Rich Lipstick for Spring 2013!

MAC Mineralize Rich Lipstick for Spring 2013


MAC's love affair with lips has led to the launch of a new MAC masterpiece. Introducing Mineralize Rich Lipstick - it's larger in size and scope and lavishes lips with nutrient-rich moisture. Featuring a luxurious formula and gorgeous colour, enhanced with a mineral moist complex that provides lips with nourishment and lasting hydration. Lightweight colour glides on with ease for an intense bright with shade retention. (Permanent)


Select Shades Available in North America, UK, AU & NZ)

  • Luxe Naturale - Light beige cream
  • Posh Tone - Soft warm nude cream
  • Glamour Era - Mid-tone warm brown frost
  • Style Surge - Neutral coral cream
  • Lady At Play - Mid-tone cool tangerine
  • Lush Life - Deep cool plum
  • Dreaminess - Soft cool pink cream
  • Grande Dame - Mid-tone neutral rose cream
  • Elegant Accent - Mid-tone warm rose cream
  • Divine Choice - Mid-tone cool pink cream
  • All Out Gorgeous - Deep warm red
  • Everyday Diva - True red cream

Other shades (See locations for availability): 

  • Ultraprecious - Soft peach cream* (North & South Asia)
  • Smart & Sweet - Soft coral cream* (North & South Asia)
  • Utterly Delicious - Bright coral cream* (North & South Asia, Europe, South Africa, Middle East, India, Latin America)
  • Splurge - Mid-tone cool tangerine* (Europe, South Africa, Middle East, India, South America)
  • Ladies Who Lunch - Light cool pink cream* (North & South Asia)
  • Strikingly Fabulous - Mid-tone warm bright pink* (North & South Asia)
  • Red Coquette - Vivid bright bluish red* (North & South Asia)

*To see the full list by location, click here.

MAC Mineralize Rich Lipsticks

MAC Mineralize Rich Lipsticks

I've read that they apply buttery, feel moisturizing on the lips and have good lasting power. I also like the chic packaging (they also have a magnetic closure). They also contain 4.4.g of product in comparison to the 3g in a standard MAC lipstick or 3.6g in a MAC Sheen Supreme.

MAC Mineralize Rich Lipsticks will retail for $22.00 US/$26.00 CAD.

Availability: February 28th online and March 7th in-stores.

I can't wait to try these! Do you think you'll be picking any of these up?

Credits: MAC-Guy on Specktra

Sneak Peak - MAC Mineralize Moisture SPF 15 Foundation for Spring 2013.

MAC Mineralize Moisture SPF 15 Foundation for Spring 2013


M•A•C expands its innovative collection of foundations with a gorgeous NEW formula full of extraordinary benefits. Its lightweight lush texture feeds skin instantly with mineral-rich nourishing hydration, all day long. The uniquely creamy fluid, ideal for dry skin, blends beautifully, featuring shea butter, emollients and conditioning extracts to keep the face soft and supple. Its combination of powders creates an optical blurring effect that virtually diminishes imperfections and fine lines for a more even tone. (Permanent)

I don't think it's any secret by now that MAC is my favorite cosmetic brand, so when I hear word of new product launches, I'm usually clicking my heels in excitement. Well, last year MAC Mineralize Satinfinish SPF 15 Foundation came to the end of it's road and was discontinued - I've used it in the past and it was okay, but I wasn't really a fan of the thick texture in combination with the sheer coverage. So you wouldn't think MAC would discontinue their Mineralize foundation without coming out with a new one did you? Well, you're right. Early March, MAC is launching the Mineralize Moisture SPF 15 Foundation.

I'm crossing my fingers that the formula has improved, and hopefully the coverage has as well. It comes in a similar frosted bottle with a pump like the older version.

Vogue Beauty says:

"Every season, there is new product development that has make-up artists (and therefore us) all excited. For spring/summer 2013 it's all about this new MAC Mineralize Moisture SPF15 foundation, which has be causing quite a stir. Used in Paris at Costume National by make-up artist Sally Branka, it has also been seen in every city at pretty much every show, doing a fine job at creating the dewy, minimal make-up look that is proving to be ever so popular. Launching in the spring, this is going to be pretty major. Trust us."
Available in (18) shades: NC15, NC20, NC25, NC30, NC35, NC37, NC40, NC42, NC44, NC45, NC50, NW20, NW25, NW30, NW35, NW43, NW45 and NW50.

MAC Mineralize Moisture SPF 15 Foundation will retail for $33.00 US/$40.00 CAD.

Featured with the foundation will be the MAC #130 Short Duo-Fibre Brush, which is a permanent brush by MAC and retails for $42.00 US/$50.50 CAD.

Availability: February 28th online and March 7th in-stores.


Credits: MAC-Guy on Specktra, Vogue UK (image)

Friday, February 22, 2013

A Quick Review - Nail Magic Nail Hardener and Conditioner!

Nail Magic Nail Hardener and Conditioner

I just wanted to quickly share with you a product that I've been using constantly for the past several weeks and have seen great results with!

This winter my nails have really taken a beating to the dry air. In just one day, I broke 4 of my nails on one hand (all while grocery shopping and running errands). Any slight ding and my half of my nail was gone. It was at the point of ridiculousness, so in desperation I made a quick run to Sally's, which happened to be in the same mall - jagged nails and all.

So I walked out with a bottle of Nail Magic that was recommended to me by the sales associate.

Nail Magic contains a blend of ingredients that not only strengthens the nails, but also conditions them. It treats splitting, chipping and repairs weak and/or damaged nails.

You can use it alone, applied as a base coat, and it even says that you can use it as a top coat (which I haven't tried).

I've been applying two coats to my nails and leaving them bare of any other polish. In the bottle the liquid is tinted pale pink, but it applies clear and makes the nails look a little more primped and shiny.

I'm kind of hard on my hands with household chores so it does wear off my tips within a couple of days, but when it does, I'll usually just remove it with nail polish remover and apply it again.


Thursday, February 21, 2013

LORAC TANtalizer Deep Body Bronzing Luminizer Review, Photos and Swatches!

LORAC TANtalizer Deep Body Bronzing Luminizer

LORAC TANtalizer Deep Body Bronzing Luminizer

LORAC TANtalizer Deep Body Bronzing Luminizer ($32) is a shimmering deep-dark bronzing cream for the body. It provides instant, long lasting color to the skin without the sun or the hassle of self-tanning - and it washes off easily by the end of the night.

I've been using self-tanner for years to maintain a dark tan, but I've slowed down a lot in the past couple of years and have been keeping up with a more natural sunkissed glow.

Whenever I feel that I'm lacking color or if I want to enhance my fresh, faux tan, I always go for a tinted body moisturizer.

I always used L'Oreal Sublime Bronze One Day Gel and it worked great, but I'm pretty sure it's been discontinued, as I can't find it anywhere. I've also used Milani Body Bronzer, and it worked fine, but the results were slightly orange. That too was discontinued. So, my quest in finding a new instant bronzing tint led me to LORAC.

LORAC Tantalizer Deep Body Bronzer has the typical creamy water-based moisturizer consistency that you see in most body bronzers. It's a deep bronze shade with loads of ultra-fine golden iridescence.

It smells like vanilla, and although I loathe the smell of artificial vanilla, it's light enough where I can't smell it unless I put it up to my nose.

You can apply it as you would a self tanner or moisturizer (bare hands is fine, it washes off immediately) and the color blends out really well without looking patchy or uneven. I like mixing it with equal parts moisturizer so it smoothes on easier and so the product goes a longer way. Depending on how much you apply, you can get pretty dark, but because of the shimmer, I only use a light coat to keep it looking natural. On my skin, it's a true bronze with brown and slight red undertones. I wouldn't consider it orange.

My main use for this product is applying it on my neck and décolleté to make my skin sunkissed and glowing. It's really useful for the days when I forget to self-tan and need my face makeup to match my neck.

LORAC TANtalizer Deep Body Bronzing Luminizer Swatch

LORAC TANtalizer Deep Body Bronzing Luminizer Swatch

Wednesday, February 20, 2013

MAC Archie's Girls Betty Bright Lipstick Review, Photos, Swatches and Comparisons!

MAC Betty Bright Lipstick

MAC Betty Bright Lipstick ($16.50) is one of the three new limited edition lipsticks that recently launched in the MAC Archie's Girls Collection. Betty Bright is described as a light, vibrant peach, but I don't find it very peach at all. It's more along the lines of a vibrant, coral-pink. I'd almost consider it a lighter, slightly less pink version of Viva Glam Nicki (I'm sure if you mixed Nicki and Myth together, you'd get something very close).

Betty Bright was one of the first Archie's Girls lipsticks that sold out on the MAC website because, well, who doesn't love a good coral?

I was excited to see that it's a MAC Satin, so the coverage is opaque with one swipe. With this particular lipstick, applying less is more. I found that if I apply more than one layer, the color settles in my lip lines when I rub my lips together, the color can look uneven.

Also with light shades like this it can emphasize dryness. I own several bright peach, coral and pink lipsticks from many brands and they all do the same thing. It's almost unavoidable unless you exfoliate your lips regularly and apply a good, hydrating lip balm prior to application. Applying a lip gloss over top always helps mask dryness with shades like these.


One thin layer of MAC Betty Bright Lipstick on my lips.

Maybelline Instant Age Rewind Eraser Dark Circles Concealer Review, Photos and Swatches!

Maybelline Instant Age Rewind Eraser Dark Circles Concealer

Maybelline Instant Age Rewind Eraser Dark Circles Concealer

Maybelline Instant Age Rewind Eraser Dark Circles Concealer ($9.99) is a super-concentrated and pigmented liquid concealer combined with goji berry and haloxyl to help erase the appearance of dark circles and puffiness around the eyes. It has a unique tube design in that when you twist the top, product will be released in the round, squishy applicator sponge.

Maybelline Instant Age Rewind Eraser Dark Circles Concealer is available in (6) shades: Fair, Light, Medium, Honey, Neutralizer and Brightener. Although the neutralizer shade can be used on it's own, it's also recommended for extreme dark circles to apply underneath your regular concealer for maximum coverage. The brightener shade is pink based used to brighten up areas of the eyes and face.

I was conflicted which shade to purchase. For reference, I have medium skin with warm undertones (MAC NC35 coloring currently). Fair and Light looked too light for me, and Medium looked too dark. So, I ended up with Neutralizer.

Neutralizer is a light peachy yellow color. It seems to apply slightly lighter than it looks in the tube, and it's a little too light for me, but works fine if I blend a little foundation on top. (See swatches at the end of this post.) Medium would've probably been a better match for me.

You have to twist the tube several times to get it going at first and thereafter a small amount is dispersed with each twist. You can apply it to your undereyes with the sponge directly, or you can wipe the product off with your finger to apply or wipe the product off with a concealer brush. I like using it directly from the tube, as I think the sponge is the funnest part of using this product!

Maybelline Instant Age Rewind Eraser Dark Circles Concealer

Maybelline Instant Age Rewind Eraser Dark Circles Concealer Before and After
Maybelline Instant Age Rewind Eraser Dark Circles Concealer Before & After. (my skin is not moisturized prior, so you can see it looks a bit dry and powdery)

Here's how it looks with my skin moisturized applied over my foundation. (you can see it looks much better)

Saturday, February 16, 2013

NARS Shanghai Express Lipstick Review, Photos and Swatches!

Nars Shanghai Express Lipstick

Nars Shanghai Express Lipstick ($26) is a warm, brick red with a semi-matte finish. It's applies slightly deep, like a ripened cherry red - It's not what I'd call a Snow White or classic, bright red. It doesn't lean orange on me, which many warm reds have a tendency to do, and it doesn't turn rosy pink which many cool reds tend to do on my lips. Brick red is a really good description for the color as there are some definite brown undertones, which seems to flatter my skin tone very well (medium with warm, yellow undertones).

The finish is mostly matte. If you see any shine on my lips, it's because I prepped them with some lip balm. With any matte finish lipstick, an good exfoliation and layer of lip balm as a base is usually necessary so the lipstick won't dry the lips out or accentuate any dryness.

The lipstick itself isn't crazy opaque with one layer - I'd say it's more of a medium coverage with one layer, but buildable with an additional layer. I found that when I used a lip brush, I didn't get as opaque of coverage, so I prefer applying it directly from the tube and only using a lip brush for the outer edge of my lips. I actually don't own a good red lip liner to pair it with, but I'm definitely going to have to purchase one! Any recommendations?


Nars Shanghai Express Lipstick on my lips.