Thursday, March 31, 2011

A Few Swatches of L'Oreal MagicSmooth Souffle Makeup!

(Image Source: http://www.lorealparisusa.com)
While flipping through April's issue of Vogue, I was stopped at page 142 by a lovely postcard advertisement of L'Oreal MagicSmooth Souffle Foundation. Included is three different shades of the foundation (light, medium and dark), as well as a sample of L'Oreal Magic Perfecting Base Face Primer AND a $2 coupon for any L'Oreal Studio Secrets Pro Face Product (including MagicSmooth Souffle). So, I figured this was a "swatching" opportunity to show you these shades in case you're interested.

MagicSmooth Souffle is available in 12 shades. The (3) shades available in the magazine, are Classic Ivory (2nd lightest shade), Nude Beige (2 shades darker than Classic Ivory) and Sun Beige (1 shade before the darkest shade).

From left to right: Classic Ivory, Nude Beige, Sun Beige.
Swatches
As you can see from the swatches none of these shades run yellow. Classic Ivory is pink toned, Nude Beige & Sun Beige are neutral/peach.

Here are the shades in comparison to a warm foundation with a yellow undertone. I swatched MAC Studio Fix Fluid in NC30.

If you would like to read my experience with testing this product, you can check out my January post by clicking here! I never ended up purchasing this foundation as I realized I really don't like mousse foundations. They may feel luxurious on my fingers, but on my face.. not so much. I did test Nude Beige on my nose (over my foundation) and it actually looked very nice. It seemed to "blur" my pores a bit and add a little extra coverage. I would be interested in using this foundation with a large powder brush and swirling it over my foundation. But, that can either have a great or absolutely terrible result. Great- It may make my skin look extra airbrushed, as is "blurs" the pores. Terrible- it may make my skin look blotchy, cakey or dull. Overall, I'm not jumping to try this foundation anytime soon, unless I score an amazing deal on it. 

Have you tried this foundation? What do/did you think of it?

Also, if you know your shade in this foundation and your MAC shade (or any other foundation), post it in my comments! It may be of help to someone.

A Look at Various Revlon Lashes + Lots of Photos & My Thoughts About Them! (Very Pic Heavy)

Revlon contacted me a few weeks ago and asked if I'd be interested in trying out some of their false eyelashes. I of course accepted, as I've always been a bit curious about them every time I spot them at Walmart or other drugstores.

There are three different categories of Revlon false eyelashes. There is Beyond Natural, Runway and Fantasy Lengths. All three types do not include glue, so you will need to purchase it separately. But! Fantasy Lengths has an option of self-adhesive (no glue needed), great for those who struggle with using lash glue.

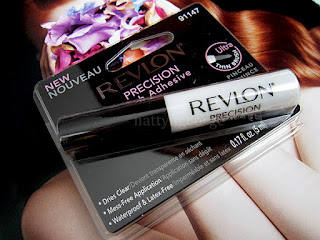
In this post, I'll be sharing with you my thoughts about the lashes I've tested from each category. As well as, my thoughts about Revlon Precision Lash Adhesive.

Revlon Beyond Natural Professional Lashes
(#91169 Long Volumizing & #91170 Dramatic 3X Volume)
Revlon Beyond Natural Professional Eyelashes
Revlon Beyond Natural Professional Eyelashes #91169 & #91170
Beyond Natural Eyelashes are available in (3) different styles. They are synthetic and handmade. I tested #91169 Long Volumizing &amp & #91170 Dramatic 3X Volume. Style #91170 are medium in length and are very thick. There are a few layers of lashes combined at different lengths to make the lashes appear fuller, darker and natural. Even though these are thick and synthetic, I found them easy to bend and apply. They are not "plastic" or stiff feeling, and without close inspection, I would of thought these were human hair. The particular style though, is not my preference. I prefer longer, less thick false lashes. I found these to be slightly uncomfortable on my lids. But, if you are use to wearing thicker lashes, you won't have a problem with these. Style #91169 are long and voluminous. I think they are the perfect length and thickness, so they won't "scream" fake lashes. These are extremely light weight and conform to the shape of your eye with little to no effort. Think of ELF lashes - very lightweight, pliable and comfortable on the eyes. I personally love this style and it's the style I would typically wear. I want to compare them to Ardell 105's or 111's in thickness - but they are completely different in length/shape.

Revlon Runway Professional Lashes 
(#91202 Smokey Glamour)
Revlon Runway Professional Eyelashes
Revlon Runway Professional Lashes #91202
 Revlon Runway Lashes are available in (2) different styles. Like Beyond Natural, these lashes are also synthetic & handmade. I put #91202 Smokey Glamour to the test. Style #91202 are fairly long in length & pack mild volume. They are the ultimate "flirty" lashes and on the eyes look incredibly natural. They may look like "IN YOUR FACE" lashes in the box, but because of the thin, almost invisible ends, they look like your real lashes. These lashes are actually two thin sets of criss-crossed lashes layered on top of each other. Although the actual lashes are lightweight, because of the "layering" of the lashes, the band is twice as thick as a regular pair of lashes. The thick band requires a little extra work getting it onto your lid. Although these didn't bother me, I did feel them on my lids while I was wearing them. I would recommend this style to more advanced false lash wearers, as the band may feel uncomfortable to beginners.

Revlon Fantasy Lengths False Eyelashes (self adhesive)
(#99500 Intensifying)
Revlon Fantasy Lengths Professional Eyelashes (self adhesive)
Revlon Fantasy Lengths Professional Eyelashes #99500
Revlon Fantasy Lengths False Eyelashes (self adhesive) are available in (4) different styles. I tried out #99500 Intensifying. Style #99500 are medium to long in length and have a mixture of shorter lashes for a more natural appearance. They are self-adhesive, requiring no glue. So I figured, "Pft, yeah.. self adhesive.. whatever that means." I remember purchasing lashes in high school that claimed to be "self adhesive" and the glue wouldn't adhere after putting it on my eyelids. I would try to avoid wind, blinking - MOVEMENT for that matter, as I didn't want to end up with one of my eye lashes sitting on the top of my cheek and the other one raised up to my eyebrow. Well, I'm very pleased to say that Revlon mastered "self adhesive" lashes. The glue is incredibly sticky, and (smart) they included a plastic applicator to ensure you will stick them to your lash line, and not your lashes. They also include one extra pair of self adhesive strips so you can use the lashes again. I found these to be comfortable, and no budging - YAY!

Revlon Precision Lash Adhesive
Product Info: 
-Ultra thin brush allows for precise application on entire lash band or even the corners of lashes.
-Saves time! Easy to apply with no hassle.
-No need for extra application tool (such as cotton swab or brush) to apply onto lash band.
-Easy touch-up anytime, anywhere.
-Convenient and purse friendly. Waterproof & Latex Free 
(info courtesy of http://revlon.com) 

I was actually eyeballing this glue for a while, but I never purchased it because I was afraid it wasn't going to live up to my DUO adhesive. What I love about this product, is the packaging... *Angels singing*. I think I need a moment of silence. Finally, a non squeeze tube adhesive, that delivers! I don't know about you, but I've been applying false lashes for around 5 years now and I still manage to get my lash adhesive everywhere. I KID YOU NOT, I have ruined several handbags with leaky tubes, ruined my bedsheets with lash adhesive stains, ruined my carpet with lash adhesive, ruined my beloved MAC 187 b/c it leaked into the bristles.. the list goes on. Those tubes just scandalously, BLOB the product out. And, if you're out to dinner and excuse yourself to "powder your nose", and notice your lashes are falling off, it's not so easy & convenient to add more glue. You'll have to squirt it out on a clean surface or gently squeeze it so it doesn't go everywhere, and use a thin tool to apply glue to the area. Pain in the bee-hind. Revlon Precision Lash Adhesive makes all of that history. It's a small tube with a thin, slightly dense brush applicator to apply the product to the lashes in a thin, even band. You can pop it in your bag with no worries and quickly touch up at any time. No blobs, no explosions. The product itself had a thin, milky texture - much more "watery" in texture than Ardell, Modlash or Duo. The color is a fluorescent white, that almost looks blue, and dries clear. No fishy smell with this adhesive.. it actually smells exactly like a fresh can of paint. Don't worry though, it doesn't linger. From what I've noticed is that it sticks very well, but I can't say for sure how long lasting it is, because I haven't tested it throughout the day. I will keep you updated.

Each style on my eyes (no mascara added to the false lashes)

Revlon false eyelashes sell for an average of $4-6 a pair. They are usually $1-2 more expensive than Ardell/Modlash. They can be found where ever Revlon is sold. I've spotted them at my local CVS, Walgreens, Wal-mart & Target for an average of $5.99.

Disclaimer: The products mentioned in this post were provided by Revlon for consideration. I am in no way affiliated with Revlon. All of my opinions about the products mentioned are 100% honest, as always.

Wednesday, March 30, 2011

SIGMA BRUSH SET GIVEAWAY!!!!!!

Sigma was kind enough to sponsor a giveaway to my awesome readers! 

One lucky person will receive the Sigma Make Me Up 12 Brush Kit (a $99 value) in any color you choose!
You can view the set in my previous post (be redirected here).

This giveaway is open internationally!

Rules to Enter:
1) You must be a follower of my blog.
2) OPTIONAL: Follow my twitter! You don't have to follow my twitter, but it would be nice :)
3) You must be 18 or older to enter (or have permission by a parent/guardian)

How to Enter:
1) Click HERE to view the different colors and POST in my comments what color/set you would like to win!
2) Along with the color/set you'd like, POST your e-mail address so I can contact you once you have won.

This giveaway starts now and ends Sunday, April 10th at 11:59PM CST. The winner will be announced Monday, April 11th. I will be using random.org to pick the winner.

Thank you everyone for reading, commenting and following my blog!
♥ Natty


Tuesday, March 29, 2011

IT'S HERE! My Sigma "Make Me Classy" 12 Brush Kit!!!


The Sigma 12 Brush Kit (Make Me Up Collection) contains five (5) face brushes and seven (7) eye brushes, for a total of 12 brushes. Each brush is labeled with the actual name of the brush and brush number. Brushes starting with "F" are face brushes and brushes starting with "E" are eye brushes. The Sigma 12 Brush Kit comes in a variety of four (4) different colors to suit your personal style. There is pink, blue, purple and black. I went with the standard black brushes, also known as the "Make Me classy" Kit. Each kit also comes with a durable holder that is convenient for traveling or storing your brushes in.

These are the individual brushes that come in this kit:
Eyeliner - E05 - An extra-fine tipped synthetic fiber brush that delivers a precise, firm, even stroke to line the eyes.
Pencil - E30 - Precise application of color on the crease, outer corner, and upper and lower lash line. Also ideal to smudge out pencil liner. Natural bristles.
Tapered Blending - E40 - Rounded and tapered top. Specially designed to apply and blend color on the crease. Natural bristles.
Eye Shading - E55 - Soft and dense with a rounded finish. Can be used to apply pressed or loose eye shadows and pigments. Ideal to build intense color on the eyelid. Natural bristles.
Large Shader - E60 - Flat shape is ideal for application of cream formulas and eye shadow primers. It also works great with loose eye shadows or pigments. Can be used to apply color all over the lid or precisely on the lash line. Natural bristles.
Small Angle - E65 - Essential for the application of gel or cream eyeliner on the upper and lower lash line. This brush is also excellent for filling out the eyebrows. Synthetic bristles.
Medium Angled Shading - E70 - Angled, tapered, flat top. Ideal to apply highlight shades underneath the eyebrow and on the inner corners. It can also be used for a precise application of darker shades on the crease area. Natural bristles.
Large Powder - F30 - Very dense with a rounded top. Ideal to apply powder products on face and body. Natural bristles.
Large Angled Contour - F40 - The angled shape makes this brush ideal to apply blush or contour shades. Natural bristles.
Duo Fibre - F50 - Specially designed to generate an ‘airbrushed’ finish when used to apply liquid foundation. It can also be used to apply blush, highlight shades and loose pigments. Blend of synthetic and natural bristles.
Foundation - F60 - Can be used to apply liquid or cream foundation. It is also recommended to apply moisturizers and conceal large areas. Synthetic bristles.
Concealer - F70 - The rounded, tapered, flat shape makes this brush ideal to conceal the under eye area. It is also recommended for a precise application in small areas. Synthetic bristles.

The price of the kit is $99, which divided by 12, is around $8.25 a brush with a free brush holder.
Click HERE to view the product on the website. 

I will have a review to come for these soon! I actually own several of the eye brushes and use them daily - I absolutely love the E40, E55, E60 & E70 brushes. I haven't tried any of Sigma's face brushes, so I'm excited to give them a go.


HOT Nail Colors for the Summer! (Forever 21 Love & Beauty Hot Pink & Orange)

Forever 21 Love & Beauty Nail Polish in the shades Hot Pink and Orange
Left: Hot Pink, Right: Orange.
I picked up these polishes the other day at Forever 21, thinking they would be perfect for the summer. I didn't realize they were both neon until I got home and swatched them, but I'm not at all disappointed with either one. I think everyone needs a couple of neon shades in their nail polish collection, and I was due for a new bottle of hot pink. I really love Orange, and I think it's a really awesome coral/orange shade that is perfect for the current "orange" nail and lips trend.

Love & Beauty Hot Pink and Orange Nail Polishes (2 coats of each, no top coat)
As for the formula of these, they are pretty much like any other neon polish. The consistency isn't too thick or thin and it's easy to work with. Application wasn't streaky what-so-ever, and the result is very smooth nails. On my hand swatches, I used two coats and the color was completely opaque. The finish is slightly matte, like most neon polishes, so a top coat is recommended!

I gave myself a pedicure last night and used Orange, and I'm loving it! For some reason, I can't get my nail polish to last long on my toes. Especially my big toes. I think its because I have long toes and my big toe gets crushed in my shoes, damaging my nail. So I tried to make it "fool proof" and applied two coats of Seche Base Coat, 1 coat of Orange polish, 1 coat of Sally Hansen Insta-Dri top coat, 1 coat of Orange polish & 1 more coat of Sally Hansen Insta-Dri top coat. Hopefully the long process with pay off!

Love & Beauty Nail Polishes can be found at Forever 21 for $2.80 a bottle. (click here to view all shades)

What do you think about neon polishes? Like/love?

Monday, March 28, 2011

Week 1: Ardell Brow & Lash Growth Accelerator Treatment Gel! + Photos!

 It seems that after Latisse came on the market, tons of companies came out with lash "boosting" products. Or maybe they always existed, but once Latisse became heavily advertised, many brands (many of which are less expensive) came out with similar products that were just as effective. I personally, found it a bit overwhelming and never went through with purchasing a lash serum, despite the fact that I'm dying to have longer lashes. I was always a bit nervous to try a product like Latisse, because I have sensitive eyes and many reviewers have mentioned that their eyes became very red and irritated for the first week, and some mentioned even longer periods of time. Well, with that said - it didn't sound very appetizing to me to walk around with pink eye for how ever long that lasts.

A while back I purchased this little tube of Ardell Brow & Lash Growth Accelerator. When I say a while back, I'm talking over 6 months ago (easily). Back when I purchased it, I only used it about two times and tossed it in my cosmetic abyss. Why didn't I continue using it? Well, laziness I suppose. I must admit, although I make sure to always take my makeup off at night, I'm guilty of not taking off my eye makeup at times. In order for me to keep up with using the treatment, I'd have to wash off my eye makeup every night. Which, at the time I wasn't doing. The past month, I've been taking it off every night - as I've been following with my skincare routine very well. So it hit me earlier in the week to pull the tube back out and use it up.

I don't have any "before" pictures, because I really didn't expect this stuff to do anything for me. I was honestly only trying to finish it because I felt guilty for tossing it since I didn't give it a legitimate try.

So, at night I apply it heavily to my eye lashes. Yes, emphasis on heavy. I apply it as if I'm applying mascara. I pack the product on the brush and comb it through my lashes, making sure to touch the base of my lashes. I coat my top lashes from underneath and on top. Then, apply a coat to my bottom lashes. In the morning, I wash my face and sometimes apply a less heavy coat before my mascara.

It's now the end of the week, and I can't believe it.. I am seeing results. Not huge, significant results.. But my eyelashes feel a lot better. My lashes aren't that terrible. I mean, they're incredibly flimsy.. and they're not long - I'd say they are medium/average in length. When I touch them now, they don't feel as flimsy - yes, they are still flimsy, but they feel a little bit stronger. Also, I usually apply a mascara base before my mascara.. and I haven't all week and the past couple of days, my eyelashes (after mascara) look the same way they would look if I did apply a base. With my mascara, they look slightly longer than they did before. Again, it's not significant enough where YOU may notice, but I definitely noticed.

So I'm convinced this is a good lash conditioner. It's not something that would give you growth like a prescription product or more expensive product - So, I don't think your expectations should be very high in that aspect. But, if you're looking for a product that will help condition your lashes (if your lashes are flimsy, damaged from mascara, false lashes or lash extensions) this may be right up your alley.

I'm going to continue using this product until it's finished and I'll keep you updated weekly.

Makeupalley rates this a 3.9/5, with a 80% re-purchase rate. (click here to read reviews)


Ardell Brow & Lash Growth Accelerator Treatment Gel retails for around $5 (give or take). It's difficult to find in stores (around me at least), but you can find it for $3.99 a tube at drugstore.com.

I'm actually really hyped about this - and once I'm finished with this product, I'd like to actually try a more "intense" lash growth product. If you have tried any, I'd love your recommendations or any thoughts/opinions you may have in the comments below!!

Thanks so much, guys! ♥

NOTD: Wet N Wild Fast Dry Nail Polish in Grey's Anatomy.

Three (3) coats of Wet n Wild Gray's Anatomy, No Top coat
Gray’s Anatomy #237C, is a silvery gray with light purple and green pearly undertones. Depending on the lighting and angle, Grey's anatomy can appear as a silvery light purple or a silvery green. I notice in lower light, the purple is very prominent and when I bring my fingers in the sunlight, the green shows much more. It's slightly holographic, and reminiscent of the colors you may find inside a seashell. 

As for the polish itself, because it's a pearl, you have to be careful when applying it, because it shows all of your brush strokes once the polish is dry. A base coat may be a good idea for a smooth application. The polish is incredibly sheer, and to build the color to it's full opacity, you'd need three coats minimum. This polish claims to be dry in 60 seconds, but I think it takes a bit longer than that. After a couple of minutes, I tested it out and touched my nail and was able to make a fingerprint. So, I wouldn't compare this at all to OPI. I applied three coats, and although the color wasn't completely opaque, it was alright. I don't think I waited long enough between coats, otherwise the outcome may of been better. The finish is quite dull, so a top coat is very necessary.

I personally, didn't care for the color at all. I'm usually only go for creme formula polishes, and skip out on any frost or pearl finish polishes. But, I thought I'd try something new, that looked a bit interesting. In the end, I should of stuck with my instincts. I ended up removing this polish from my nails after I took the photo. It just reminded me of something I would of worn with a mood ring when I was in 5th grade. haha! Don't let my opinion effect yours though, this shade is actually very popular and many love it! It's actually a cheaper dupe for OPI "Not like the Movies" nail polish from the Katy Perry collection. 

(Sorry my blog has been turning into a nail blog lately, lol)

What do you think of this color???

Saturday, March 26, 2011

Beauty & The Best: Products that receive the "Allure Best of Beauty Award" trial after trial.

While flipping through April's issue of Vogue, I came across a small section titled "Beauty and the Best" - A different kind of beauty recognition. So what it is basically, is a list of beauty items that have consecutively won a "Allure Best of Beauty Award", which is that little red stamp you may see on the label of some beauty products. I'll admit, while browsing through the beauty section at my local drugstore, I have picked up items because of that little red stamp.

The items featured, like I just mentioned continue winning the award after thousands of trials with other beauty products. So I thought I'd share the list with you guys! And maybe you can let me know what you think of the items (if you have tested them) in my comments below!


(The wording of the descriptions are taken directly from the magazine)

Best Shampoo for Fine Hair - Pantene Fine Hair Flat to Volume Shampoo. Used alone or with Pantene Fine Hair Flat to Volume Conditioner, it's volume that lasts up to 24 hours.
Best Single Process Home Color - Clairol Nice 'n Easy Perfect 10. Get high-gloss color in just 10 minutes!
Best Defrizzer - Fekkai Glossing Cream. The styling cream that helps eliminate frizz and adds moisture and brilliant shine.  
Best Day Mascara - Covergirl Lashblast Mascara. It's a big brush for big, bold, look-at-me lashes.
Best Facial Moisturizer - Olay Regenerist Micro-Sculpting Cream. The one shown to better hydrate than 23 luxury creams!
Best Deodorant - Secret Clinical Strength. This is waterproof wetness protection you can depend on to outlast heat, humidity and water.
Best Razor - Venus Embrace. The five-blade razor for women that hgus every curve for a close shave and dramatically smooth skin. 
Best Body Lotion - Olay Ultra Moisture Lotion. It's clinically proven to moisturize better than a  leasing lotion.

Makeupalley ratings for the products mentioned:
Pantene Fine Hair Flat to Volume Shampoo - 2.8/5, 33% re-purchase rate based on 6 reviews.
Clairol Nice 'n Easy Perfect 10 - 3.3/5, 57% re-purchase rate based on 275 reviews.
Fekkai Glossing Cream - 4.2/5, 77% re-purchase rate based on 917 reviews.
Covergirl Lashblast Mascara - 3.7/5, 67% re-purchase rate based on 3,626 reviews.
Olay Regenerist Micro-Sculpting Cream - 3.6/5, 64% re-purchase rate based on 178 reviews.
Secret Clinical Strength Deodorant - 3.5/5, 52% re-purchase rate based on 317 reviews.
Venus Embrace - 4/5, 73% re-purchase rate based on 111 reviews.
Olay Ultra Moisture Lotion - 4.6/5, re-purchase rate of 90% based on 10 reviews.

I personally have only used three of the products mentioned. Covergirl Lash Blast, Secret Clinical Strength & Fekkai Glossing Cream. I love all three of them, with CG Lash Blast & Secret Clinical Strength being my favorites that I use every day. I'm interested in trying the Clairol Nice 'n Easy Perfect 10 for my hair the next time I dye my hair. I currently use Clairol Natural Instincts and think it's great, but maybe I'll try something different. I'm also interested in trying Olay's Micro-Sculpting Cream.. as the Regenerist line has been peaking my interest lately. Most of the Regenerist products have really good reviews. (you can view them here)

What do you think about these products?


(Source: "Beauty & The Best." Vogue April 2011: Pages 199-204)

Nars Mekong Eyeshadow Review, Photos and Swatches!

nars mekong review

NARS Mekong Eyeshadow

NARS Mekong Eyeshadow ($24) is a deep-dark brown infused with gold shimmer.

Like many of Nars Eyeshadows, Mekong is extremely pigmented. In fact, it's probably the most pigmented eyeshadow I own next to Nars Night Clubbing. In fact, it's a bit like Night Clubbing in that they are both very shimmery in the pan, but apply to the lids almost black with minimal shimmer.

In some ways, it's intimidating to use because it's so pigmented and dark. It works very well for a liner, and will probably be my main use for this shadow.

I don't at all find it difficult to blend using a soft brush and it looks excellent in the crease and applied as a liner. On my lids, its a blackend brown with a slight golden/brown sheen. Applied wet, it is darker (almost black), but the shimmer shows up much more. It makes for a beautiful, rich liner applied wet. 

nars mekong swatches

I find that when using this shadow, I have fallout on my cheeks - so when using this, it's best to tap off excess product before applying it to your lids. You literally barely have to touch the shadow with your brush for great color payoff. 

Also, you can guard your cheek with a piece of paper (I like using a business card) or you can apply your foundation after your eyes. I can see why only 57% say they would repurchase, as I don't think I'll ever finish this eyeshadow. With daily use - I think it would take me a few years to finish.. and by that time, I'd probably find something else I love.

This shadow has a rating of 4/5 on makeupalley, with a 57% re-purchase rate. So, the overall rating is quite good, but only half of the reviewers would repurchase. The major complaints about this shadow is that even though it is richly pigmented, the shadow looks black on the lids rather than the beautifully shimmery brown. The shimmer doesn't transfer too well on the lids, making it look like an almost matte black-brown with very little sheen. Some say it's difficult to blend with poor lasting power. Some say it's perfect in every way. (Read reviews here)

So what do you think of Mekong? Is it a love it? Or leave it??

Friday, March 25, 2011

MAC (LE) Cut-a-Caper Lipstick! Swatches & Lots of Comparisons!

mac cup a caper

MAC Cut-a-Caper Lipstick

MAC Cut-a-Caper Lipstick is a semi-opaque, medium coral-pink with a lustre finish. It's a limited edition shade that launched in the MAC 2010 Tartan Tale Collection.

The color is quite pigmented and can be built easily with additional coats. It is vibrant, but not nearly as vibrant as it looks in the tube. Because it's not completely opaque, it's a shade that's easy to wear.

mac cut a caper lipstick review

mac cut a caper swatch
Here is MAC Cut a Caper on my lips (my lips are lined with MAC Subculture Lip Pencil)

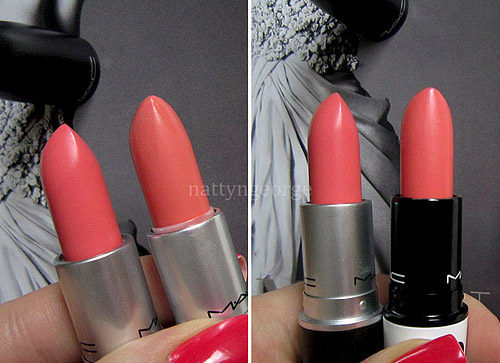
Here is a comparison of Cut-a-Caper next to MAC Jazzed and Everhip (both limited edition shades). Sadly, I don't own MAC Ravishing, but it's another lipstick that is often compared to these.
mac cut a caper dupe
Left Photo: MAC Cut a Caper & MAC Jazzed, Right Photo: MAC Cut a Caper and MAC Everhip

mac cut a caper swatches
Swatches from left to right: MAC Cut a Caper, MAC Everhip and MAC Jazzed.

All three lipsticks are very similar. They share the same vibrancy and depth. Cut-a-Caper has the strongest pink tone of the three. Jazzed has the most orange/coral tone. Everhip is the "in-between". It's stronger in pink than Jazzed, and more orange/coral than Cut-a-Caper.

Other Comparisons: (I forgot to add Illamasqua Obey in the bunch - which definitely belongs in the category)
mac cut a caper swatches
Swatches from left to right: NYX Round Lipstick in Pumpkin Pie, MAC Cut-a-Caper (LE), MAC Everhip (LE), MAC Jazzed (LE), YSL Rouge Volupte 26 Tender Peach, Wet n Wild Mega Matte 903C Just Peachy, MAC Shygirl. Glosses: Revlon Super Lusturous Nude Lustre, Revlon Super Lusturous Life's a Peach (DC), NYX Smokey Look, OCC Divine & OCC Cha Cha.

NOTD: Zoya Renee!

Two (2) coats of Zoya Renee & One (1) coat of Sally Hansen Insta-Dri Top Coat
Renee can be best described as: Ultra-bright red-toned medium neon pink creme. Bright and eye-catching, perfect for showing off a deep summer tan. (Source: http://Zoya.com)

In the bottle, Renee looks like a medium toned, magenta pink. Once applied to the nails it is much different. It looks like a vibrant pinked, red. In low lighting, my nails look completely red, but in the sunlight - the pink tone is much more visible.
You could really see in this photo how different the color looks on the nails, than in the bottle.

The formula is okay. It's opaque with two coats, although some may prefer three thin coats because my nail line was slightly visible. The reason I'm not crazy about the formula is because, it's now day 3-4 and most of my nails have cracks in the polish. Also, this polish is very easy to chip. Just about all of my nails on my right hand are chipped. 

So, this isn't a nail polish I'd recommend unless you're crazy about the color and you're very "easy" on your hands.