Tuesday, October 26, 2010

Revlon Just Enough Buff & Smoked Peach + Wet n Wild Pink Suga Lipstick Swatches!

While I was running a quick errand last night at CVS, I took a quick stroll though the cosmetic aisle. I saw that Revlon had a new display with a bunch of new colors and right away I picked up the lipstick with the name "Smoked Peach #013". If you all don't know me by now, I love my peaches and corals :) Anyways, Revlon was buy 1 get one 50% off so I picked up "Just Enough Buff # 613". I think Just Enough Buff is a common lipstick that many people own, like Revlon Nude Attitude... but it never really appealed to me till last night. Also, I've been meaning to do a contouring tutorial which involves a very dark shade of foundation and a very light. Somehow, I lost the light concealer stick I was using before.. so I went over to Wet n Wild and grabbed a couple of concealers in the shades "Light" & "Light Medium". I also ended up getting one of their lipsticks I haven't seen before (It says new shade anyway..) called "Pink Suga #900B".


(Sorry for the not so great swatches..)

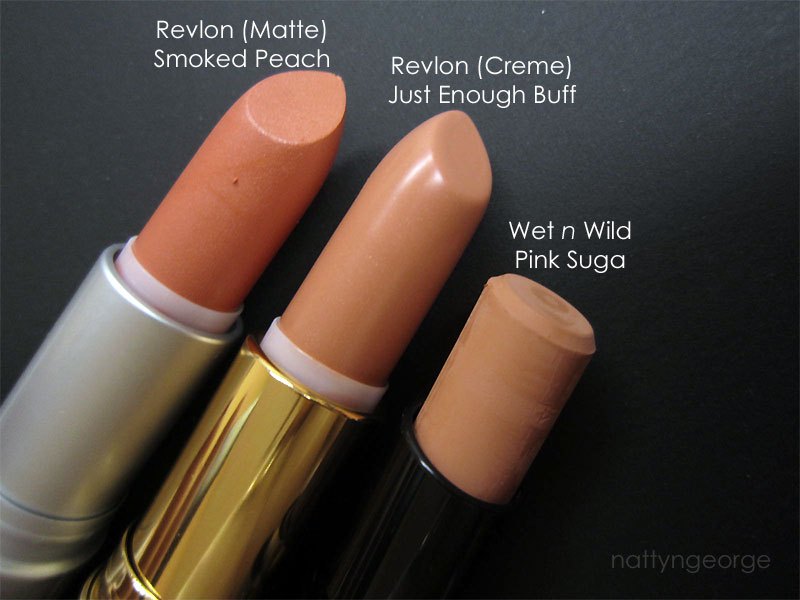
Wet n Wild Pink Suga - I don't think the name pink sugar properly suits this lipstick. I didn't find it to be very pink as I found it to be muted, warm peach. It is very pigmented & you only need a couple of swipes for full coverage. It has a matte finish. I could see it drying out my lips, so I would recommend a lip gloss in addition to the lipstick or a lip balm. If you love peaches, I'm sure you'll love this color.

Revlon Just Enough Buff - This lipstick is a little on the sheer side but you can build more coverage with more swipes. It applies smoothly.. kind of like a MAC Lustre and dries to a semi-shiny satin. The color is beautiful. It's a warm, peach pink with bright pink luster. It almost remind me of my HG MAC Shygirl. I'm sure I'll be wearing this lipstick very often. I found the formula to be somewhat dry and will most likely be using a gloss with it.

Revlon Smoked Peach - Wow this is a bright lipstick. haha It's a bright, warm pinkish coral. It is very pigmented and has a matte finish. This lipstick reminds me of a cross between MAC Vegas Volt and MAC Morange. I really like this color.. but I'm sure I'll only be wearing it once in a while. I'm not very daring with bright lipsticks ;)

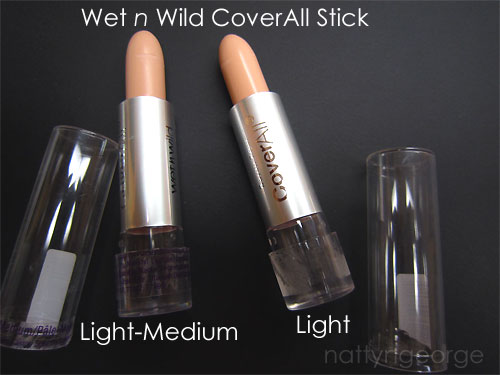
I haven't tried the concealers yet, but just keep in mind.. they look much darker in the tube than they did on my skin. Light is slightly warmer than Light-medium.. both colors look almost identical.

Do you own any of these colors? What are your thoughts?

Monday, October 25, 2010

NOTD: Maybelline Express Finish 50 Second Nail Color in Crimson!


I thought I would share a quick NOTD (it should really be Nails of the Week, not day.. lol). It is Maybelline Express Finish 50 Second Nail Color in the shade "Crimson". The nail color does dry quickly and you can apply a second coat within a minute. I used two coats and a top coat. So far, it has been two days and I have no chips. I used a terrible top coat though and my nails are looking a little dull today. They looked gorgeous the day I painted them. If this polish lasts for a full week I'll be sure to use it a lot through the fall and winter. :)

*Update: Terrible! Me and my mom both used this and our nails were chipping like crazy in just a day!! I won't be purchasing any express finish polishes in the future.

Tutorial: How I fill in my Eyebrows using MAC Espresso Eyeshadow.

In this tutorial, I'll be showing you how I fill in my brows using an eyeshadow. My favorite eyeshadows to use are matte eyeshadows from MAC. My every-day medium brown shade is MAC Espresso, when my hair is a bit lighter, I use MAC Cork and when my hair is deep-dark, I use MAC Brun.

Products used in this tutorial:

**The little white circles in the photos are shown as guides.

STEP 1:

This may not be a necessary step for those with sparse or fine brows, but very necessary for those with coarse and/or unruly, bushy brows. Use your spoolie and brush your eyebrows upward.

STEP 2:

Now take your scissors, and line them across the topmost, thickest part of the brow. Trim any hairs that are too long.


Already looking better!

STEP 3:

Using your tweezers, pluck any re-growth.

STEP 4:

I always like starting on the underside of my brow and working up. Starting at the beginning of the under-side of the brow, follow your natural brow shape all the way across. The underside can be the harshest line, because it's usually the cleanest/most precise part of your brows if you got them waxed, threaded, etc. The top of the brow is usually more natural. *Make sure to apply light pressure, and don't apply too much product towards the ending (tail) of the brow.

STEP 5:

If your brows are sparse (mine aren't sparse, but I colored them in for the sake of the tutorial) and need to be darkened overall, lightly fill the inside (think of the top and bottom of your brows as borders, and you need to color in between the lines) of your brow with whatever residue is on your brush from Step 4. Again, don't apply too much pressure. Small, light brush strokes work the best. Additional product shouldn't be necessary as you don't want your brows to look harsh or "painted" on.

STEP 6:

Lastly, trace the uppermost part of your brow making sure not to apply too much product towards the beginning or end. To avoid looking unnatural, you can start towards the middle or arch of your brow.

STEP 7:

Comb your lashes with a spoolie to soften any harshness and blend the shadow in better with your brows.

Did you make your brows appear thicker than you wanted to?
Simply take your concealer and a small concealer brush (a Q-tip or clean sponge eyeshadow applicator would work if you don't own proper brushes) and trace the borders of your brow. The concealer acts as an eraser, and will thin out the shape of your brows if you made them too large.

Add a highlight to your brow bone
Adding a shimmery highlight to your brow bone will emphasis the arch in your brow, making your brows appear clean, well-groomed and making your eyes look fresh and more awake. *Adding a bit near your tear ducts wouldn't hurt either!

I hope you found this tutorial helpful!

In addition, here are some swatches of some brow products I own. I couldn't for the life of me find my MAC Brow Crayon in the shade Spiked.


The only pencil I really don't like out of the bunch swatched is the NYC pencil. It is very creamy and goes on clumpy. I prefer a drier textured pencil for my brows. All of the others I like and use depending on the shade of my hair. My favorites remain MAC Espresso & Cork, Maybelline Define a Brow & MAC Eyebrow Crayon.

Thursday, October 21, 2010

FOTD: Smokey Brown (something quick & easy)

Hey Guys!

I thought I'd post a quick FOTD. I was watching one of pixiwoo's recent videos and I liked the way Sam had her eye makeup.


http://www.youtube.com/watch?v=ovYfow38UUs

It looked like she may of only used a couple shades of brown with a little bit of a messy application. So, when I was doing my makeup on my way out the door last night, I grabbed a couple of my brown eye shadows and a fluffy smudge brush and tried it myself. I really liked the outcome. I couldn't get any good pictures because I was having lighting issues.. it looked a lot better in person. :( I thought I'd share anyway..


Face:
Palladio Stick Concealer in the shade #Yellow
Maybelline Dream Matte Mousse in the shade #Dark 2 to contour my cheekbones
Make Up Forever HD #127 Foundation mixed with a dab of Nars Sheer Glow Foundation in #Stromboli
Rimmel Lasting Finish Transparent Powder to set my foundation and under eyes
MAC Improvise Mineralized Blush

Eyes:
NARS Galapagos eyeshadow smudged all over my lid and under my bottom lash line
MAC Cork Eyeshadow smudged over the previous application of eye shadow
Covergirl Volume Exact Mascara
Cargo Reverse Lip Liner in the shade #Medium on my waterline to brighten it up

Lips:
Wet n Wild Lipstick in shade #901B Think Pink
MAC 2N Lipglass